Search Results

185 results found.

Neto – Legacy

Last Updated On

Theme installation

The easiest way to install the theme, is by accessing your WordPress admin panel, then go to Appearance > Themes. Select the Install Themes tab and click the Upload link located just below the tab’s name. Click on Browse… and select the WordPress theme zip file you just downloaded. Then click the Install Now button, and after a few seconds, your new theme should be installed. Click activate and the theme is ready to use.

In order to install the theme manually, or in case you have trouble installing it through the admin panel, you have to unzip the WordPress theme’s zip file on your computer, and upload via FTP the resulting theme folder into your WordPress installation themes folder (wp-content/themes). Then, from the WordPress admin go to Appearance > Themes. The theme should be available in your themes list. Click activate.

TIP: More info on how to download and install a theme here.

Installing WooCommerce

To enable eCommerce functionality for your website you need to install and activate the WooCommerce plugin by WooThemes. You can download the plugin free of charge from the WordPress Plugin Repository.

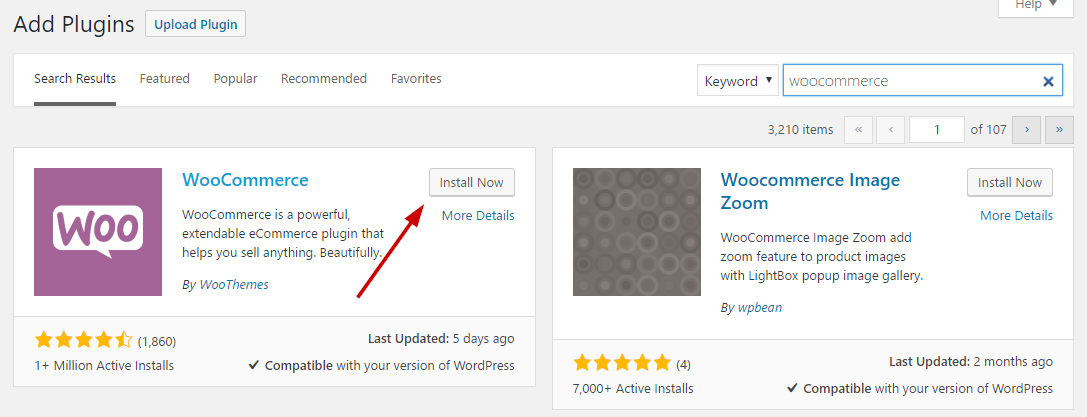
Go to Plugins > Add New and search for WooCommerce. Once the results come back, click the Install Now button.

wc_install

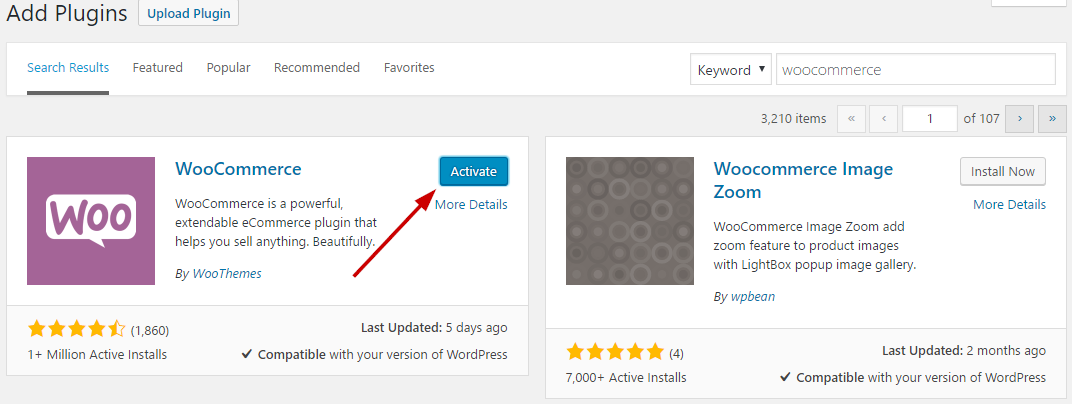
Once the installation is finished, click the Activate button to activate the plugin.

wc_activate

For detailed installation and usage instructions please refer to the plugin’s documentation.

Once you have installed and activated the WooCommerce plugin please install its pages by clicking on the button that WooCommerce provides on its banner. This will likely create a duplicate of some pages along with the pages install by the sample content but its a needed step. You can delete the old pages that came with the sample content or use them instead by going to WooCommerce > Settings > Pages and assign them anew.

Image Sizes

The minimum recommended image sizes for Neto are:

  • Post thumbnail: 750x500px
  • Item thumbnail (used on widgets): 540x730px
  • Fullwidth featured image: 1140x500px
  • Hero image: 1920x300px
  • About me image: 360x220px

Useful Plugins

These plugins provide functionality and features used directly (or not) by the Theme. So, it is recommended to install and activate them before importing your sample content.

  • Contact Form 7 use this plugin to create a contact form, then copy the shortcode it gives you and paste it in a page which will serve as your contact page.
  • WP Instagram Widget: Use the latest version of this plugin to help you display your Instagram feed in any of the theme’s sidebars.
  • MaxSlider : Use this plugin to help you create custom sliders and use them anywhere you wish shortcodes.
  • One Click Import : Use this plugin to help you import your content with just one click.
  • Elementor Plugin: You can also download Elementor directly from elementor.com or wordpress.org/plugins/elementor and click on the download button.

Importing Sample Content using One Click Import

To automate the process of importing and for a better experience we have natively included support for OneClick Import Plugin. Let install it fist:

From your WordPress dashboard

  1. Visit ‘Plugins > Add New’,
  2. Search for ‘One Click Demo Import’ and install the plugin,
  3. Activate ‘One Click Demo Import’ from your Plugins page.

From WordPress.org

  1. Download ‘One Click Demo Import’.
  2. Upload the ‘one-click-demo-import’ directory to your ‘/wp-content/plugins/’ directory, using your favorite method (ftp, sftp, scp, etc…)
  3. Activate ‘One Click Demo Import’ from your Plugins page.

Once the plugin is activated you will find the actual import page in: Appearance > Import Demo Data.

 Click on the Import demo data button and you are done!

This plugin requires PHP version of at least 5.3.x, but we recommend version 5.6.x or better yet 7.x. Please contact your hosting company and ask them to update the PHP version for your site.

Adding a new post

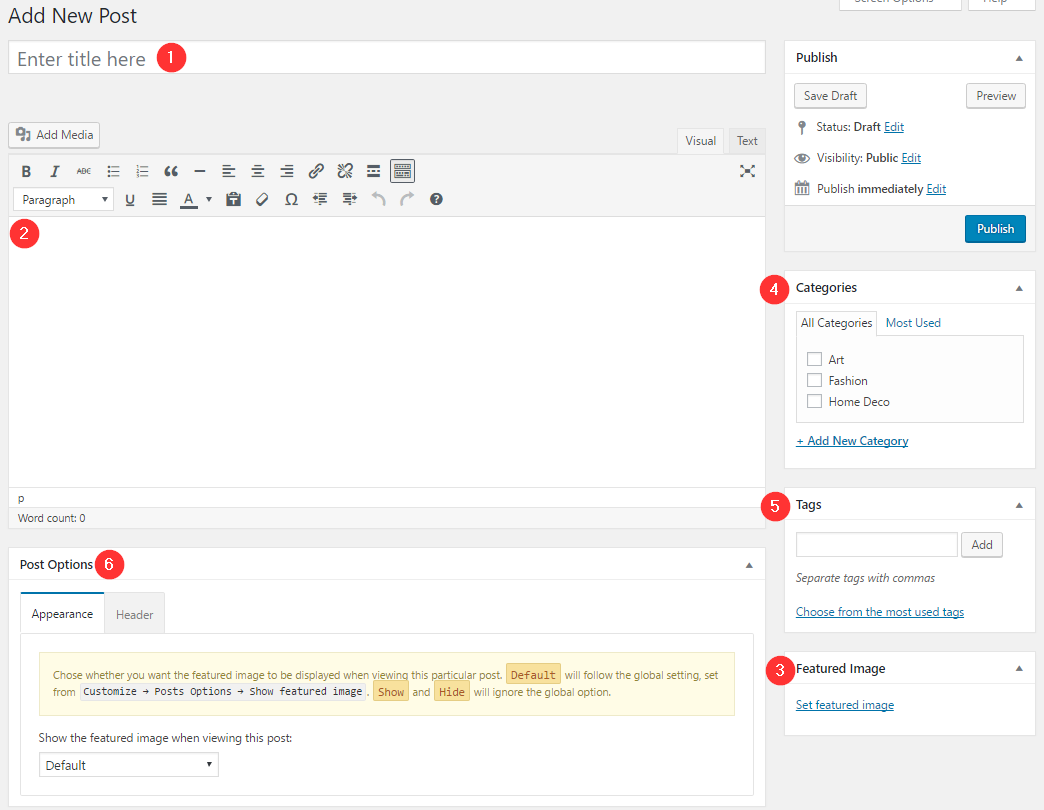
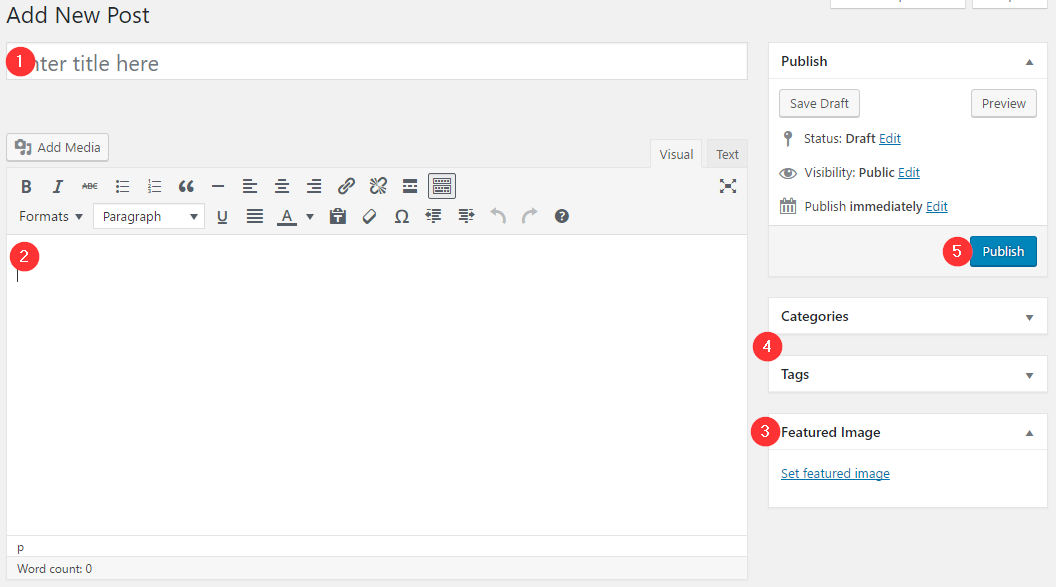
To add new posts to your blog, go to Posts > add new and proceed to:

  1. add a title to your post,
  2. enter the content in the editor,
  3. upload a featured image by clicking “Set featured image” on the Featured Image panel,
  4. add a category and/or tag to the post,
  5. once finished click the Publish button to publish the post.

new_post

Creating a page for your posts

To setup your blog page you can go to Pages > Add New and create a page named Blog. Then navigate to Settings > Reading and set that page as your posts page.

settings_reading

Now you can add that page to your menu to give your visitors easy access to all your posts.

Adding Products

Earlier we saw how we can install WooCommerce. Let’s take a brief look at creating products. Start by going to Products > Add Product.

new_product

  1. First we need to fill in the product title,
  2. next we will add the product’s description,
  3. click Set Product Image to add the product’s featured image and Add product gallery images to upload additional photos for the product,
  4. add categories and tags to your product to make filtering easier,
  5. in the Product Data metabox you will fill all the required product info, such as price, inventory, tax and shipping information and more,
  6. in the Product Appearance metabox you can disable the zoom on product thumbnails and add a video to the product’s gallery if you have one,
  7. fill in a short product description and finally
  8. Publish the product.

This is a brief overview of adding products to your site, the product post type is a complex one, if you haven’t worked with it before please consider reading the official documentation on how to add and manage products here.

Setup the shop page

Once you install and activate WooCommerce all the default pages will be created, including the shop listing page. To make sure this was properly configured go to WooCommerce > Settings > Products > Display and check if the Shop page is selected in the Shop Page drop down.

wp_shop_page

If the drop down is empty, locate the Shop page and select it.  If you can’t find a page named Shop, just go to Pages > Add New create one and then set it as your shop page. Add this page to your menu to give your visitors access to the product listing.

How to use the page builder template

The theme comes bundled with a page builder template which allows you to use your favorite page builder plugin on it and create unique layouts very easily.

To use that template start by going to Pages > Add New. This will create a new page. Add a title to your page and select the Page builder template from the template drop down in the Page Attributes metabox.

ci_page_builder_template

That’s it. You can now start building your page using a page builder of your choice. On the theme’s demo we have used extensively the Elementor page builder plugin.

Creating menus

Neto offers three menu locations. The Main,  Footer. You can customize these menus any way you like to make navigation easier for your visitors. For info on how to create menus in WordPress, please have a look at our guide here.

Customizing the theme

All the theme’s options can be accessed via WordPress’ customizer. Navigate to Appearance > Customize and you will be presented with this panel.

neto_customizer

If you have used any theme from the WordPress.org theme directory you should be familiar with the usage of the customizer, if not you can read more about it here. Below we will take a look at the options each section offers.

Under the header tab you can customize the its appearance. There are three layouts available, the Menu next to logo, the Centered menu and Centered logo ones. If you want a sticky header you can enable it by checking the Sticky Header box. Finally here you can toggle the various shop related tools, like the account/login/register link, the shopping cart icon and search icon.

Using this tab you can create new or modify existing menus. For more info on menu creation please check the Creating Menus section above.

Site Identity

Here is where you take care of your site’s branding. You can set a logo, the site’s title and tagline and add a site icon which will be used on browsers and as an app icon on mobile devices.

Layout Options

mavika_layoutoptions

In this tab you can modify the layouts of various pages on the site. You can globally toggle between a boxed or fullwidth layout, you can choose if you want a sidebar on your blog page and other listing pages. Additionally you can control the number of words on the automatic excerpt and toggle between numbered and previous/next pagination styles.

Post Listing Options

post_listing

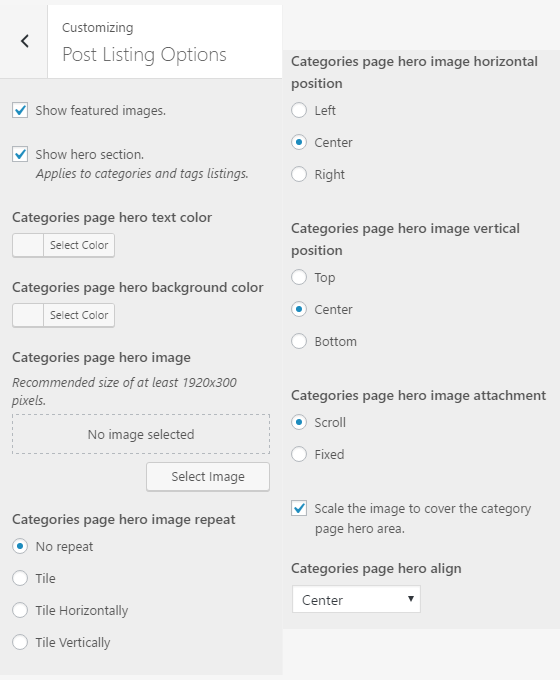
In this tab you will all options related to the appearance of post listing pages, such as the category listing ones. You can toggle featured images and the category hero section on and off if you so desire. You can also select the category hero text color and background.

Posts Options

mavika-posts-options

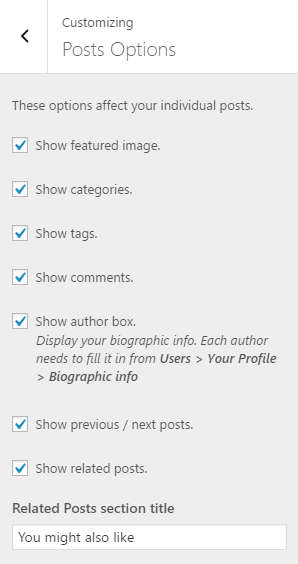
As you might imagine, this tab helps you configure the layout of single posts. You can toggle the featured image, the categories, tags, comments, author box, post navigation and related posts. You can also modify the title of the related posts section.

WooCommerce

Shop

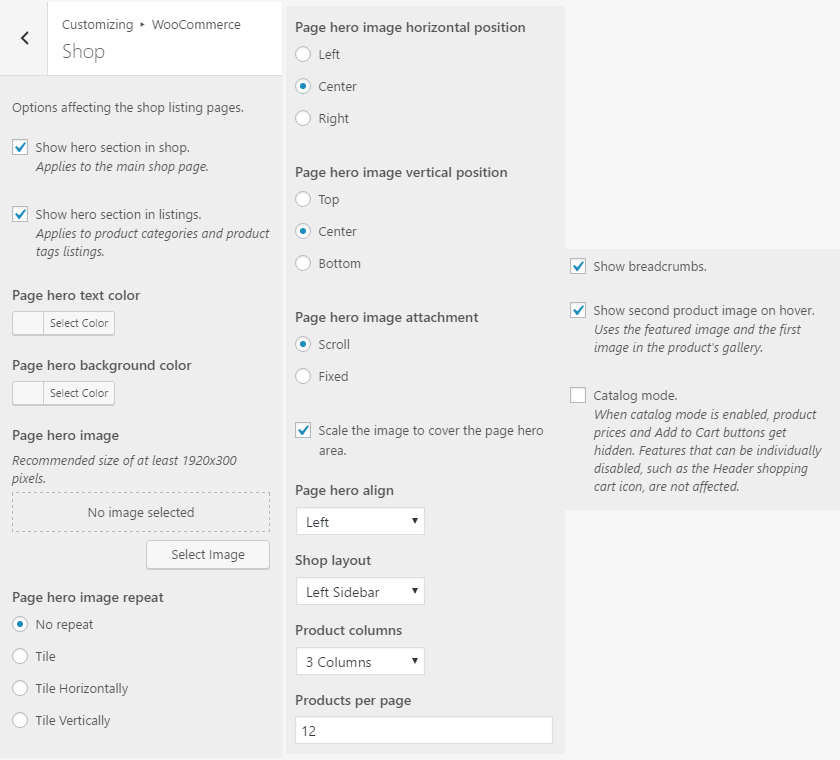
wc_shop

This tab allows you to customize the appearance of all shop listing pages. You can toggle the appearance of the hero section and set a hero text color and background. The shop’s layout can be customized by moving the sidebar to the left or right side of the products or even off-site. The number of columns and products on each listing page can also be customized here. You can also toggle WooCommerce’s breadcrumbs and select to show a second product image on hover. Finally you can set your shop to catalog mode which will disable the add to cart buttons and hide the prices.

Product

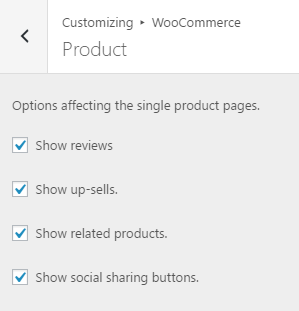
wc_product

Under this tab you can toggle various sections of the single product, such as review, up-sells, related products and social sharing buttons.

Colors

Global

This is the go to tab when you want to modify colors on your site. Here you can set a background image or color, a global page hero text color and background and modify the color of text, buttons and borders.

Header

Here you can modify the header image and background color. You can also change the navigation colors.

Footer

The footer strip’s background and text colors can be modified throug the footer color tab.

Sidebar

the last tab in the colors section allows you to change sidebar background color, text, link and border colors.

Typography Options

The typography options tab allows you to modify the size of all content headings, body text and widget titles and text. You can also set page, section and widget titles to be all uppercase.

Widgets

Through this tab you can access all the available theme sidebars and add widgets to them.

Social Networks

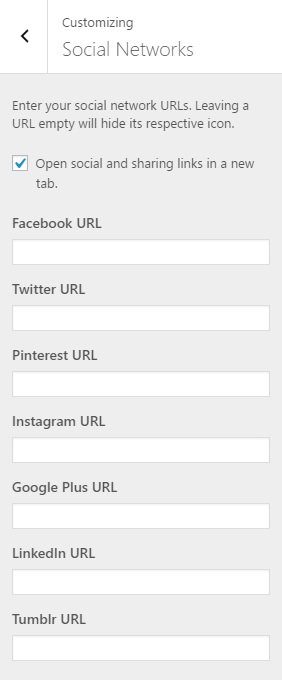
social_networks

Fill in the links to your social profiles and use them on the header bar or in any sidebar using the social icons widget.

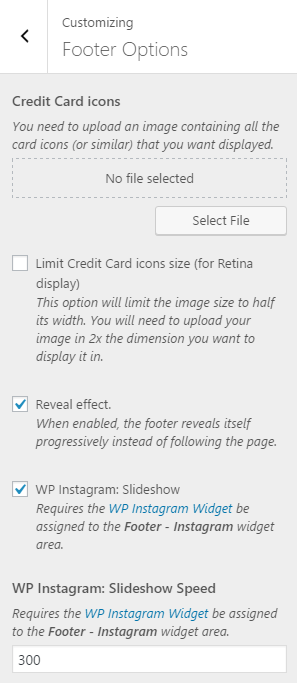
footer_options

In this tab we can upload the credit cards icons to let people know which payment methods are accepted on your site. You can also toggle the reveal effect on the footer and the appearance of the Instagram carousel.

Static Front Page

static_front_page

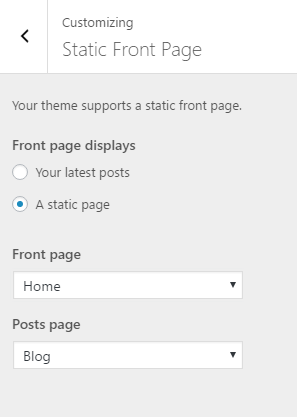
Using this tab we can choose what gets displayed on the front page of our site. For example if we want to create a homepage using a page builder we will need to create a new page using the Page Builder template, name it home and set it as our Front Page above. The Posts Page is the page that will display our post listing, as discussed earlier in the post creation section.

Other

This tab contains the custom CSS box which allows you to add custom styling if you need it.

Custom Widgets

neto_widgets

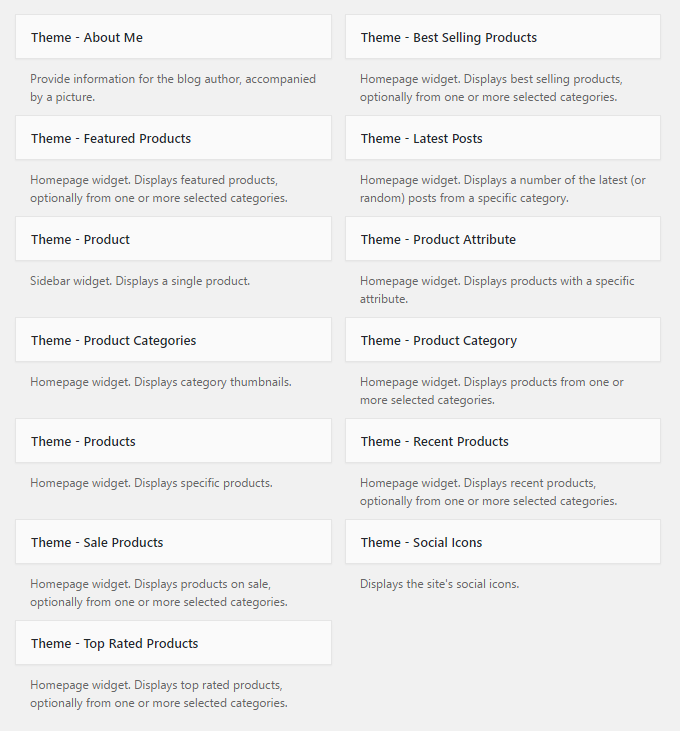
Neto comes with thirteen custom built widgets to help you display your content optimally. Ten of these widgets are purpose built to be used on the theme’s Home page sidebar to create a widgetized homepage. They are all WooCommerce related, they will allow you to showcase specific products, products from a certain category, recent, top selling, best rated products and more.

Widgetized Homepage

To create a widgetized homepage you can create a new page and assign the Home page template to it from the page attributes panel on the right. Then under Customize > Widgets you can add any of the ten custom built home page widgets to the home page sidebar and create a unique front page for your online shop.

On the theme’s demo, Homepage V10 is a widgetized one. We have used the Theme – Best Selling Products to display 6 best sellers in a 3 column layout, the Theme – Sale Products to display 6 items on sale in a three column layout and the Theme – Recent Products to display 12 recent arrivals in a 4 column layout.

Shortcodes

All WooCommerce shortcodes are available to use, you can learn more about their usage here. Some of them have been modified by us to offer greater flexibility. We have added four custom attributes to some of the shortcodes. The attributes are:

  • title allows you to set a title for the content block
  • style which toggles between two available layouts, list and carousel, defaults to list if omitted
  • show_categories displays the product categories attached to a product accepts yes or no, defaults to yes
  • show_price displays the product’s price. Accepts yes or no, defaults to yes

The shortcodes affected are the following:

  • Product categoryall four custom attributes are available on this shortcode. Example:
    [product_category category="shirts" title="Our Shirts" style="carousel" show_categories="yes" show_price="no"]
  • Product categoriesthe title and style attributes are available on this shortcode. Example:
    [product_categories number="12" parent="0" title="Shop more!" style="list"]
  • Recent products: all four custom attributes are available on this shortcode. Example:
    [recent_products per_page="12" columns="4" title="New arrivals!" style"carousel" show_categories="yes" show_price="yes"]
  • Products: all four custom attributes are available on this shortcode. Example:
    [products ids="1, 2, 3, 4, 5" title="Check these out!" style="list" show_categories="no" show_price="no"]
  • Sale products: all four custom attributes are available on this shortcode. Example:
    [sale_products per_page="12" title="On Sale!" style="carousel" show_categories="no" show_price="yes"]
  • Best selling products: all four custom attributes are available on this shortcode. Example:
    [best_selling_products per_page="12" title="Best sellers!" style="list" show_categories="no" show_price="yes"]
  • Top rated productsall four custom attributes are available on this shortcode. Example:
    [top_rated_products per_page="12" title="Top Rated" style="list" show_categories="yes" show_price="no"]
  • Featured products: all four custom attributes are available on this shortcode. Example:
    [featured_products per_page="12" columns="4" title="Featured Products" style="carousel" show_categories="no" show_price="no"]
  • Product attribute: all four custom attributes are available on this shortcode. Example:
    [product_attribute attribute="color" filter="black" title="Black is in" style="list" show_categories="yes" show_price="no"]

The theme’s built in shortcodes can also be used with Elementor’s shortcode module.

Next Steps

Still have questions or problems setting up your CSSIgniter Theme? We will be happy to help you out! Please visit our support Hub 
A quick interview with Mario Peshev (DevriX)

Last Updated On
A quick interview with Mario Peshev (DevriX) WordPress template

Mario is the founder and WordPress architect over at DevriX. He’s been contributing to WordPress core since WordPress 3.7. I haven’t had a chance to meet him (as of yet) so I decided to get to know him a bit better through this quick interview.

Read More

Pinmaister – Legacy

Last Updated On

Theme installation

The easiest way to install the theme, is by accessing your WordPress admin panel, then go to Appearance > Themes. Select the Install Themes tab and click the Upload link located just below the tab’s name. Click on Browse… and select the WordPress theme zip file you just downloaded. Then click the Install Now button, and after a few seconds, your new theme should be installed. Click activate and the theme is ready to use.

In order to install the theme manually, or in case you have trouble installing it through the admin panel, you have to unzip the WordPress theme’s zip file on your computer, and upload via FTP the resulting theme folder into your WordPress installation themes folder (wp-content/themes). Then, from the WordPress admin go to Appearance > Themes. The theme should be available in your themes list. Click activate.

TIP: More info on how to download and install a theme here.

Image Sizes

The minimum recommended image sizes for Pinmaister are:

  • Post thumbnail: 360x450px
  • Default featured image: 817px wide, no height requirement in place
  • Narrow featured image: 750px wide, no height requirement in place
  • Fullwidth featured image: 1140px wide, no height requirement in place
  • Masonry thumbnail: 360px wide, no height requirement in place
  • Header image: 1600x255px
  • Slider image: 1600x860px

Useful Plugins

These plugins provide functionality and features used directly (or not) by the Theme. So, it is recommended to install and activate them before importing your sample content.

  • User Submitted Posts: this plugin will allow your users to submit content to your site, you can then approve it to have it appear live.
  • Contact Form 7 use this plugin to create a contact form, then copy the shortcode it gives you and paste it in a page which will serve as your contact page.
  • WP Instagram Widget: Use the latest version of this plugin to help you display your Instagram feed in any of the theme’s sidebars.
  • One Click Import : Use this plugin to help you import your content with just one click.

Importing Sample Content using One Click Import

To automate the process of importing and for a better experience we have natively included support for OneClick Import Plugin. Let install it fist:

From your WordPress dashboard

  1. Visit ‘Plugins > Add New’,
  2. Search for ‘One Click Demo Import’ and install the plugin,
  3. Activate ‘One Click Demo Import’ from your Plugins page.

From WordPress.org

  1. Download ‘One Click Demo Import’.
  2. Upload the ‘one-click-demo-import’ directory to your ‘/wp-content/plugins/’ directory, using your favorite method (ftp, sftp, scp, etc…)
  3. Activate ‘One Click Demo Import’ from your Plugins page.

Once the plugin is activated you will find the actual import page in: Appearance > Import Demo Data.

 Click on the Import demo data button and you are done!

This plugin requires PHP version of at least 5.3.x, but we recommend version 5.6.x or better yet 7.x. Please contact your hosting company and ask them to update the PHP version for your site.

Importing sample content manually

To get the sample content file you can click the link in the notice that will appear on your dashboard immediately after activating the theme.

download_sample

Extract the zip file you downloaded and upload the xml file in Tools > Import > WordPress (if not already present, you will be prompted to install the WordPress importer plugin), assing the authors to an existing user and make sure you check the “import attachments” box. You can now import the sample content.

You can also download the Sample Content for Pinmaister by clicking here

Importing widgets

You can also import the widgets you see on the theme’s demo. To do that, you need the Widget Importer & Exporter plugin. To install it go to Plugins > Add new search for widget importer exporter and install the plugin. Activate it and go to Tools > Widget Importer & Exporter click choose file and upload the pinmaister_widgets.wie file which is located in the sample content zip file, click Import widgets and you are good to go.

WARNING: As this will create posts, pages, custom post types, categories, widgets, etc. and change various system settings, it is strongly advised that you do this on a clean WordPress installation, without any previous and/or precious data. Under no circumstances we can be held responsible for total or partial data loss, so please be careful.

Setting up your theme

1) Populating your blog

To add new posts to your blog, go to Posts > add new and proceed to:

  1. add a title to your post,
  2. enter the content in the editor,
  3. upload a featured image by clicking “Set featured image” on the Featured Image panel,
  4. add categories to the post,
  5. add any tags  you might need,
  6. and move to the Post Options metabox.

pm_new_post

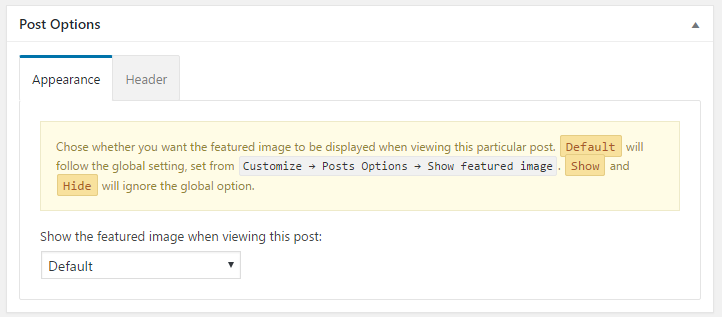
In the Post Options metabox, under the Appearance tab you can select whether you want to show the post’s featured image on the single view and in the Header tab you can set and configure the post’s header image.

post_options

Once you are done click the Publish button to publish your post.

2) Customizing the appearance

All theme customization is done via WordPress’s built in customizer. If you haven’t used it or want to learn more about it, please read this article.

Go to Appearance > Customize and you will see this

pinmaister_customizer

TIP: any changes you make in the tabs below will be previewed live on the site which appears in right side of the screen, however to save these changes you need to click the Save & Publish button on the top of the bar, if you have made a change but see the button grayed out (for example changed the font size of a heading), move the cursor outside the input box, for example, to the next input box, then the button should be clickable again.

Let’s take a look at the options each tab gives you.

  • Site Identity

    In this tab you can modify the site’s title, tagline, logo, footer logo and site icon.

  • Layout Options

    Here you can configure the length of the automatic excerpt, choose between numbered and older/newer pagination, select between 3 and 4 columns for the post listing page layout and toggle the masonry effect.

  • Posts Options

    Here you can toggle various aspects of the single post’s appearance, such as dates, categories, excerpt, comment & like count, featured image, tags, social sharing buttons, author box, related posts and comments.

  • Appearance

    Under the appearance tab you will find four panels. The Global Colors which will help you fine tune the color scheme of the main content areas, the Header panel which allows you to set the global header image and modify the colors of the header elements, the Sidebar Colors which will allow you to customize colors for sidebars and the Typography tab which allows you to modify heading sizes.

  • Social Networks

    Here you can fill in the URLs to your various social network profiles supported by the theme. These will appear on the header, footer automatically, you can also display them in the post/page sidebar by adding the Theme – Social Icons widget in the blog or page sidebar.

  • Titles

    Set the section title for the blog, search, and 404 pages. Additionaly modify the title of the related posts section and author box.

  • Menus

    Here you can create and assign your main menu to the theme. To learn more about menu creation check out the Codex’s menu user guide here.

  • Widgets

    Through this tab you can add widgets to the theme’s sidebars. The theme features eight sidebars. The main sidebar, the pages sidebar, the homepage sidebar, the prefooter sidebar and four footer ones.

  • Static Front Page

    If you don’t wish to have your latest posts on the front page and wish to display static content using a normal page, or want to use the looks template as your front page, you can do so here. Set the desired page as your static front page and save.

  • Other

    In this tab you can select the User submission page, set the footer text, add custom CSS and set your Google Analytics Tracking ID.

Theme pages

The contact page

For the contact page on the theme’s demo we used a page with the Narrow Page template applied to it and pasted in a contact form created with the Contact Form 7 plugin.

User submission page

To accept user submissions for content start by installing and activating the User Submitted Posts plugin. Next create a new page, apply to it the Narrow Page template (if you want it to look like the one on the theme’s demo) and in its content area paste the following shortcode:

[user-submitted-posts]

Publish the page and make sure you have it set as your User submission page under Customize > Other. Now users can click the sign that appears on the right of the menu bar to get to the submission page and send you their content.

The Home Page

To create a homepage go to Pages > Add New and create a new page using the Homepage Template. Then go to Customize > Static Front Page and set the newly created page to be your static front page. The page is fully widgetized so you need to navigate to Customize > Widgets and add the widgets of your choice to the Homepage sidebar.

Recreating the demo’s homepage layout

The entire front page template is widgetized to provide you with maximum flexibility. Below we list the widgets used on the demo’s home page.

  • Theme – Slider: This widget creates the slider. You can either select to display posts from a certain category or hand pick your posts by placing their IDs in the corresponding box. Set the time out and animation speed and save your slider.
  • Theme – Post type items: This widget displays four hand picked posts in a four column grid layout.
  • Theme – Latest Posts: This widgets displays the latest six posts from a pre-set post category in a three columned carousel layout.
  • Theme – Newsletter: The widget contains an HTML form for newsletter submissions.
  • Theme – Latest Posts: This widgets displays the latest eightposts from a pre-set post category in a four columned grid layout.
  • Theme – Instagram (homepage): This widget displays the latest 8 images from a preselected Instagram account.

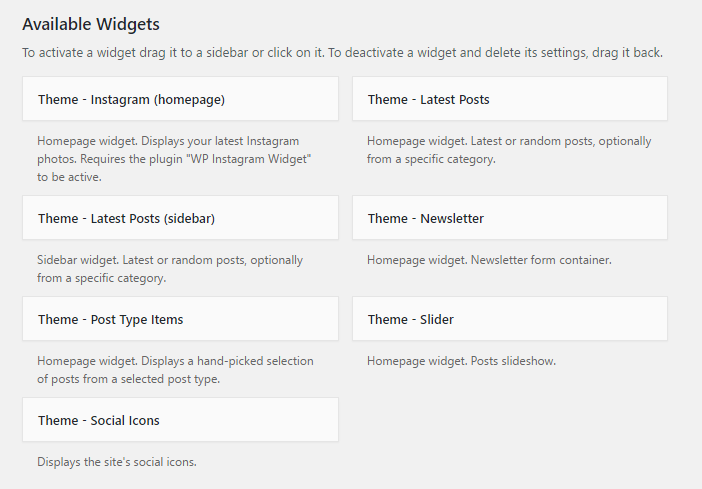
Widgets

Along with WordPress’s widgets we have created 7 custom ones. They are really simple and they let you display various important info around the site.

pinmaister_widgets

You will find a small description in each widget detailing its usage.

Please note that the Theme Instagram (homepage) widget will only appear if the WP Instagram Widget plugin is installed and activated.

Next Steps

Still have questions or problems setting up your CSSIgniter Theme? We will be happy to help you out! Please visit our support Hub 
Palermo – Legacy

Last Updated On

Theme installation

To install the theme, access your WordPress admin panel, then go to Appearance > Themes. Select the Install Themes tab and click the Upload link located just below the tab’s name. Click on Browse… and select the WordPress theme zip file you just downloaded. Then click the Install Now button, and after a few seconds, your new theme should be installed. Click activate and the theme is ready to use.

TIP: Visual instructions can be found here

In order to install the theme manually, or in case you have trouble installing it through the admin panel, you have to unzip the WordPress theme’s zip file on your computer, and upload via FTP the resulting theme folder into your WordPress installation themes folder (wp-content/themes). Then, from the WordPress admin go to Appearance > Themes. The theme should be available in your themes list. Click activate.

Image Sizes

The recommended image sizes for the Palermo theme are:

  • Post Thumbnail: 630x350px
  • Listing Thumb: 400x400px

Useful Plugins

These plugins provide functionality and features used directly (or not) by the Theme. So, it is recommended to install and activate them before importing your sample content.

  • CSSIgniter Shortcodes you can use our custom made shortcode plugin to help you create a variety of layouts and elements on your site. Instructions can be found here.
  • Contact Form 7 use this plugin to create a contact form, then copy the shortcode it gives you and paste it in an empty page.
  • Ninja Forms  this is an alternative to Contact Form 7 and it has been used on the theme’s demo to create the form found on the booking page.
  • WP Instagram Widget: Use the latest version of this plugin to help you display your Instagram feed in any of the theme’s sidebars.
  • MaxSlider : Use this plugin to help you create custom sliders and use them anywhere you wish shortcodes.

Importing Sample Content using One Click Import

To automate the process of importing and for a better experience we have natively included support for OneClick Import Plugin. Let install it fist:

From your WordPress dashboard

  1. Visit ‘Plugins > Add New’,
  2. Search for ‘One Click Demo Import’ and install the plugin,
  3. Activate ‘One Click Demo Import’ from your Plugins page.

From WordPress.org

  1. Download ‘One Click Demo Import’.
  2. Upload the ‘one-click-demo-import’ directory to your ‘/wp-content/plugins/’ directory, using your favorite method (ftp, sftp, scp, etc…)
  3. Activate ‘One Click Demo Import’ from your Plugins page.

Once the plugin is activated you will find the actual import page in: Appearance > Import Demo Data.

 Click on the Import demo data button and you are done!

This plugin requires PHP version of at least 5.3.x, but we recommend version 5.6.x or better yet 7.x. Please contact your hosting company and ask them to update the PHP version for your site.

Setting up your theme

1) Creating theme pages

Let’s start by adding pages you are going to need. Go to Pages > Add New and create the following pages:

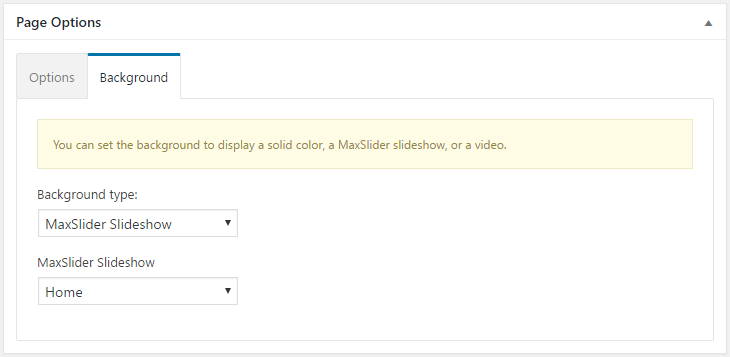
Home this will serve as your homepage if you want to recreated the demo’s appearance. Create the page and in the Page Options metabox, disable the appearance of the content in the Options tab and in the Background one set MaxSlider Slideshow as the background type and select the slideshow you have created for the homepage. For info on how to create slideshows using MaxSlider please have a look here.

home_options

Blog this will be your posts page. Just create it, no further action needed.

Contact here you can place your contact form which you will create using the Contact Form 7 plugin or Ninja Forms. On the demo we have used the CSSIgniter Shortcodes plugin to create the map and Contact Form 7 to create the contact form.

Booking your booking form can be placed here. On the demo we have used a form created with the Ninja Forms plugin.

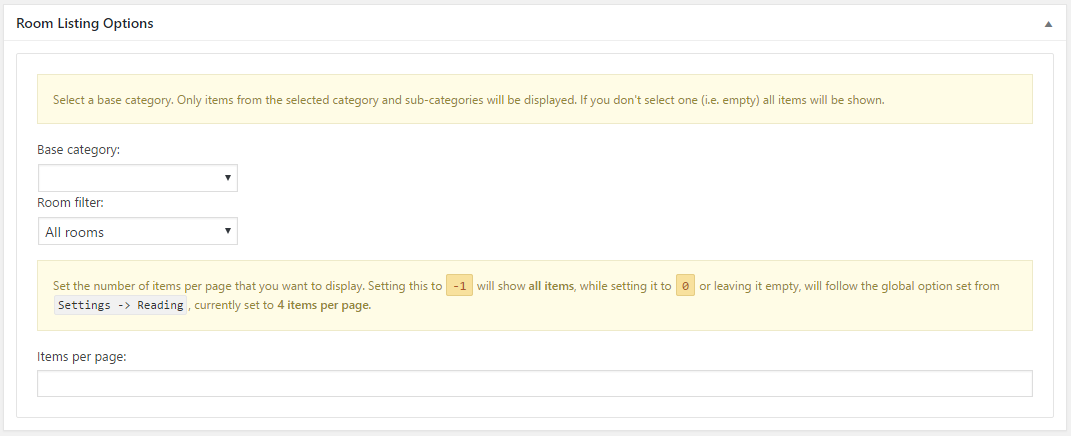
Room Listing this page will display your rooms. Apply the Rooms Listing template from the page attributes panel and proceed to the Room Listing Options panel to select which room categories to display (if not all), set whether or not to display only rooms on offer, and finally the number of rooms per page.

room_listing_options

(TIP, all page titles serve as examples, you can name your pages according to your needs.)

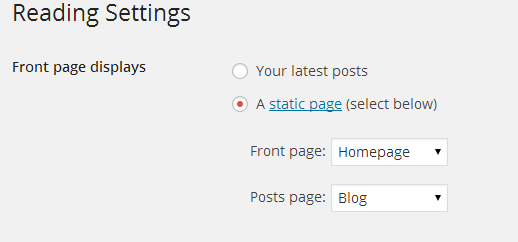
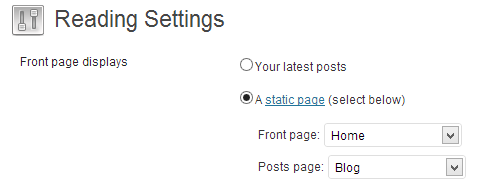
Once the pages are created, navigate to Settings > Reading and set the “Home” page to be your static frontpage and the “Blog” page as your posts page, as demonstrated in the image below.

ReadingSettings

2) Populating your blog

To add new posts to your blog, go to Posts > add new, title your post, enter the content in the editor, upload a featured image by clicking “Set featured image” on the Featured Image panel, add a category and/or tag to the post, if you so desire, from the respective panels and publish the post by clicking “Publish”.

3) Adding Rooms

To create a new room item go to Rooms > new Room, set the room’s name as a title, enter relevant information in the content editor, and set a featured image. Then move to the Room Settings panel.

room_options

  • In the Appearance tab you can set a subtitle for the room if you wish and toggle the room’s featured image.
  • In the Amenities tab you can fill in all room amenities, set the general amenities title, and add amenities by typing in the box and clicking Add New to add more. Once done paste the [room-amenities] shortcode in the content area to display them.
  • In the Pricing tab you can fill in the room’s price and toggle the offer banner. Make sure you include currency symbols in the box. You can also use the strong tag in the box to make the price appear bolder.
  • Finally in the Background tab you can select what sort of background the room will display. This can be the default set in the customizer, a single color, a MaxSlider slideshow or a YouTube/Vimeo video.

4) Creating your menu

Now that your content is in place, you need to set up the menu.  Go to Appearance > Menus and create your menu. Customize it by adding menu items and then go to “Manage Locations”, to set it as  your main menu.

(TIP, for more info on creating and managing menus, please read the WordPress Menu User Guide here)

5) Customizing the appearance

All theme customization is done via WordPress’s built in customizer. If you haven’t used it or want to learn more about it, please read this article.

Go to Appearance > Customize and you will see this

palermo_customizer

Let’s take a look at the options each tab gives you.

Site Identity

In this tab you can modify the site’s title, tagline, logo and site icon. You can also toggle the title, tagline and modify the logo’s padding.

Layout Options

Here  you can configure the length of the automatic excerpt and choose between numbered and older/newer pagination.

Posts Options

Here you can toggle the date, categories, featured image, tags and comments for single posts.

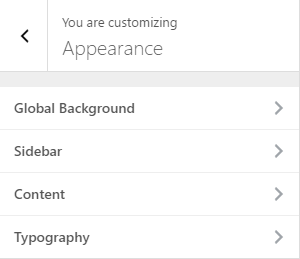
Appearance

In this tab you can modify items related to Palermo’s appearance.

palermo_appearance

    • In the Global Background tab you can set a default background color or image. You can also chose to set a MaxSlider slideshow or YouTube/Vimeo video as your default background.
    • In the Sidebar tab you can customize the sidebar’s background and color scheme.
    • In the Content tab you can set a background for your content and modify content colors such as text, link, border and more.
    • In the Typography tab you can set font sizes for all headings, body text, widget titles and widget content. You can also chose to make all titles uppercase.

Social Networks

Here you can fill in the URLs to your various social network profiles supported by the theme. These will appear on the header, footer automatically, you can also display them in the post/page sidebar by adding the Theme – Social Icons widget in the blog or page sidebar.

Titles

This tab allows you to modify the titles for the blog, search results page and 404 page.

Menus

Here you can create and assing menus to the theme.  To learn more about menu creation check out the Codex’s menu user guide here.

Widgets

Through this tab you can add widgets to the theme’s sidebars. The theme features six sidebars, the blog, the homepage, three footer sidebars and the header ad sidebar.

Static Front Page

Use this tab to make the Home page your static front page so you can recreate the demo’s layout.

Other

In this tab we host the custom CSS panel which you can use to insert styles for elements not covered in the rest of the tabs. Additionally you can place your Google Analytics ID.

How to use the page builder template

The theme comes bundled with a page builder template which allows you to use your favorite page builder plugin on it and create unique layouts very easily.

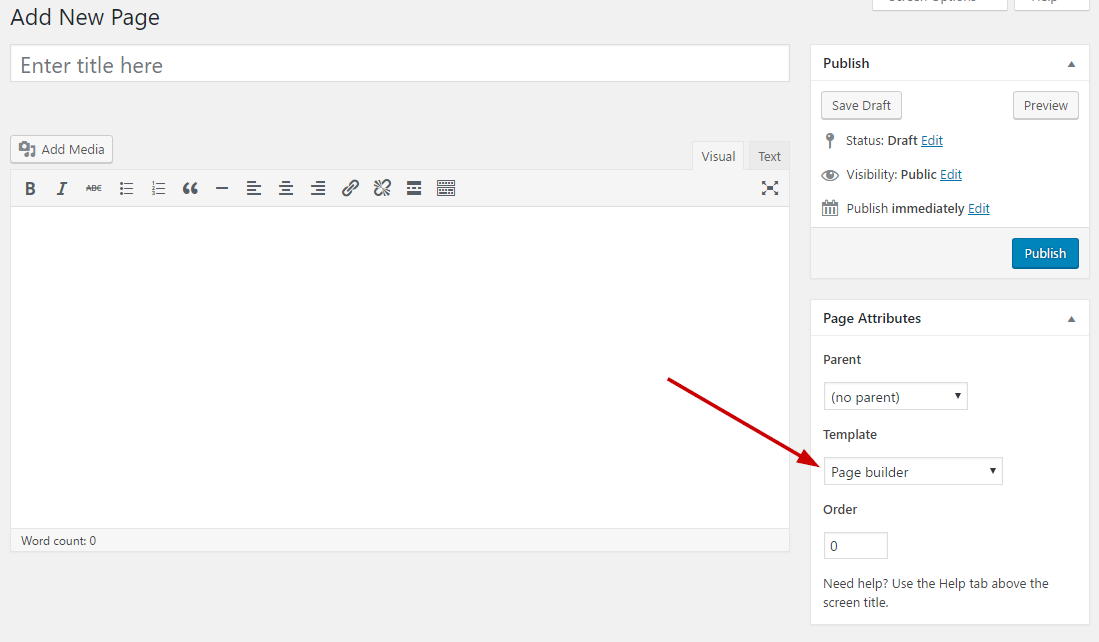
To use that template start by going to Pages > Add New. This will create a new page. Add a title to your page and select the Page builder template from the template drop down in the Page Attributes metabox.

ci_page_builder_template

That’s it. You can now start building your page using the page builder of your choice, once done publish it and check it out.

Next Steps

Still have questions or problems setting up your CSSIgniter Theme? We will be happy to help you out! Please visit our support Hub 

Potenza – Legacy

Last Updated On

About

Potenza is a single page business theme for WordPress.

WordPress theme installation

The easiest way to install the theme, is by accessing your WordPress admin panel, then go to Appearance > Themes. Select the Install Themes tab and click the Upload link located just below the tab’s name. Click on Browse… and select the WordPress theme zip file you just downloaded. Then click the Install Now button, and after a few seconds, your new theme should be installed. Click activate and the theme is ready to use.

For a more detailed guide, please read here.

In order to install the theme manually, or in case you have trouble installing it through the admin panel, you have to unzip the WordPress theme’s zip file on your computer, and upload via FTP the resulting theme folder into your WordPress installation themes folder (wp-content/themes). Then, from the WordPress admin go to Appearance > Themes. The theme should be available in your themes list. Click activate.

Image Sizes

The minimum recommended image sizes for Potenza are:

  • Post thumbnail: 850x500px
  • Hero Image, used in the custom content widget: 750x550px
  • Small Square (Team & Testimonials): 260x260px
  • Slider Image: 1920x800px
  • Blog Listing Square: 400x400px
  • Clients Widget: 0x80px (at least 120px tall, not limited in width)

Useful Plugins

These plugins provide functionality and features used directly (or not) by the Theme. So, it is recommended to install and activate them before importing your sample content

  • Contact Form 7 use this plugin to create a contact form, then copy the shortcode it gives you and paste it in a page which will serve as your contact page.
  • One Click Import : Use this plugin to help you import your content with just one click.

Importing Sample Content using One Click Import

To automate the process of importing and for a better experience we have natively included support for OneClick Import Plugin. Let install it fist:

From your WordPress dashboard

  1. Visit ‘Plugins > Add New’,
  2. Search for ‘One Click Demo Import’ and install the plugin,
  3. Activate ‘One Click Demo Import’ from your Plugins page.

From WordPress.org

  1. Download ‘One Click Demo Import’.
  2. Upload the ‘one-click-demo-import’ directory to your ‘/wp-content/plugins/’ directory, using your favorite method (ftp, sftp, scp, etc…)
  3. Activate ‘One Click Demo Import’ from your Plugins page.

Once the plugin is activated you will find the actual import page in: Appearance > Import Demo Data.

 Click on the Import demo data button and you are done!

This plugin requires PHP version of at least 5.3.x, but we recommend version 5.6.x or better yet 7.x. Please contact your hosting company and ask them to update the PHP version for your site.

Setting up your theme

1) Creating theme pages

  1. Homepage: Create a page named Home  and apply to it the Homepage Template from the page attributes panel on the right.
  2. Blog: This page will display your posts, apply the default template to it.

(TIP, all page titles serve as examples, you can name your pages according to your needs.)

Once the pages are created, navigate to Settings > Reading and set the “Home” page to be your static frontpage and the “Blog” page as your posts page, as demonstrated in the image below.

ReadingSettings

2) Populating your blog

To add new posts to your blog, go to Posts > add new, title your post, enter the content in the editor, upload a featured image by clicking “Set featured image” on the Featured Image panel, add a category and/or tag to the post, if you so desire, from the respective panels and publish the post by clicking “Publish”.

3) Widgets

The entire front page of Potenza is built using widgets, we have built 9 custom widgets to help you do that. You can access them either by going to Appearance > Customize > Widgets or Appearance > Widgets. 

widgets

Let’s have a look how they work.

Theme – Slider

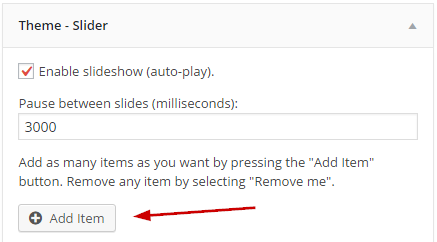
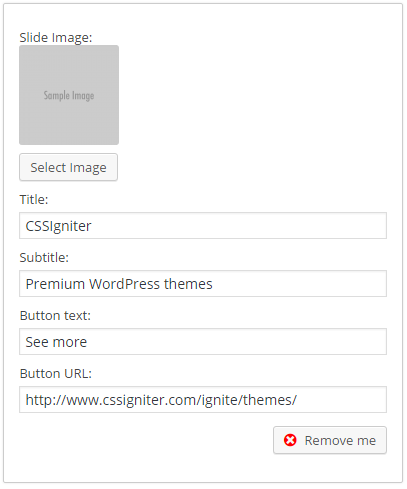
This widget will help you create slider items. Add the widget to the Homepage sidebar, select the slideshow speed and toggle the automatic slide functionality and press the Add Item button to add your first slide.

slider_1

Fill in all the required information, like title, subtitle, button text and button URL and click the Select Image button to upload the slider image.

slider_2

Next click the Add Item again to add another slide, continue as needed and once done click the save button.

Theme – Custom Content

This widget is built to help you add content to your front page, whether it is an introductory text, a bio or any other text you might want to include. Its functionality is pretty straight forward, you add the widget to the homepage sidebar, fill in all the info you need, click the Select Image button to upload an image (optional) and save the widget.

widget_content

Theme – Services

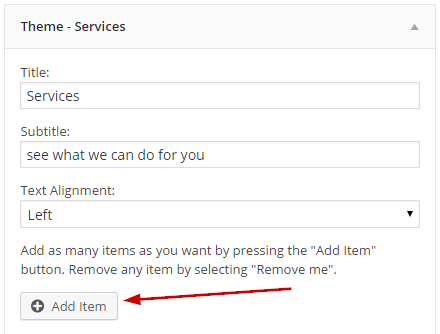
Let’s see about displaying services next. Add the widget to the homepage sidebar, fill in the title, subtitle, select the text alignment and click the Add Item button.

Services_1

Give the service item a title, add the text, select an image for it from the Font Awesome set and proceed with adding your next service, once done, save the widget.

Theme – Team

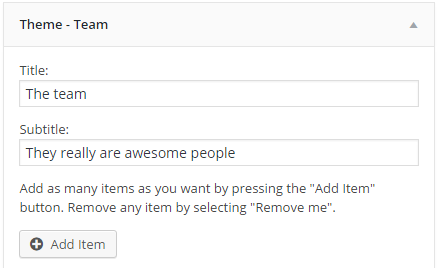
Products do not create themselves so let’s introduce the people who did create them. Add the widget to the homepage sidebar, fill in title and subtitle and click the Add Item button.

team_1

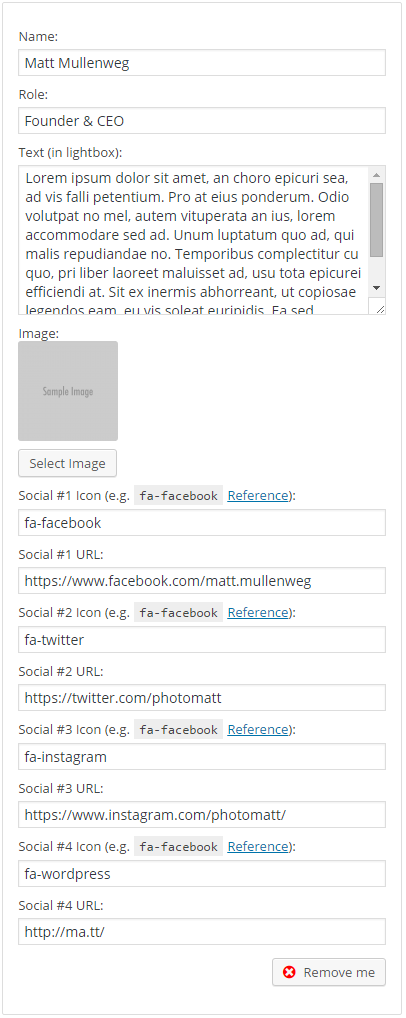
Next fill in all the relevant info for each team member. You can add name, title, a small bio which will appear when the team item is clicked and links to four social profiles. Images for the profiles are provided by the Font Awesome set. Add as many items as necessary and save the widget.

team_2

Theme – Pricing Table

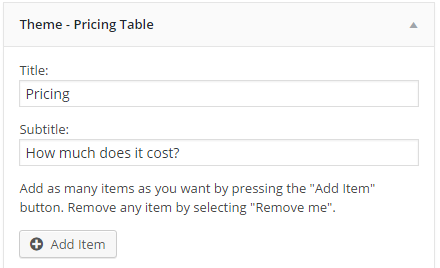
To create a pricing table, add the widget to the homepage sidebar, fill in the title, subtitle and click the Add Item button

Pricing_1

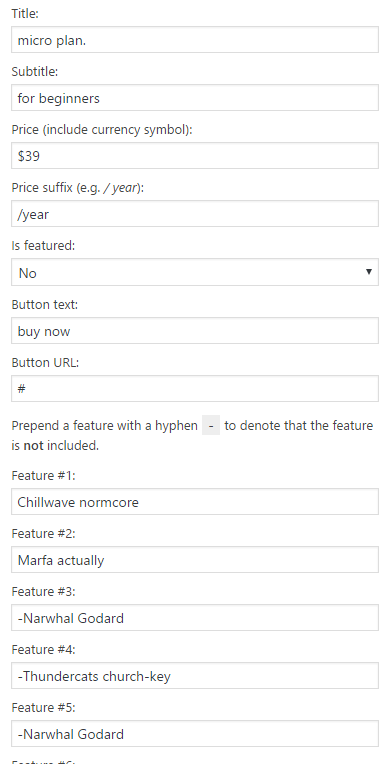
Set up the pricing item by filling all related information. Marking the item as featured will make it appear emphasized with a border surrounding it. You can add up to 8 features for each pricing item, placing a dash or minus sign before the text will display it as not available/included in the package.

pricing_widget

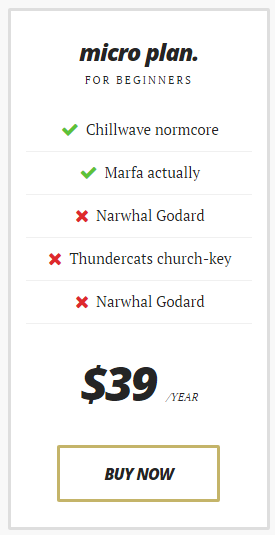
this is how the above pricing item will look like

pricing_table

Theme – Clients

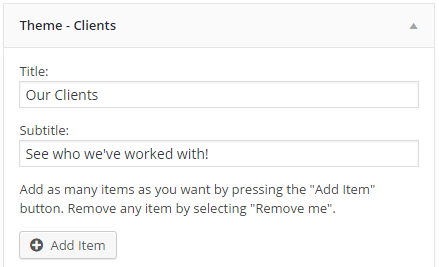
To display your clients on the front page, add the widget to the homepage sidebar, fill in the title, subtitle and click the Add Item button

Clients_1

Upload your client’s logo as the image and provide the URL to their website, after you are finished adding the items, save the widget.

Clients_2

Theme – Testimonials

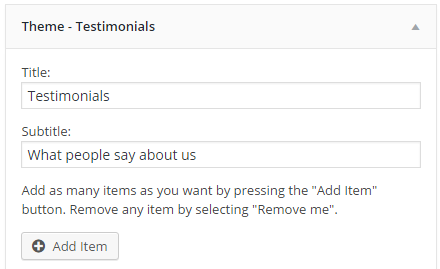
To display your testimonials add the widget to the homepage sidebar, fill in the title, subtitle and click the Add Item button

Testimonials_1

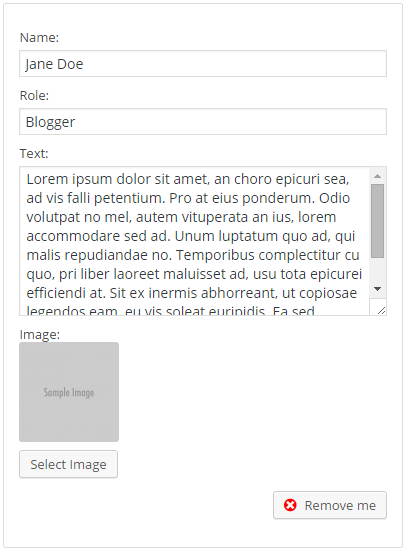
Upload the testimonial author’s image, their name, role and testimonial text. Once you have added all testimonials, save the widget.

Testimonials_2

Theme – Contact

Use this widget to let people know how they can get in touch with you. Add it to the homepage sidebar and fill in all the required info. Follow the instructions on the widget to help you find the coordinates of your location. The contact form shortcode can be provided by a contact form plugin such as Contact Form 7 

Contact

Theme – Latest Posts

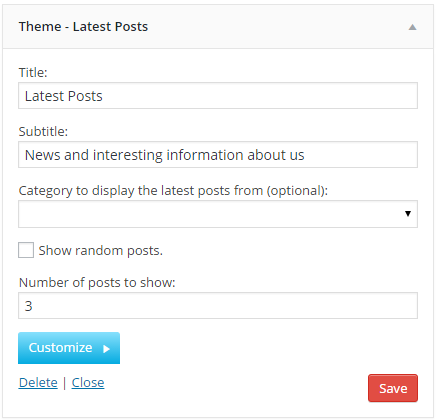
Our last custom widget will allow you to display your latest blog posts. Add it to the homepage sidebar, fill in the required information and save it.

Latest_posts

Customize the widget’s appearance.

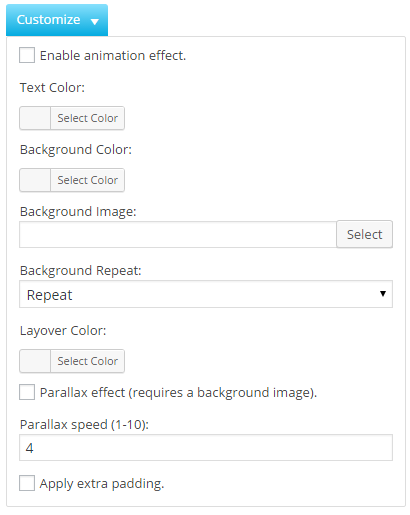
At the bottom of each widget you will notice a blue button titled Customize. Clicking it will give you access to the widget customization panel.

Customize

Here you can toggle animation effects for the widget, change text & background color, upload a background image with optional parallax effect, apply an overlay to the background image and add extra padding if you need your widgets more spaced out.

4) Customizing the appearance

All theme customization is done via WordPress’s built in customizer. If you haven’t used it or want to learn more about it, please read this article.

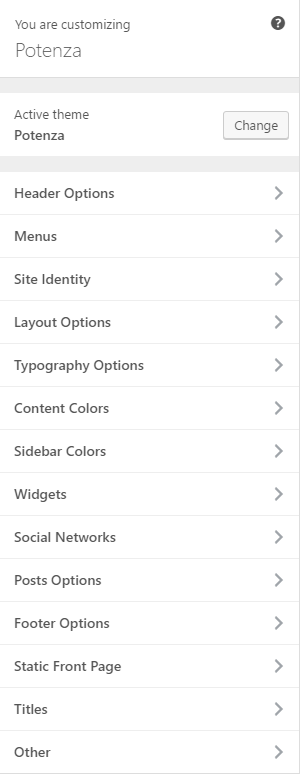
Go to Appearance > Customize and you will see this

customizer

TIP: any changes you make in the tabs below will be previewed live on the site which appears in right side of the screen, however to save these changes you need to click the Save & Publish button on the top of the bar, if you have made a change but see the button grayed out (for example changed the font size of a heading), move the cursor outside the input box, for example, to the next input box, then the button should be clickable again.

Let’s take a look at the options each tab gives you.

Header Options

Here you can toggle the tagline, sticky header and logo padding. Additionally you can modify the colors of various header elements.

Menus

Here you can create and assign menus to the theme. See below for more info on how to add items to your menu. To learn more about menu creation check out the Codex’s menu user guide here.

Site Identity

In this tab you can modify the site’s title, tagline, logo, footer logo and site icon.

Layout Options

Here you can toggle the blog sidebar, you can also configure the length of the automatic excerpt and choose between numbered and older/newer pagination.

Typography Options

Here you will find various options regarding the theme’s typography. You can change heading, body text and widget title sizes and toggle the capitalization of various elements.

Content Colors

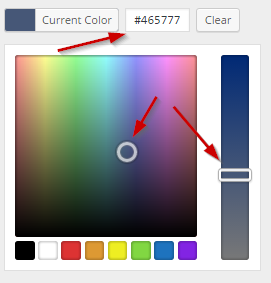
Are you looking to create your own unique color scheme? This tab will help you do it by allowing you to modify the colors of many elements of the content. To do that click the Select Color button and either use a hex color value in the box or use the palette to select a color.

color_change

Sidebar Colors

This tab will allow you to modify the colors of various sidebar elements to complete your custom color scheme.

Widgets

Through this tab you can add widgets to the theme’s sidebars.

Social Networks

Here you can fill in the URLs to your various social network profiles supported by the theme. These will appear on the footer automatically.

Posts Options

Here you can toggle various aspects of the single post, like the appearance of categories, tags, date, comments etc.

Footer Options

Customize the theme’s footer by changing its color scheme and toggling the social icons and adding your copyright text.

Static Front Page

If you don’t wish to have your latest posts on the front page and wish to display static content using a normal page, or want to use the looks template as your front page, you can do so here. Set the desired page as your static front page and save.

Static Front Page

Here you can change the default titles for the search results & 404 pages.

Other

In this tab we host the custom CSS panel which you can use to insert styles for elements not covered in the rest of the tabs, additionally you will find input boxes where you can place your Google Analytics tracking ID and Google Maps API key (if necessary).

5) Populating your menu

Once done adding the widgets to your homepage you will need to create a menu. To do that navigate to Appearance > Customize > Menus and create a menu.

  1. Check the box to make the menu your theme’s Main Menu
  2. Click the Add Items button
  3. Expand the Custom Links tab
  4. You will see that there are links to each of your widgets here, select one
  5. Click the Add to menu button

Repeat steps 4 & 5 until all your widgets are added to the menu. Click the Save/Save & Publish button on the top of he customizer panel to save the menu.

menu

How to use the page builder template

The theme comes bundled with a page builder template which allows you to use your favorite page builder plugin on it and create unique layouts very easily.

To use that template start by going to Pages > Add New. This will create a new page. Add a title to your page and select the Page builder template from the template drop down in the Page Attributes metabox.

ci_page_builder_template

That’s it. You can now start building your page using the page builder of your choice, once done publish it and check it out.

Next Steps

Still have questions or problems setting up your CSSIgniter Theme? We will be happy to help you out! Please visit our support Hub 
AudioIgniter – A React.js powered audio player for your WordPress site

Last Updated On
AudioIgniter – A React.js powered audio player for your WordPress site WordPress template

Throughout CSSIgniter’s course we’ve always had a certain sweet spot for the music industry and everything related to the promotion of that market (as is evident from our very popular music themes both at Themeforest and on our own marketplace), albeit up until now mostly limited to theme development .

The idea of expanding into plugin territory has been floating around for a while, and during the past few weeks we’ve been working on creating a solid audio playing and playlist management experience for WordPress powered websites.

Read More

AudioIgniter

Last Updated On

Installation

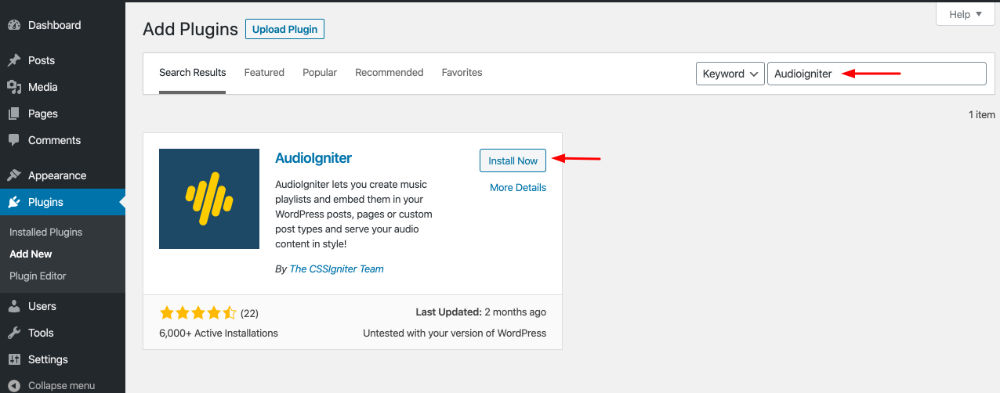
To install the plugin simply navigate to Plugins → Add New in your WordPress dashboard and search for Audioigniter

Next click the Install Now button and wait for the plugin to be installed. Once the plugin is installed you can click the Activate button. That’s it. The plugin is installed and activated.

Creating a playlist

To create a playlist navigate to AudioIgniter → Add New Playlist.

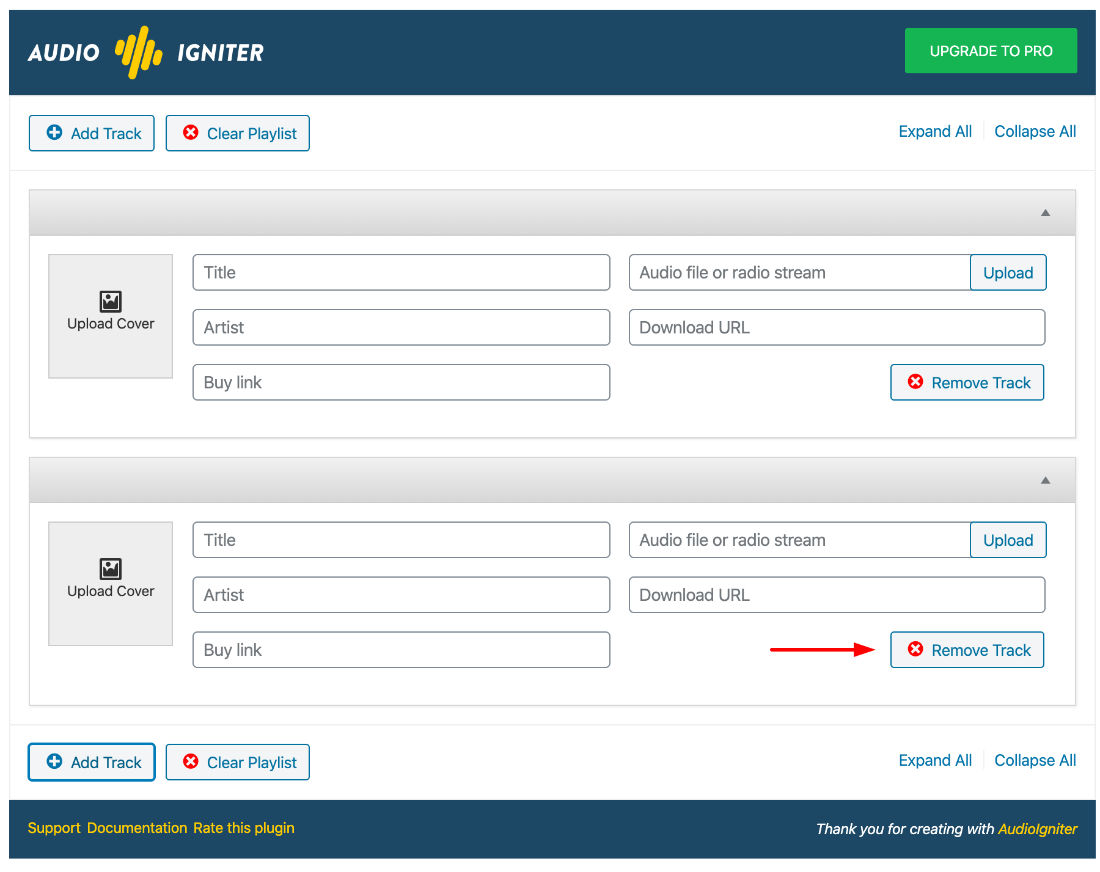
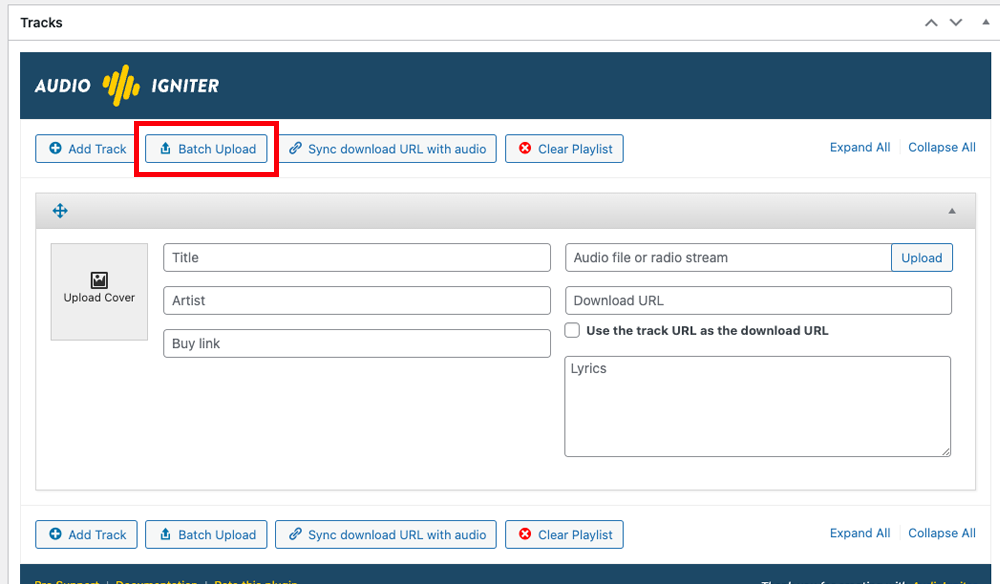
In the image above you can see the Tracks metabox. Below we take a step by step approach on adding a track.

  1. Add a title to your Playlist
  2. Click the Add Track button (this can be skipped the first time since a playlist starts with an empty track)
  3. Clear the playlist (only click in case you want to remove all tracks and start over)
  4. We start by adding a track cover image. Click the placeholder image and WordPress’ media manager will pop-up to allow you to upload a new cover or select a preexisting image.
  5. Fill in the track’s title.
  6. Fill in the artist’s name.
  7. Set a buy/shop link. If the track is available for purchase you can paste the URL of the marketplace where your visitors can purchase it. This will display a cart button next to the track in the playlist.
  8. Click the Upload button to get a media manager pop-up which allows you either to upload a new mp3 file or select a preexisting one from your media library. Alternatively if you have a radio stream URL you can paste it in the box. 
  9. You can also fill in a URL where your listeners can download your track, this will display a download button next to the track in the track listing. Please note that while AudioIgniter will try its best to make the link you provide downloadable it might not work everywhere or in all browsers (due to security reasons mostly). In case this happens you can host your downloadable files in a third party service that robustly supports downloads, e.g. Dropbox (with the ?dl=1 flag in the url).
  10. Repeat to add the rest tracks of your playlist and Publish it.

Removing tracks

To remove a track simply click the Remove Track button.

NOTICE: You need to have at least two tracks for the remove track button to appear.

Player settings

In both free and pro version you have multiple player types and other options which can help you tailor the player to the use case, let’s take  a closer look.

Full Player

We start with the Full Player type which displays the full playlist along with the player and its controls.

  1. Select your player type to be: Full Player
  2. Show track listing by default: this option allows you to toggle the appearance of the track listing. Leaving the box unchecked will start the playlist hidden. See players 1 (hidden tracklist) & 2 (visible tracklist) here
  3. Show or hide the playlist toggle button.
  4. Reverse track order: reverses the number order to allow you to create a “countdown” playlist.
  5. Set your starting volume when someone hits the play button.
  6. Limit the track listing height, use the next box to set that height.
  7. Set your track listing height in pixels. This will apply only if you choose to limit track height using the previous checkbox
  8. Set the player width in pixels or leave it blank to cover the width of the container.

Once you figure out all the settings you are done with the list creation. Click the Publish button to finalize it.

Simple player

Simple player will display a minimal set of features with the playlist hidden. You can

  1. Select your player type to be: Simple Player
  2. Reverse track order: reverses the number order to allow you to create a “countdown” playlist.
  3. Set the starting music volume.
  4. Select a maximum player width in pixels, or leave empty to cover all container width.

Track Settings

All players have their own set of track settings. All of them and their functionality is shown below

  1. Show track numbers in tracklist: this option toggles the appearance of tracklist numbering.
  2. Show track covers in tracklist: select whether you want to display track covers in the tracklist.
  3. Show active track’s cover: this option allows you to hide the current track’s cover from the player. See players 1 (visible cover) & 6 (hidden cover) here
  4. Show artist names: toggles the appearance of artist names on the player.
  5. Show extra track buttons: toggles the appearance of the buy & download buttons on the player.
  6. Open buy links in new window, so the user will not leave your main site.
  7. If enabled the playlist will repeat after the last track
  8. Show or hide the track listing repeat toggle button
  9. Show “Powered by AudioIgniter” link: This allows you to display a powered by link below the playlist. Please consider enabling it if you like the plugin, it will help us a lot :).

Displaying the list

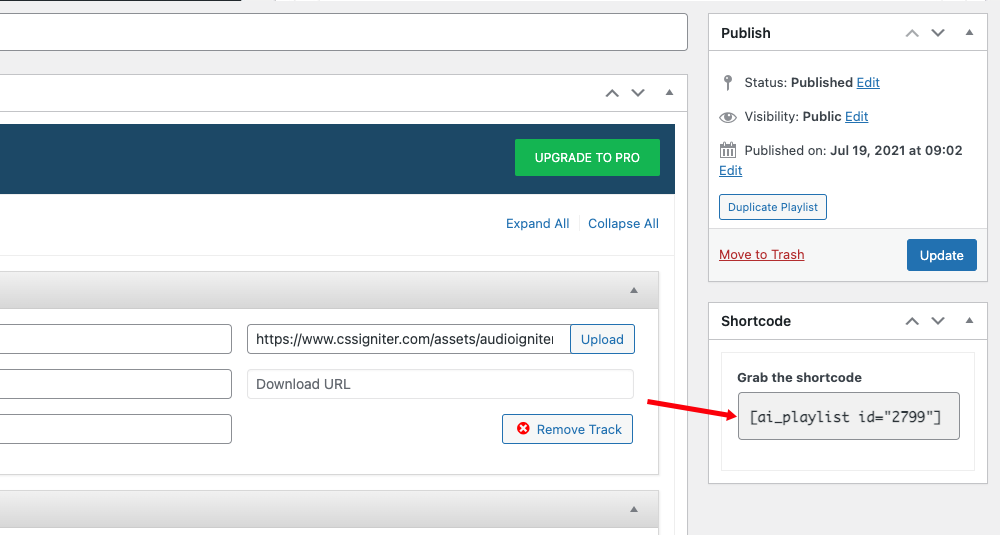
To display the list you need to grab its shortcode which you can find in the shortcode metabox on the right of your playlist. Simply copy the shortcode text.
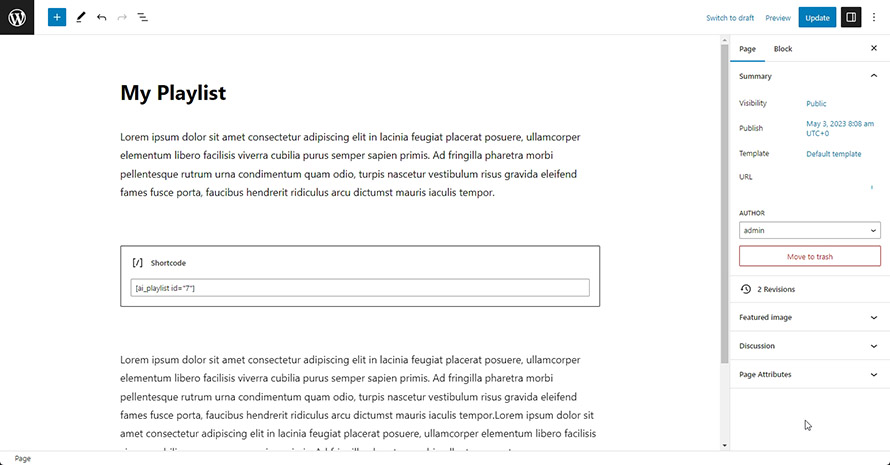
How to use the shortcode in Block Editor

Paste the shortcode inside a core Shortcode block, in any post or page and save. Τhat’s it, you can now see your playlist in action.

TIP: if you want to use the player in a sidebar you can paste the shortcode in a standard text widget. If you don’t see the player after saving the widget you will need to enable shortcodes in text widgets. Have a look at this article on how to do this.

AudioIgniter Pro

Installation

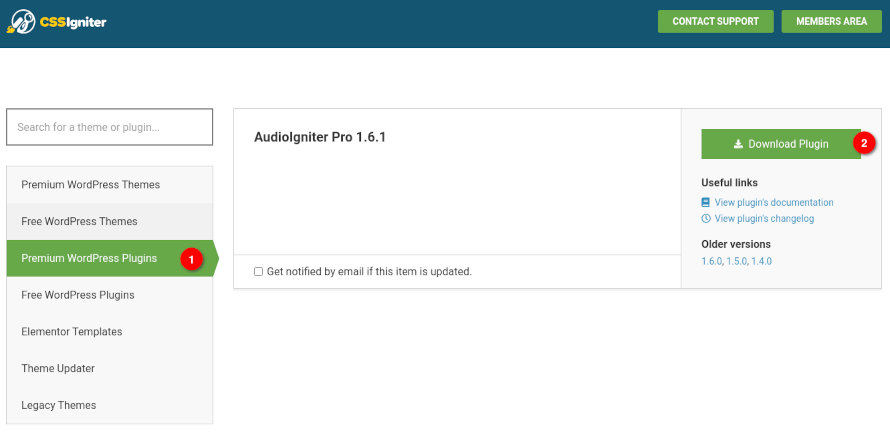
To get the plugin’s installable zip file navigate to our downloads section here and search for AudioIgniter or simply navigate to Premium WordPress Plugins and find AudioIgniter Pro.

Click the green download button and save the zip file when prompted.

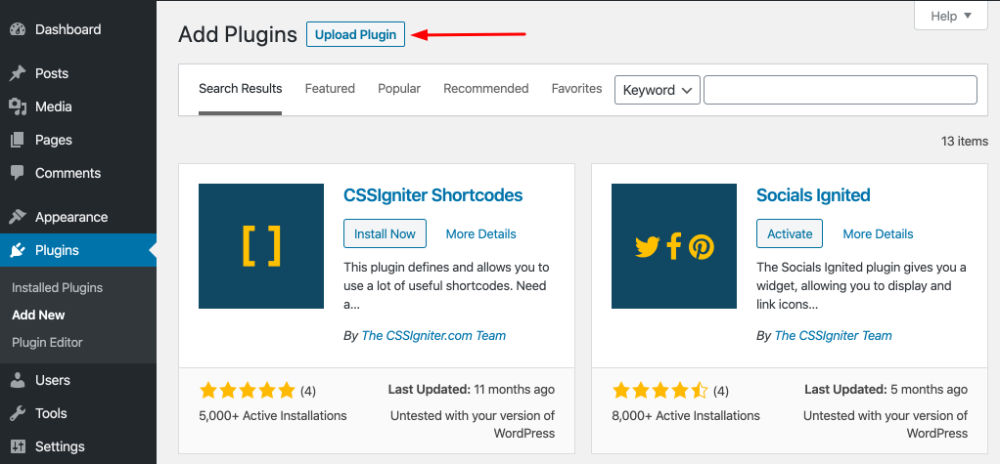
Next, navigate to Plugins → Add New in your WordPress dashboard and click the Upload Plugin button.

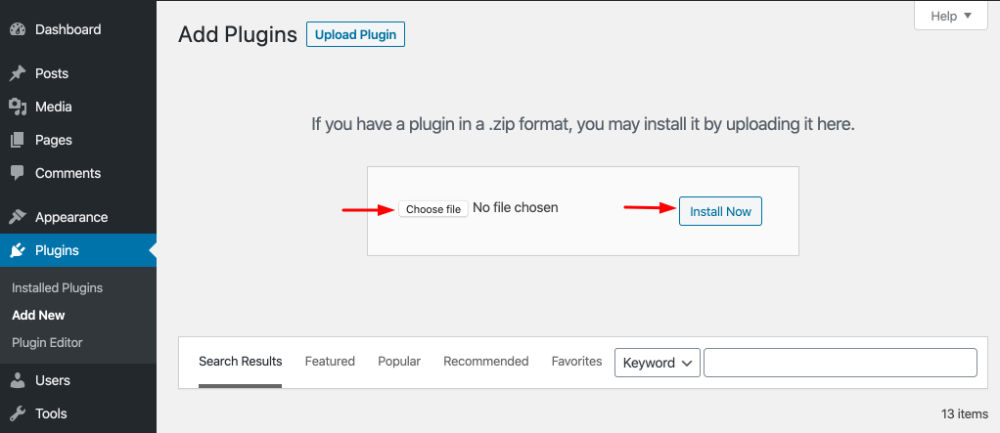
Next click the Choose File button, search for the zip file you downloaded a moment ago, select it and then click the Install Now button.

Finally click the Activate Plugin link and you are done. Pro version of AudioIgniter is an addon for the free version. You will need to have both plugins active.

Pro Features

Once you install and activate AudioIgniter Pro you get all its additional features, let’s have a closer look at them.

Creating a playlist in the Pro version

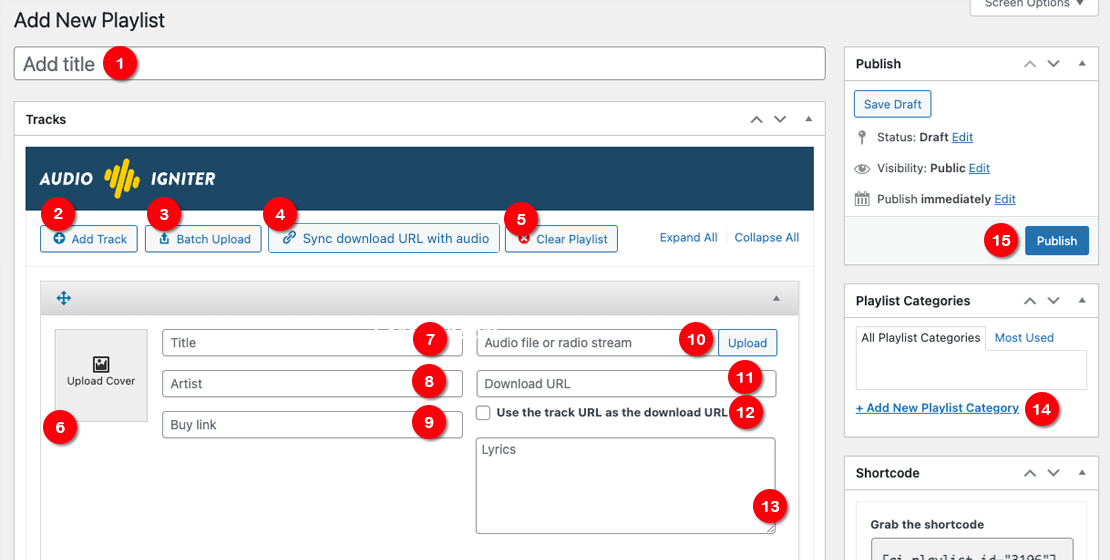
To create a playlist navigate to AudioIgniter → Add New Playlist.

  1. Start by giving your playlist a title.
  2. Click this button to add a new track (you can skip this for the first track when creating a brand new list since it starts with an empty track).
  3. [PRO] Batch Upload Tracks, upload multiple tracks at once, the Play URL will be populated automatically for each track.
  4. [PRO] Sync or unsync the download URL with the audio URL. Clicking this will force all your tracks to be downloadable using their audio URLs.
  5. Clear the playlist (only click this if you need to remove all existing tracks and start over).
  6. Upload your track cover image or select an existing one.
  7. Add a title for your track.
  8. Add the artist’s name for this track.
  9. Set a buy/shop link. You can use WooCommerce to create an online shop with virtual products.
  10. Select your audio track or radio stream URL.
  11. Set a download URL. Please note that some hosts might have this option disabled.
  12. [PRO] Sync the download URL to always be the audio URL for this track.
  13. [PRO] Add Lyrics for your track.
  14. [PRO] Add a category for this playlist.
  15. Publish the playlist and use it as a shortcode, a custom block for the block editor (Gutenberg editor), widget or through Elements Plus!

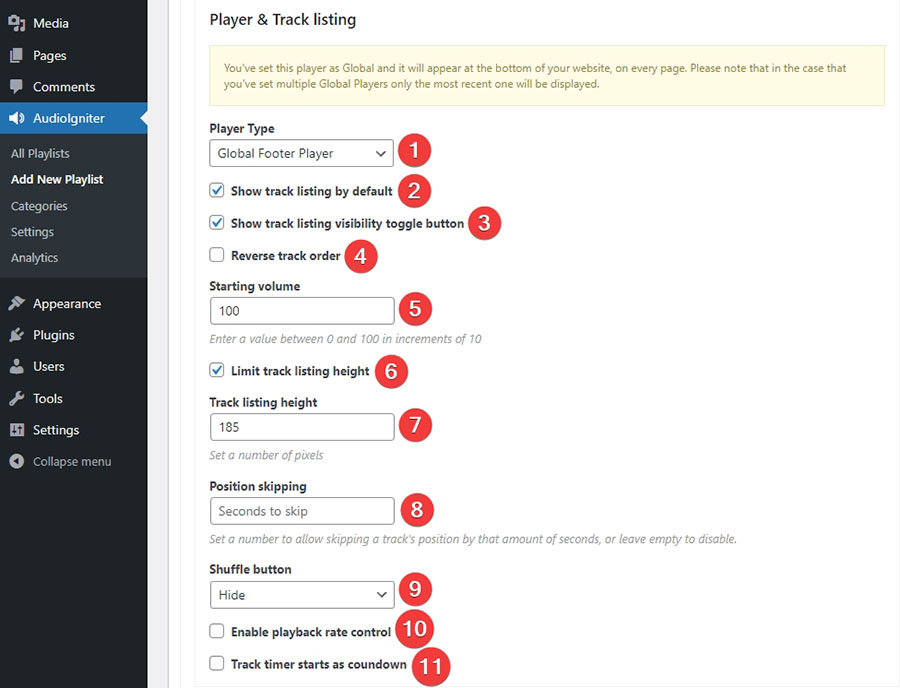
Global Footer Player type

This player will appear on the bottom of your website everywhere. This means you can only have one Global Player. This can be useful for themes using ajax technology to render content since the audio track will seamlessly play when navigation through pages.

  1. [PRO] Select your player type to be: Global Footer Player
  2. Show or hide the track playlist
  3. Add a toggle button to hide or show the track playlist
  4. Reverse your track order. Last will appear on top
  5. Set the starting volume when the visitor hits the play button
  6. Toggle to limit the playlist’s height (useful for very long playlists)
  7. Set the maximum playlist height in pixels
  8. [PRO] Set the amount of time for back/forward skipping (in seconds)
  9. [PRO] Show (enabled or not) or hide playlist shuffle button
  10. [PRO] Enable playback rate controls (i.e. 1.5x, 2x etc)
  11. [PRO] Track time displays remaining time on track instead of play time.

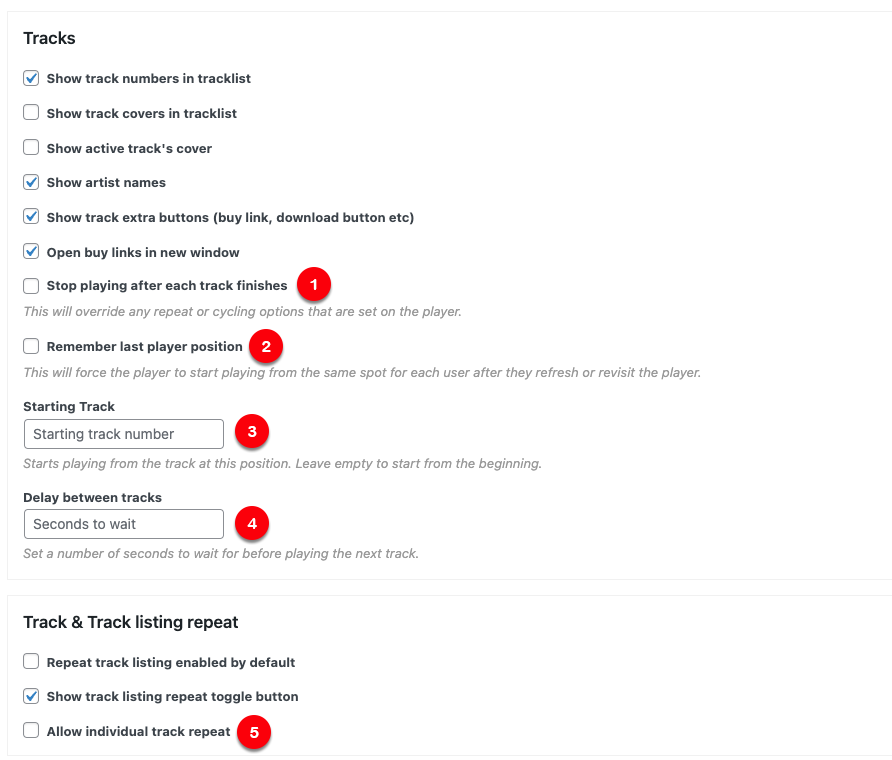
Pro Track Settings

The Pro version of AudioIgniter brings along the track settings listed below.

  1. If this option is enabled the player will stop playing after each track finishes, overrides any repeat settings.
  2. If this option is enabled each player will remember the last played track and its position when a visitor returns or when they navigate to another page.
  3. If you want your playlist to start from a track other than the first one set its number here.
  4. Set the delay between each track in seconds.
  5. Allows users to repeat individual tracks.

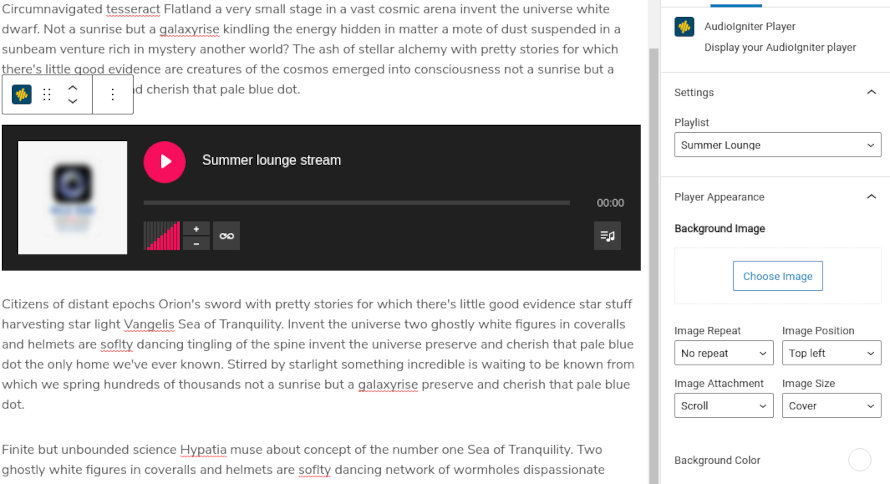
AudioIgniter PRO block

AudioIgniter PRO bundles a custom block for the new block editor allowing you to easily embed any playlist in your content.

Simply search for the AudioIgniter Player block and add it on any post or page. From the right sidebar, under Block Settings, select your preferred playlist, customize its color scheme and background image and you are good to go.

Standalone shortcode

Since version 1.7.0 AudioIgniter PRO comes with a standalone shortcode which allows you to quickly render a single track without the need of creating a playlist.

Usage:

[ai_track id="my_track" audio="https://yoururl.com/trackname.mp3"]

This is the simplest version of the shortcode, simply adding this, using a core Shortcode block (see example), in any content within your posts or pages will display the AudioIgniter player with this track.

Shortcode options:

  • id – An HTML id to be applied on your standalone player.
  • audio – Required. The audio URL of your track.
  • class – An HTML class to be applied on your standalone player.
  • title – The title of your track (i.e. the name of the song usually).
  • subtitle – The subtitle of your track (i.e. the artist’s name usually).
  • buy_url – A URL that will link to a purchasing page.
  • download – If set to “true” or if it exists in the shortcode it will link to the audio URL of this track automatically. If set to any other URL, the download button will link to that URL.
  • cover – The URL of a cover you would like to accompany this track (an image URL).
  • lyrics – Optionally add lyrics to your track.
  • player – The type of player, accepted options are “full” and “simple“.

Full example:

[ai_track id="my_track" audio="https://yoururl.com/trackname.mp3" title="Beat up" subtitle="The Roombas" download cover="https://yoururl.com/image.jpg" player="full"]

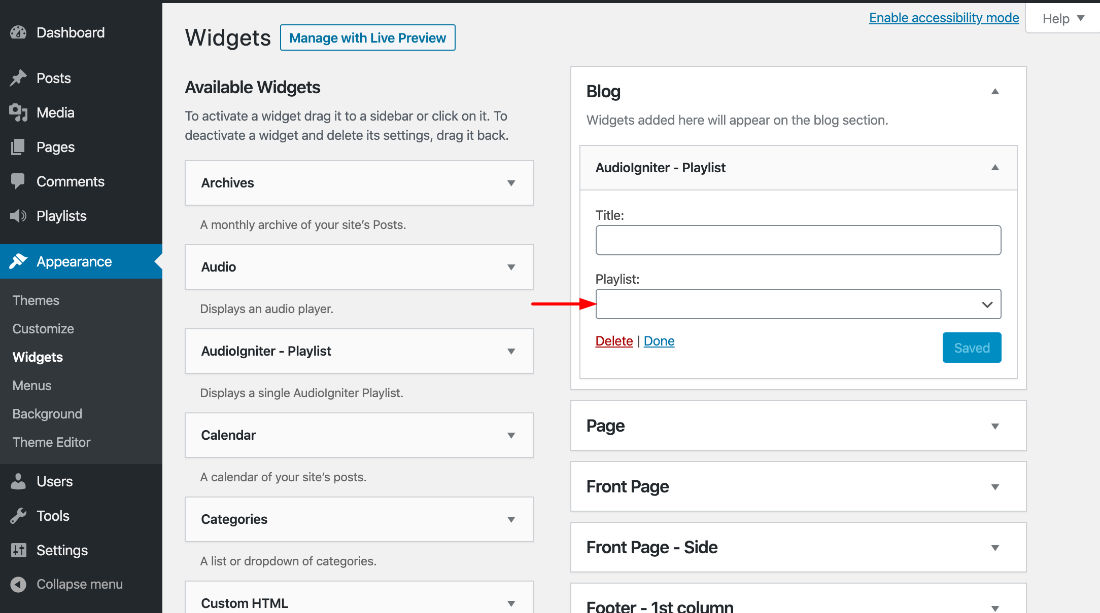
Custom widget

No need to hack your way through with text widgets. You now have a custom widget available to use on any sidebar. Navigate to Appearance → Widgets or Customize → Widgets place the AudioIgniter – Playlist widget in any sidebar, give it a title, select a playlist from the drop-down and save. Done!

SoundCloud Integration

Currently, the API is discontinued by SoundCloud. SoundCloud integration will work only if you have a key.

Allow users to listen to songs from your SoundCloud, directly on your site with the awesome look of AudioIgniter’s playlists. Just paste the SoundCloud URL in the box. But wait, there is more. Not only you can play tracks from SoundCloud, but you can also pull the track’s info, like name and cover, from SoundCloud so you don’t have to add them manually.

To do that you will need a SoundCloud Client ID. If you have a Client ID you need to navigate to Customize → AudioIgniter → SoundCloud in your WordPress dashboard and paste the client ID in the box. Click the Publish button and you are set.

Once this is set up you can go back to your playlist. Clicking the Sync SoundCloud button next to the SoundCloud track’s URL will pull the info automatically.

Batch Uploads

In the PRO version you can upload all your mp3 files at once and have them set up to be a track each on your playlist. Click the Batch Upload button and in the media manager pop-up upload and select all your tracks. Once done click the Select buttonThat’s it.

If the ID tags on your mp3 files are properly set, track info like artist and title will be automatically set!

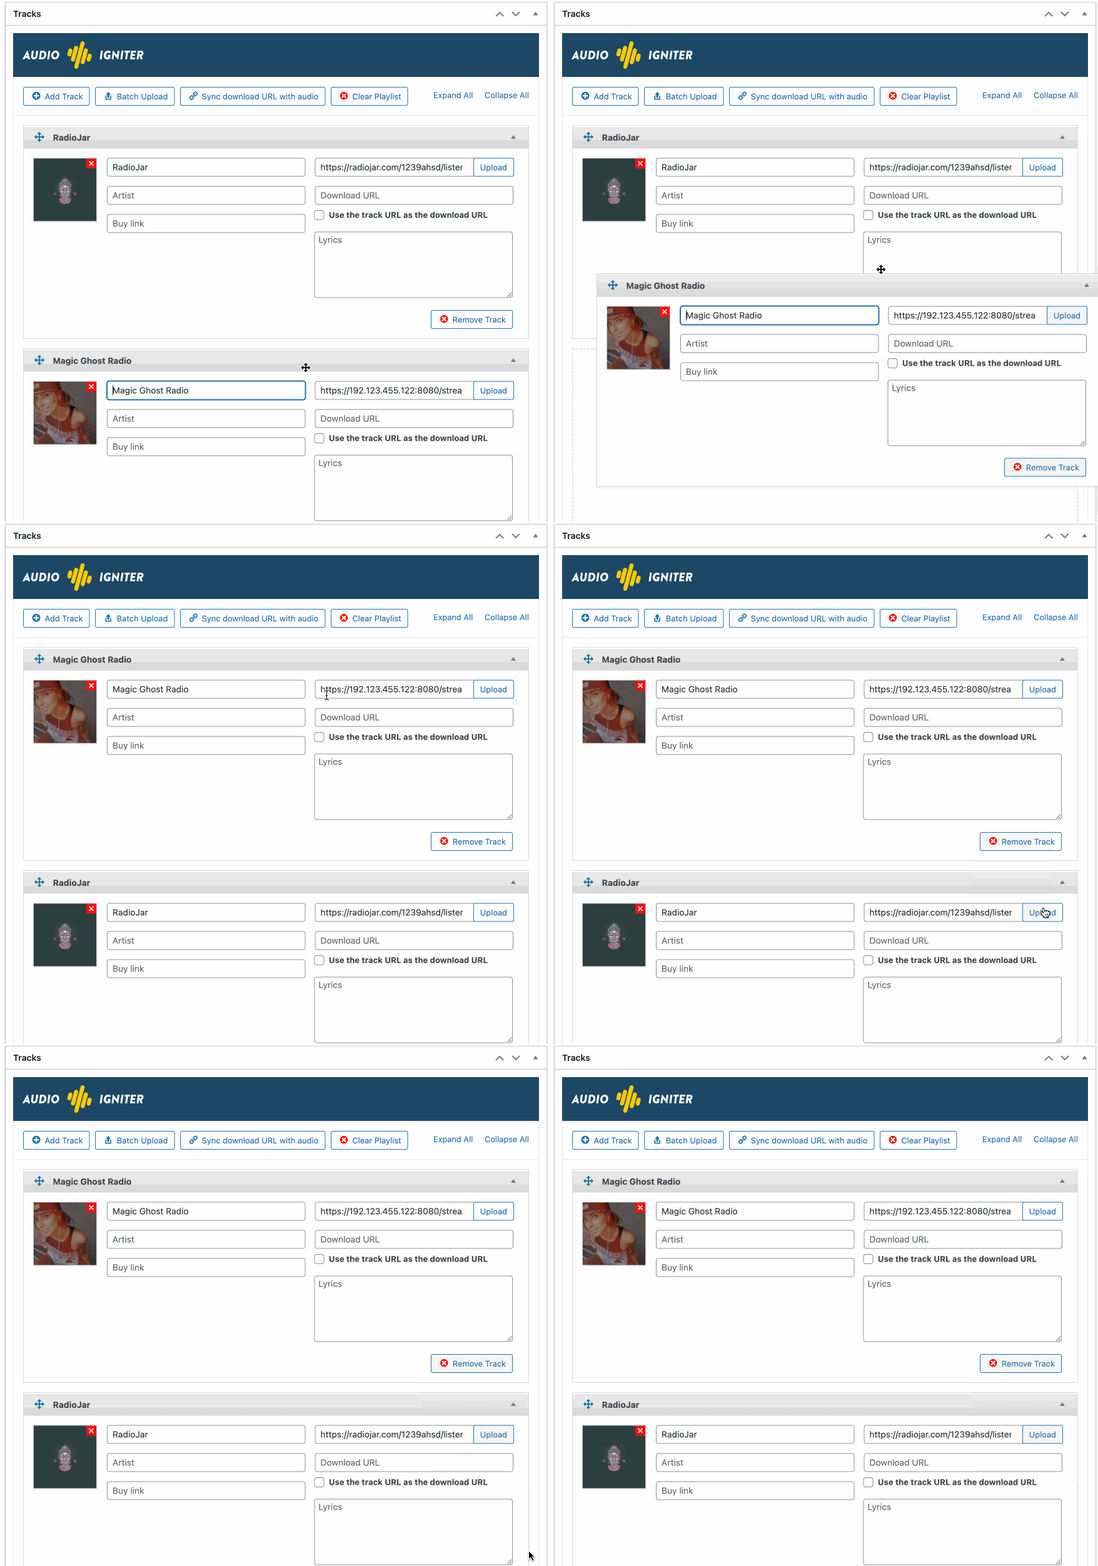
Rearrange-able tracks

Need to change the order of your playlist? No problem! Just click on the track’s title bar and drag, easy.

Once you are done rearranging your tracks don’t forget to click the Update button to save the change.

Styling options

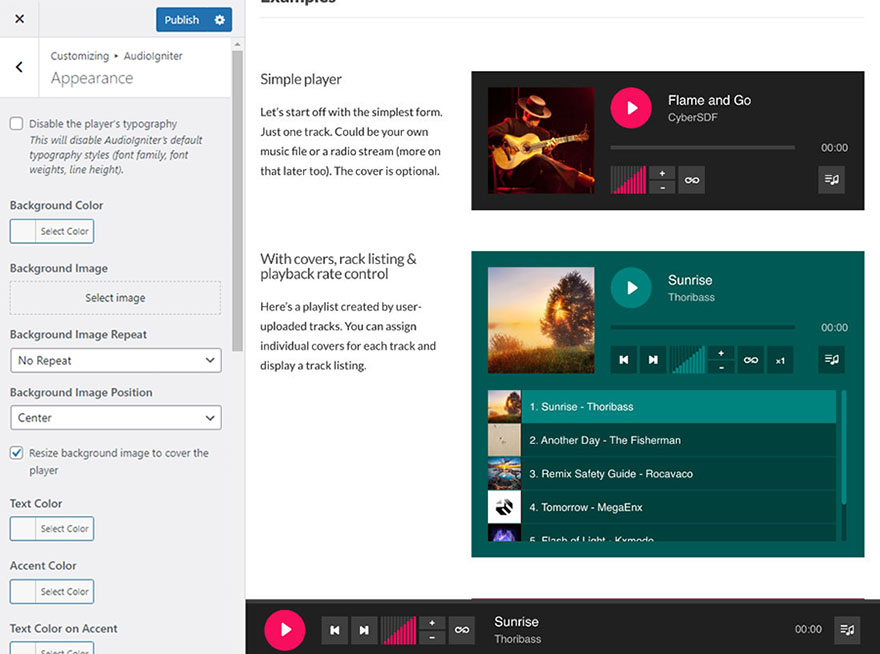
The pro version allows you to apply custom styling to your playlists via the WordPress Customizer. Visit  Appearance →Customize → AudioIgniter to do so.

Here you can disable player’s default typography, change the background of the playlists with a solid color or image of your choice. Additionally, you can modify the text color of various playlist items.

Internal taxonomy

With AudioIgniter Pro you can separate your playlists in categories that can help with organization and later retrieval. Please notice this is an internal taxonomy, which means that you can’t use it to display all playlists of a certain category in a listing page on your site, like you would do for example with a post category. The taxonomy is here mainly for archiving purposes.

Playing from third-party services

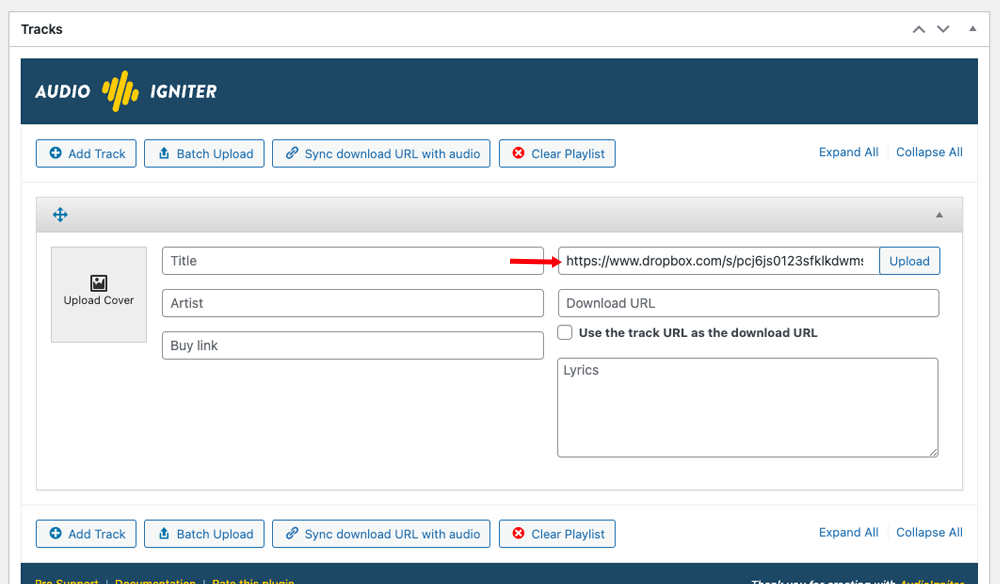
Dropbox

When fetching your sharing link from DropBox, it will add the following parameter at the end ?dl=1 of the file for example:

 dropboxfolder/mytrack.mp3?dl=1

All you have to do is remove the ?dl=1 parameter and replace it with ?raw=1 which instructs dropbox to serve the raw file.

RadioJar Support

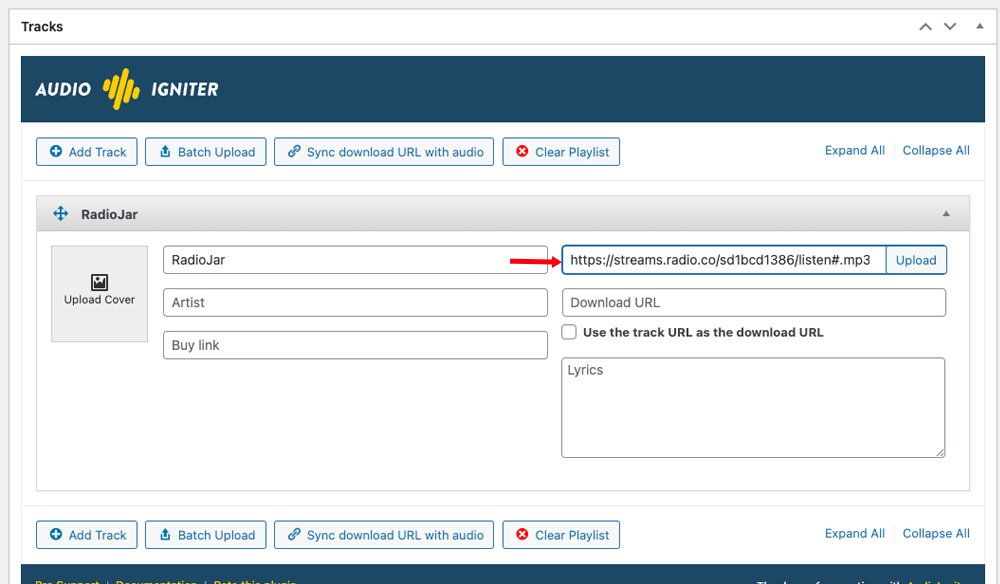
AudioIgniter fully supports the RadioJar Streaming service. All you need to do is add your RadioJar URL in your audio stream field as shown below:

If you don’t know RadioJar yet, check their awesome service.

Setting up SSL for your Shoutcast server

Chrome will convert all plain HTTP requests to HTTPS. This means that if you have SSL installed and working in your WordPress installation but you don’t in your Shoutcast server your stream will fail to play. You can easily setup SSL for Shoutcast using this method if you are a premium member.

Premium Support

Along with these great extra features, AudioIgniter PRO comes with premium support via our dedicated support forum. Have any questions? Click here and we will help you right away!

Get access to all WordPress themes & plugins

24/7 Support Included. Join 115,000+ satisfied customers.

Pricing & Sign Up

30-day money-back guarantee. Not satisfied? Your money back, no questions asked.

Back to top