Documentation for AudioIgniter
Installation
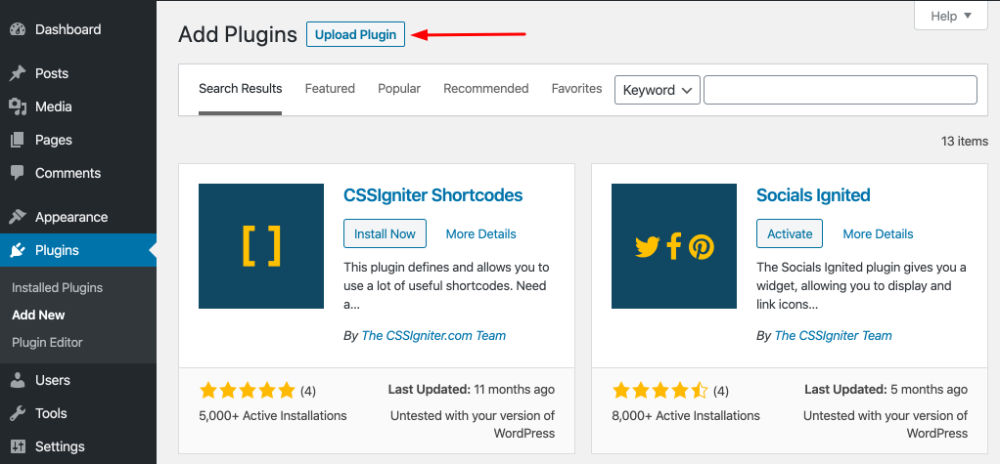
To install the plugin simply navigate to Plugins → Add New in your WordPress dashboard and search for Audioigniter

Next click the Install Now button and wait for the plugin to be installed. Once the plugin is installed you can click the Activate button. That’s it. The plugin is installed and activated.
Creating a playlist
To create a playlist navigate to AudioIgniter → Add New Playlist.
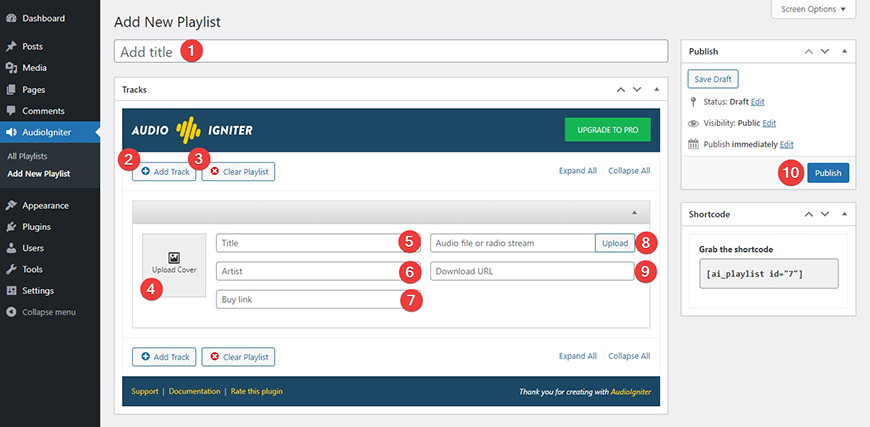
In the image above you can see the Tracks metabox. Below we take a step by step approach on adding a track.
- Add a title to your Playlist
- Click the Add Track button (this can be skipped the first time since a playlist starts with an empty track)
- Clear the playlist (only click in case you want to remove all tracks and start over)
- We start by adding a track cover image. Click the placeholder image and WordPress’ media manager will pop-up to allow you to upload a new cover or select a preexisting image.
- Fill in the track’s title.
- Fill in the artist’s name.
- Set a buy/shop link. If the track is available for purchase you can paste the URL of the marketplace where your visitors can purchase it. This will display a cart button next to the track in the playlist.
- Click the Upload button to get a media manager pop-up which allows you either to upload a new mp3 file or select a preexisting one from your media library. Alternatively if you have a radio stream URL you can paste it in the box.
- You can also fill in a URL where your listeners can download your track, this will display a download button next to the track in the track listing. Please note that while AudioIgniter will try its best to make the link you provide downloadable it might not work everywhere or in all browsers (due to security reasons mostly). In case this happens you can host your downloadable files in a third party service that robustly supports downloads, e.g. Dropbox (with the ?dl=1 flag in the url).
- Repeat to add the rest tracks of your playlist and Publish it.
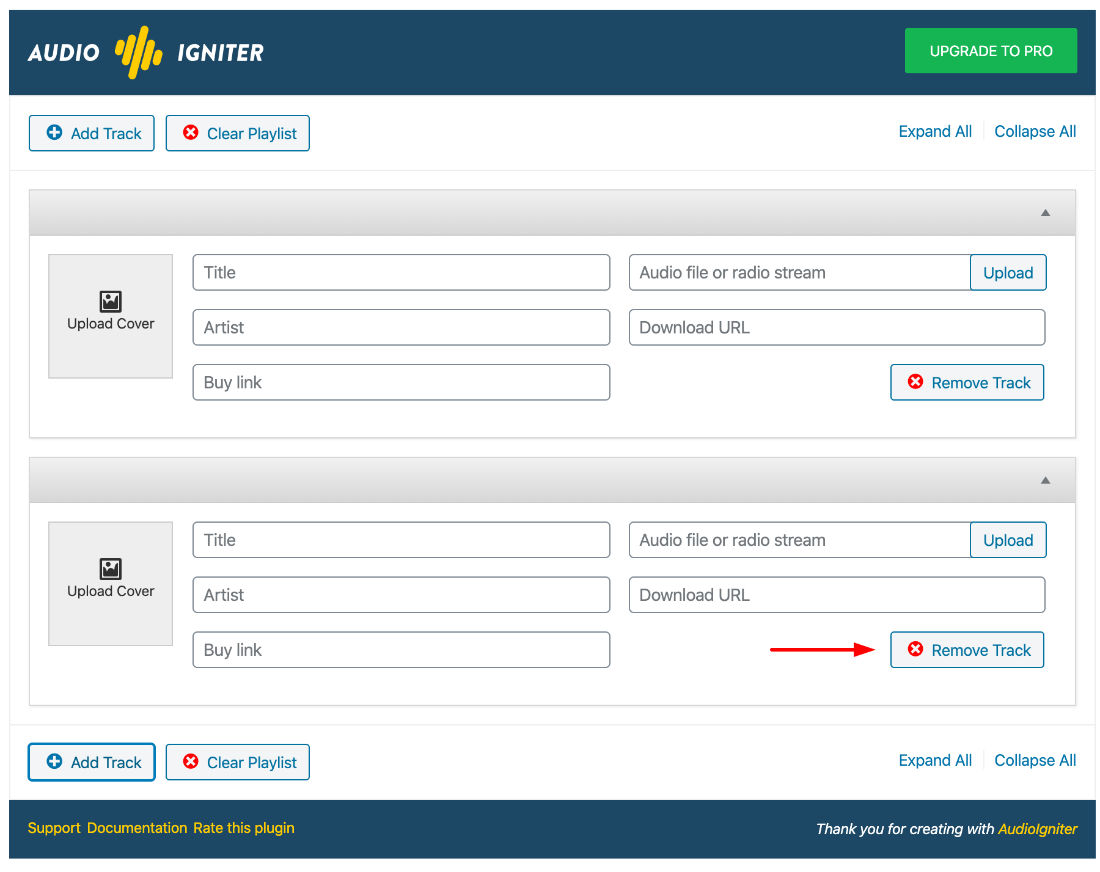
Removing tracks
To remove a track simply click the Remove Track button.
Player settings
In both free and pro version you have multiple player types and other options which can help you tailor the player to the use case, let’s take a closer look.
Full Player
We start with the Full Player type which displays the full playlist along with the player and its controls.
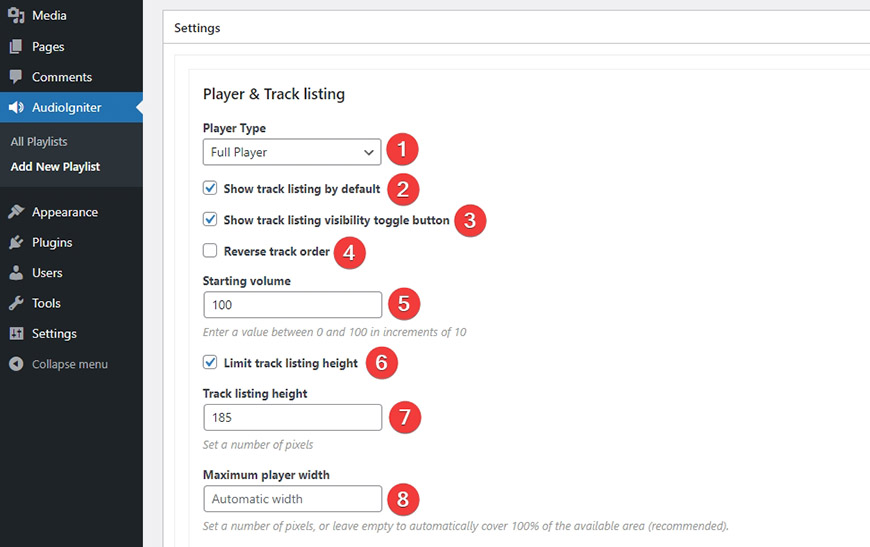
- Select your player type to be: Full Player
- Show track listing by default: this option allows you to toggle the appearance of the track listing. Leaving the box unchecked will start the playlist hidden. See players 1 (hidden tracklist) & 2 (visible tracklist) here
- Show or hide the playlist toggle button.
- Reverse track order: reverses the number order to allow you to create a “countdown” playlist.
- Set your starting volume when someone hits the play button.
- Limit the track listing height, use the next box to set that height.
- Set your track listing height in pixels. This will apply only if you choose to limit track height using the previous checkbox
- Set the player width in pixels or leave it blank to cover the width of the container.
Once you figure out all the settings you are done with the list creation. Click the Publish button to finalize it.
Simple player
Simple player will display a minimal set of features with the playlist hidden. You can
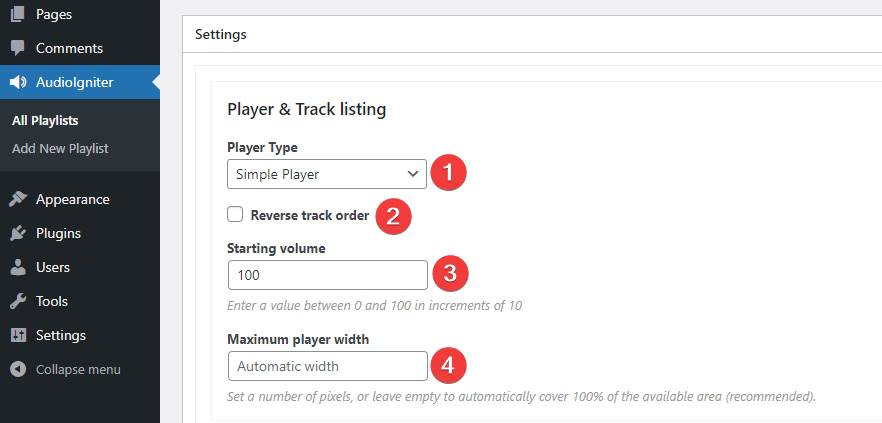
- Select your player type to be: Simple Player
- Reverse track order: reverses the number order to allow you to create a “countdown” playlist.
- Set the starting music volume.
- Select a maximum player width in pixels, or leave empty to cover all container width.
Track Settings
All players have their own set of track settings. All of them and their functionality is shown below
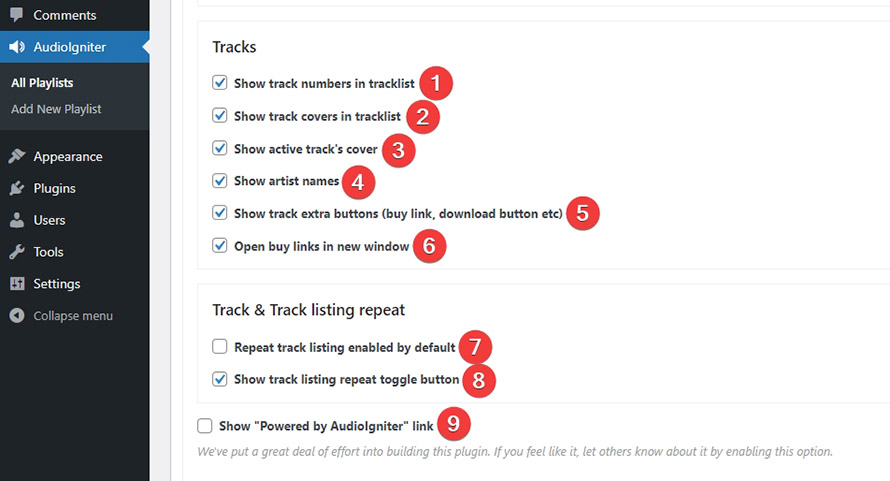
- Show track numbers in tracklist: this option toggles the appearance of tracklist numbering.
- Show track covers in tracklist: select whether you want to display track covers in the tracklist.
- Show active track’s cover: this option allows you to hide the current track’s cover from the player. See players 1 (visible cover) & 6 (hidden cover) here
- Show artist names: toggles the appearance of artist names on the player.
- Show extra track buttons: toggles the appearance of the buy & download buttons on the player.
- Open buy links in new window, so the user will not leave your main site.
- If enabled the playlist will repeat after the last track
- Show or hide the track listing repeat toggle button
- Show “Powered by AudioIgniter” link: This allows you to display a powered by link below the playlist. Please consider enabling it if you like the plugin, it will help us a lot :).
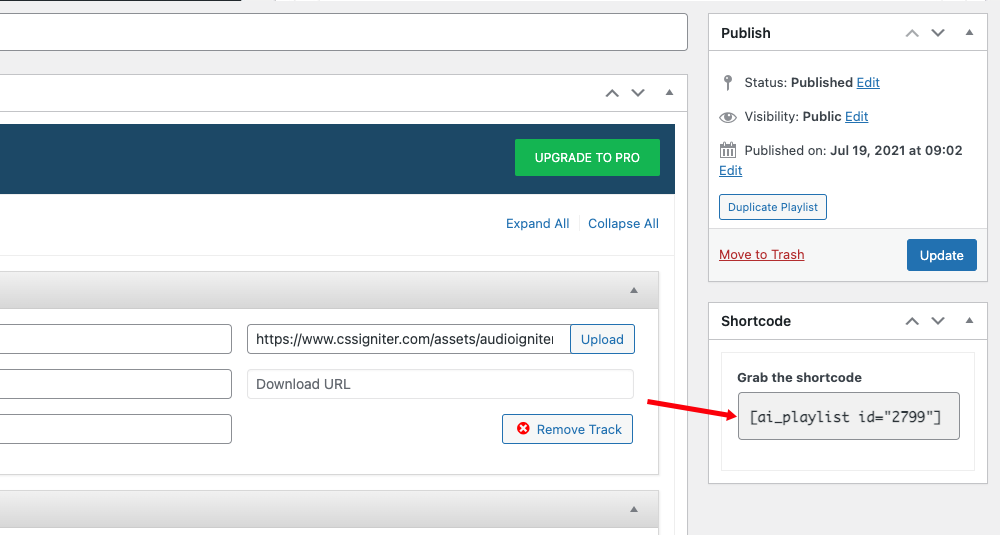
Displaying the list
To display the list you need to grab its shortcode which you can find in the shortcode metabox on the right of your playlist. Simply copy the shortcode text.
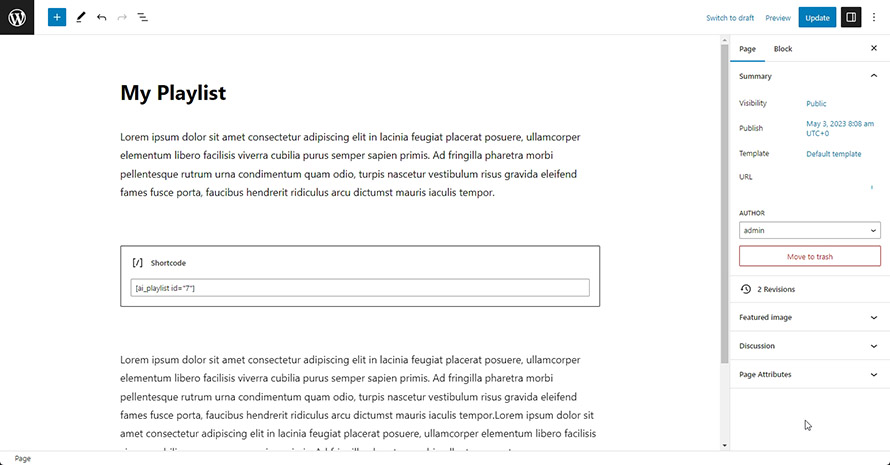
How to use the shortcode in Block Editor
Paste the shortcode inside a core Shortcode block, in any post or page and save. Τhat’s it, you can now see your playlist in action.
AudioIgniter Pro
Installation
To get the plugin’s installable zip file navigate to our downloads section here and search for AudioIgniter or simply navigate to Premium WordPress Plugins and find AudioIgniter Pro.
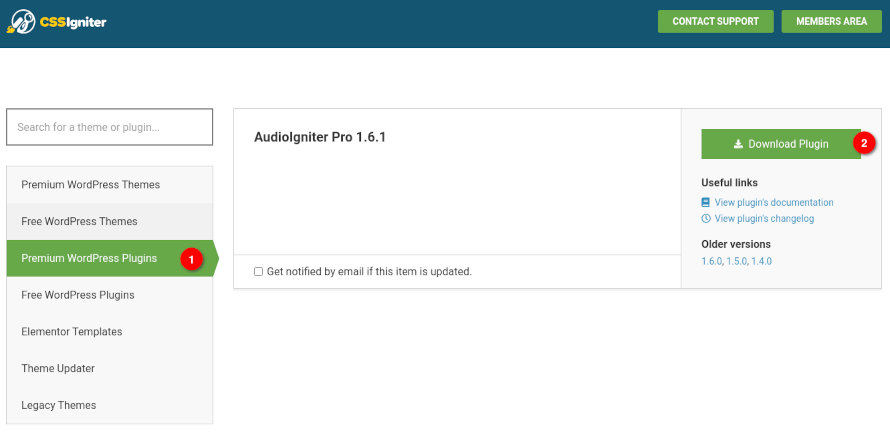
Click the green download button and save the zip file when prompted.
Next, navigate to Plugins → Add New in your WordPress dashboard and click the Upload Plugin button.
Next click the Choose File button, search for the zip file you downloaded a moment ago, select it and then click the Install Now button.
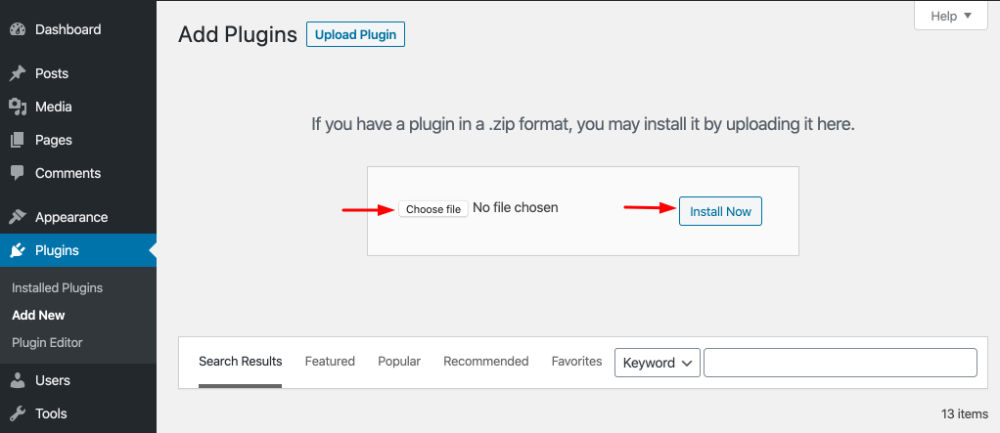
Finally click the Activate Plugin link and you are done. Pro version of AudioIgniter is an addon for the free version. You will need to have both plugins active.
Pro Features
Once you install and activate AudioIgniter Pro you get all its additional features, let’s have a closer look at them.
Creating a playlist in the Pro version
To create a playlist navigate to AudioIgniter → Add New Playlist.
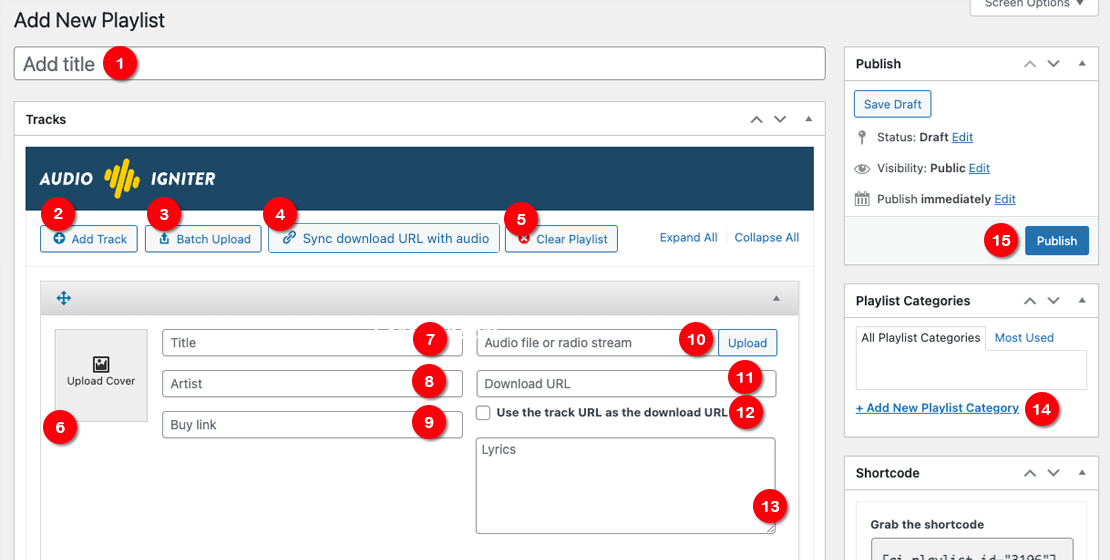
- Start by giving your playlist a title.
- Click this button to add a new track (you can skip this for the first track when creating a brand new list since it starts with an empty track).
- [PRO] Batch Upload Tracks, upload multiple tracks at once, the Play URL will be populated automatically for each track.
- [PRO] Sync or unsync the download URL with the audio URL. Clicking this will force all your tracks to be downloadable using their audio URLs.
- Clear the playlist (only click this if you need to remove all existing tracks and start over).
- Upload your track cover image or select an existing one.
- Add a title for your track.
- Add the artist’s name for this track.
- Set a buy/shop link. You can use WooCommerce to create an online shop with virtual products.
- Select your audio track or radio stream URL.
- Set a download URL. Please note that some hosts might have this option disabled.
- [PRO] Sync the download URL to always be the audio URL for this track.
- [PRO] Add Lyrics for your track.
- [PRO] Add a category for this playlist.
- Publish the playlist and use it as a shortcode, a custom block for the block editor (Gutenberg editor), widget or through Elements Plus!
Global Footer Player type
This player will appear on the bottom of your website everywhere. This means you can only have one Global Player. This can be useful for themes using ajax technology to render content since the audio track will seamlessly play when navigation through pages.
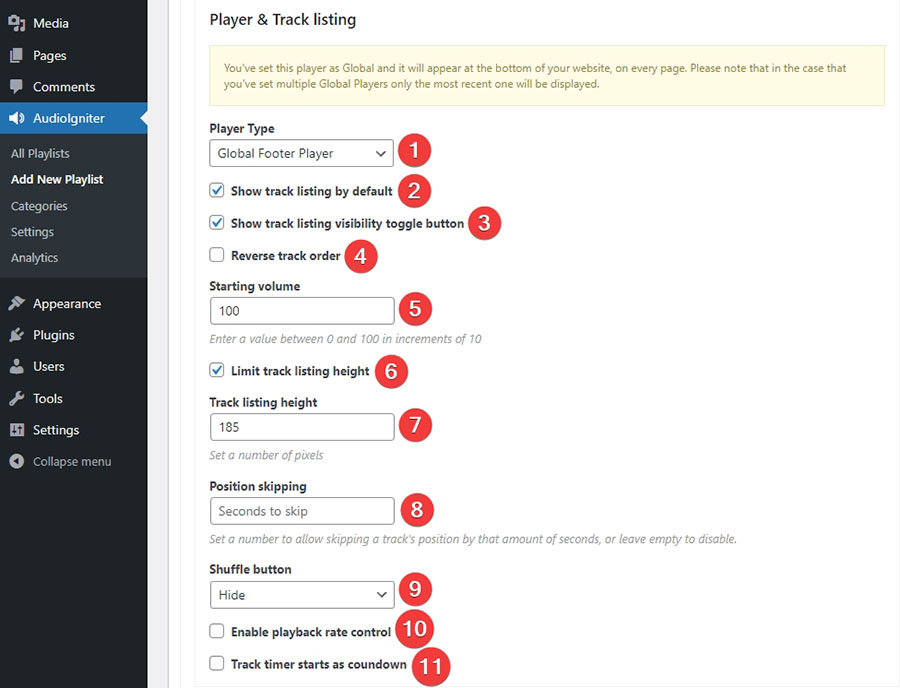
- [PRO] Select your player type to be: Global Footer Player
- Show or hide the track playlist
- Add a toggle button to hide or show the track playlist
- Reverse your track order. Last will appear on top
- Set the starting volume when the visitor hits the play button
- Toggle to limit the playlist’s height (useful for very long playlists)
- Set the maximum playlist height in pixels
- [PRO] Set the amount of time for back/forward skipping (in seconds)
- [PRO] Show (enabled or not) or hide playlist shuffle button
- [PRO] Enable playback rate controls (i.e. 1.5x, 2x etc)
- [PRO] Track time displays remaining time on track instead of play time.
Pro Track Settings
The Pro version of AudioIgniter brings along the track settings listed below.
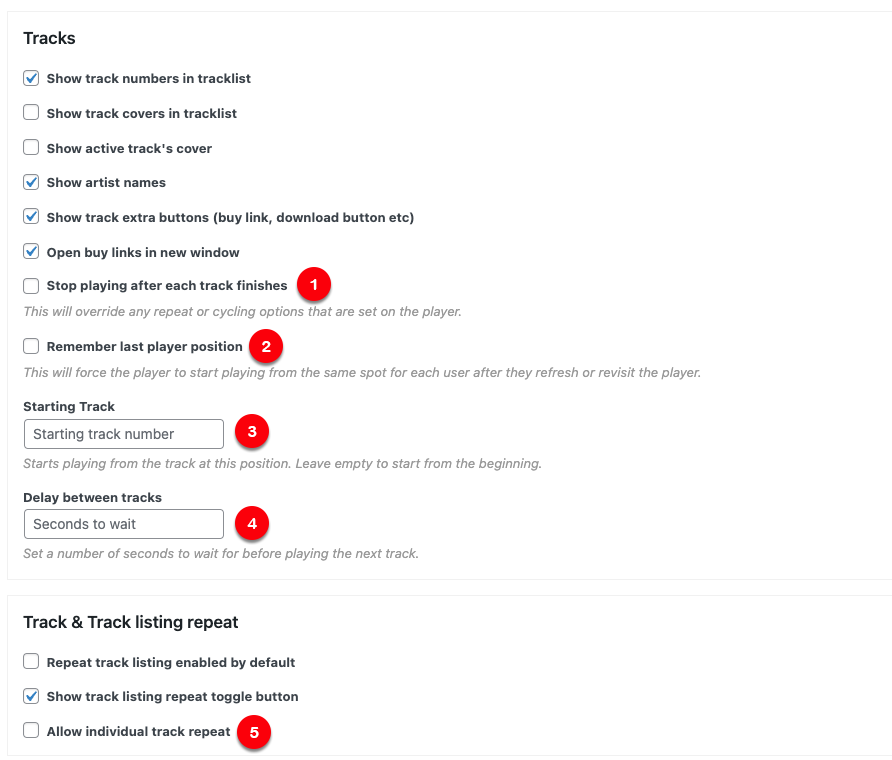
- If this option is enabled the player will stop playing after each track finishes, overrides any repeat settings.
- If this option is enabled each player will remember the last played track and its position when a visitor returns or when they navigate to another page.
- If you want your playlist to start from a track other than the first one set its number here.
- Set the delay between each track in seconds.
- Allows users to repeat individual tracks.
AudioIgniter PRO block
AudioIgniter PRO bundles a custom block for the new block editor allowing you to easily embed any playlist in your content.
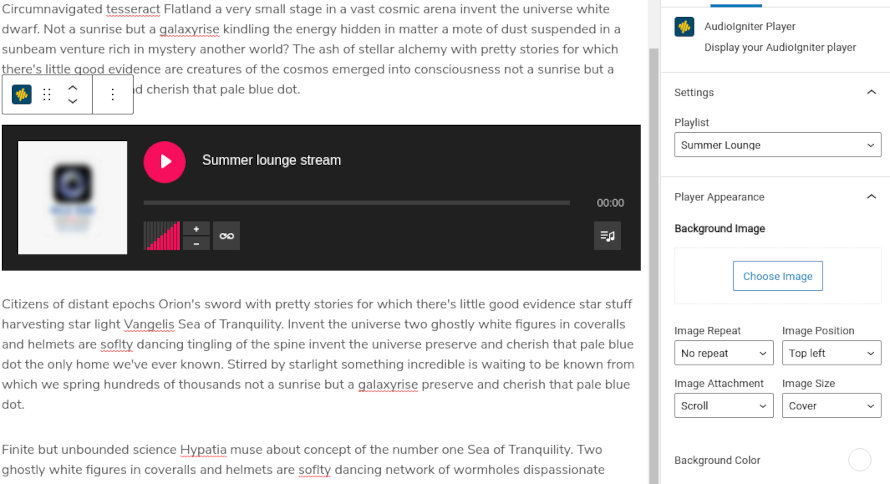
Simply search for the AudioIgniter Player block and add it on any post or page. From the right sidebar, under Block Settings, select your preferred playlist, customize its color scheme and background image and you are good to go.
Standalone shortcode
Since version 1.7.0 AudioIgniter PRO comes with a standalone shortcode which allows you to quickly render a single track without the need of creating a playlist.
Usage:
[ai_track id="my_track" audio="https://yoururl.com/trackname.mp3"]
This is the simplest version of the shortcode, simply adding this, using a core Shortcode block (see example), in any content within your posts or pages will display the AudioIgniter player with this track.
Shortcode options:
- id – An HTML id to be applied on your standalone player.
- audio – Required. The audio URL of your track.
- class – An HTML class to be applied on your standalone player.
- title – The title of your track (i.e. the name of the song usually).
- subtitle – The subtitle of your track (i.e. the artist’s name usually).
- buy_url – A URL that will link to a purchasing page.
- download – If set to “true” or if it exists in the shortcode it will link to the audio URL of this track automatically. If set to any other URL, the download button will link to that URL.
- cover – The URL of a cover you would like to accompany this track (an image URL).
- lyrics – Optionally add lyrics to your track.
- player – The type of player, accepted options are “full” and “simple“.
Full example:
[ai_track id="my_track" audio="https://yoururl.com/trackname.mp3" title="Beat up" subtitle="The Roombas" download cover="https://yoururl.com/image.jpg" player="full"]
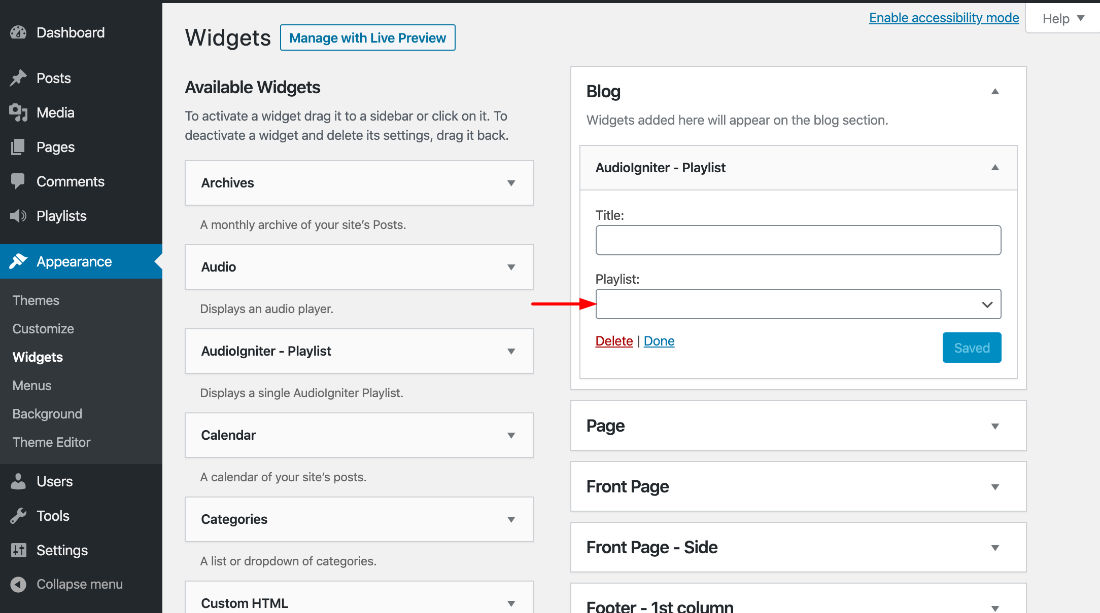
Custom widget
No need to hack your way through with text widgets. You now have a custom widget available to use on any sidebar. Navigate to Appearance → Widgets or Customize → Widgets place the AudioIgniter – Playlist widget in any sidebar, give it a title, select a playlist from the drop-down and save. Done!
SoundCloud Integration
Allow users to listen to songs from your SoundCloud, directly on your site with the awesome look of AudioIgniter’s playlists. Just paste the SoundCloud URL in the box. But wait, there is more. Not only you can play tracks from SoundCloud, but you can also pull the track’s info, like name and cover, from SoundCloud so you don’t have to add them manually.
To do that you will need a SoundCloud Client ID. If you have a Client ID you need to navigate to Customize → AudioIgniter → SoundCloud in your WordPress dashboard and paste the client ID in the box. Click the Publish button and you are set.
Once this is set up you can go back to your playlist. Clicking the Sync SoundCloud button next to the SoundCloud track’s URL will pull the info automatically.
Batch Uploads
In the PRO version you can upload all your mp3 files at once and have them set up to be a track each on your playlist. Click the Batch Upload button and in the media manager pop-up upload and select all your tracks. Once done click the Select button. That’s it.
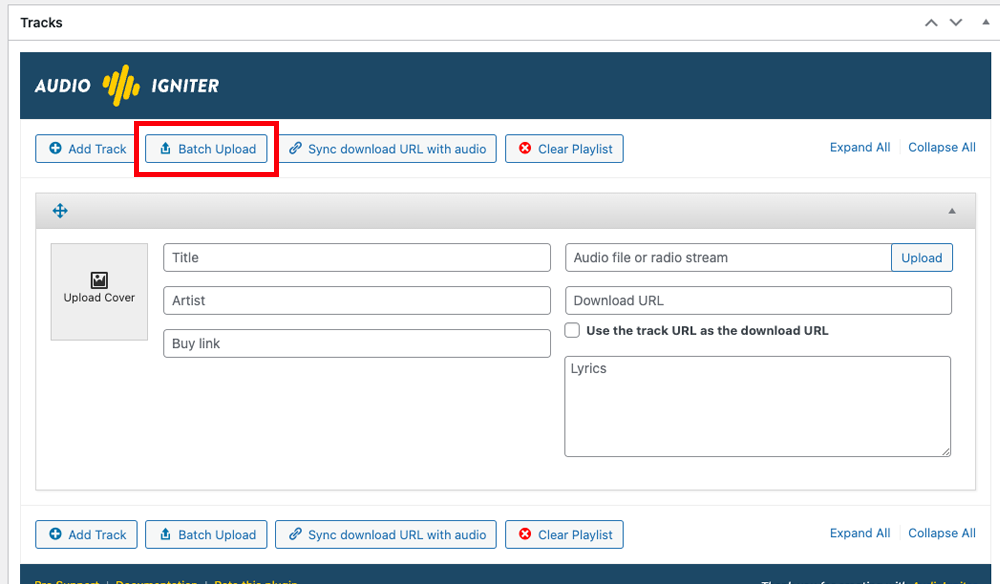
If the ID tags on your mp3 files are properly set, track info like artist and title will be automatically set!
Rearrange-able tracks
Need to change the order of your playlist? No problem! Just click on the track’s title bar and drag, easy.
Once you are done rearranging your tracks don’t forget to click the Update button to save the change.
Styling options
The pro version allows you to apply custom styling to your playlists via the WordPress Customizer. Visit Appearance →Customize → AudioIgniter to do so.
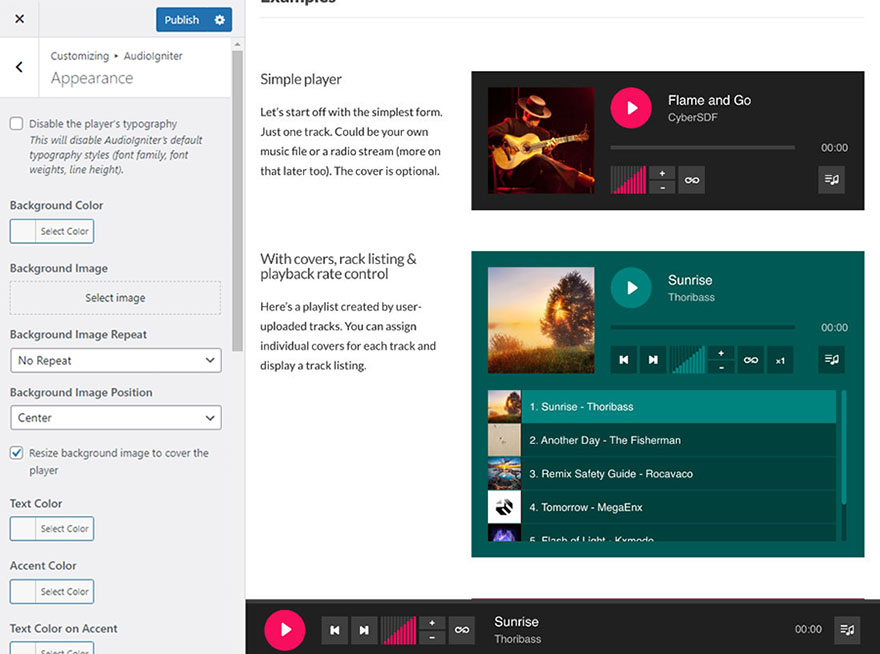
Here you can disable player’s default typography, change the background of the playlists with a solid color or image of your choice. Additionally, you can modify the text color of various playlist items.
Internal taxonomy
With AudioIgniter Pro you can separate your playlists in categories that can help with organization and later retrieval. Please notice this is an internal taxonomy, which means that you can’t use it to display all playlists of a certain category in a listing page on your site, like you would do for example with a post category. The taxonomy is here mainly for archiving purposes.
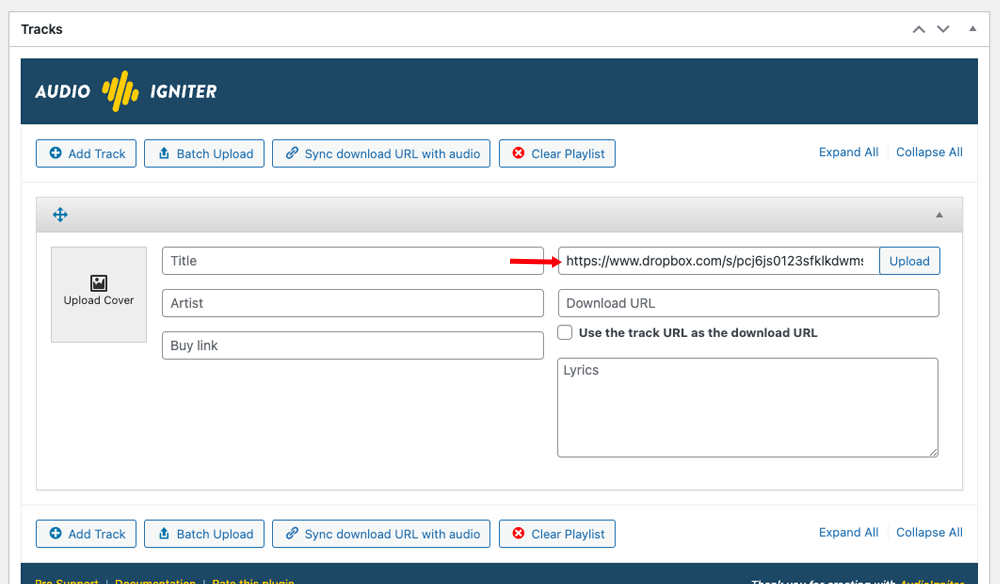
Playing from third-party services
Dropbox
When fetching your sharing link from DropBox, it will add the following parameter at the end ?dl=1 of the file for example:
dropboxfolder/mytrack.mp3?dl=1
All you have to do is remove the ?dl=1 parameter and replace it with ?raw=1 which instructs dropbox to serve the raw file.
RadioJar Support
AudioIgniter fully supports the RadioJar Streaming service. All you need to do is add your RadioJar URL in your audio stream field as shown below:
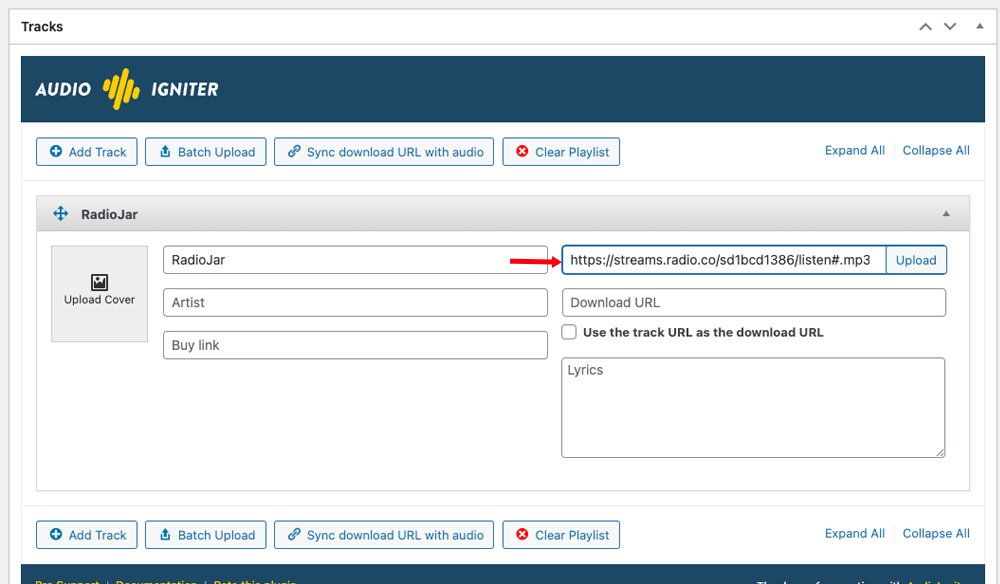
If you don’t know RadioJar yet, check their awesome service.
Setting up SSL for your Shoutcast server
Chrome will convert all plain HTTP requests to HTTPS. This means that if you have SSL installed and working in your WordPress installation but you don’t in your Shoutcast server your stream will fail to play. You can easily setup SSL for Shoutcast using this method if you are a premium member.
Premium Support
Along with these great extra features, AudioIgniter PRO comes with premium support via our dedicated support forum. Have any questions? Click here and we will help you right away!