Documentation for Potenza – Legacy
About
Potenza is a single page business theme for WordPress.
WordPress theme installation
The easiest way to install the theme, is by accessing your WordPress admin panel, then go to Appearance > Themes. Select the Install Themes tab and click the Upload link located just below the tab’s name. Click on Browse… and select the WordPress theme zip file you just downloaded. Then click the Install Now button, and after a few seconds, your new theme should be installed. Click activate and the theme is ready to use.
For a more detailed guide, please read here.
In order to install the theme manually, or in case you have trouble installing it through the admin panel, you have to unzip the WordPress theme’s zip file on your computer, and upload via FTP the resulting theme folder into your WordPress installation themes folder (wp-content/themes). Then, from the WordPress admin go to Appearance > Themes. The theme should be available in your themes list. Click activate.
Image Sizes
The minimum recommended image sizes for Potenza are:
- Post thumbnail: 850x500px
- Hero Image, used in the custom content widget: 750x550px
- Small Square (Team & Testimonials): 260x260px
- Slider Image: 1920x800px
- Blog Listing Square: 400x400px
- Clients Widget: 0x80px (at least 120px tall, not limited in width)
Useful Plugins
These plugins provide functionality and features used directly (or not) by the Theme. So, it is recommended to install and activate them before importing your sample content
- Contact Form 7 use this plugin to create a contact form, then copy the shortcode it gives you and paste it in a page which will serve as your contact page.
- One Click Import : Use this plugin to help you import your content with just one click.
Importing Sample Content using One Click Import
To automate the process of importing and for a better experience we have natively included support for OneClick Import Plugin. Let install it fist:
From your WordPress dashboard
- Visit ‘Plugins > Add New’,
- Search for ‘One Click Demo Import’ and install the plugin,
- Activate ‘One Click Demo Import’ from your Plugins page.
From WordPress.org
- Download ‘One Click Demo Import’.
- Upload the ‘one-click-demo-import’ directory to your ‘/wp-content/plugins/’ directory, using your favorite method (ftp, sftp, scp, etc…)
- Activate ‘One Click Demo Import’ from your Plugins page.
Once the plugin is activated you will find the actual import page in: Appearance > Import Demo Data.
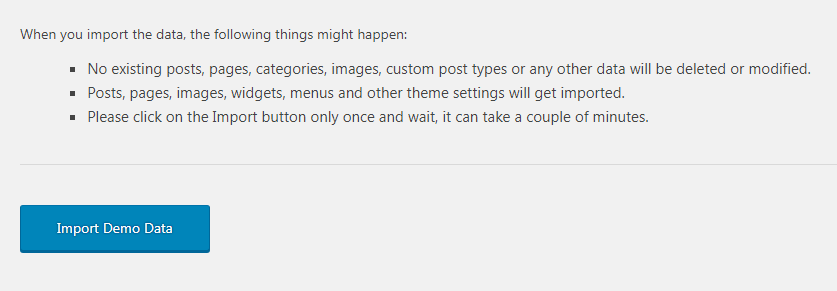
Click on the Import demo data button and you are done!
This plugin requires PHP version of at least 5.3.x, but we recommend version 5.6.x or better yet 7.x. Please contact your hosting company and ask them to update the PHP version for your site.
Setting up your theme
1) Creating theme pages
- Homepage: Create a page named Home and apply to it the Homepage Template from the page attributes panel on the right.
- Blog: This page will display your posts, apply the default template to it.
(TIP, all page titles serve as examples, you can name your pages according to your needs.)
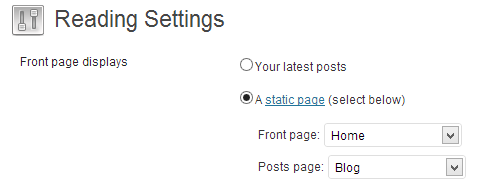
Once the pages are created, navigate to Settings > Reading and set the “Home” page to be your static frontpage and the “Blog” page as your posts page, as demonstrated in the image below.
2) Populating your blog
To add new posts to your blog, go to Posts > add new, title your post, enter the content in the editor, upload a featured image by clicking “Set featured image” on the Featured Image panel, add a category and/or tag to the post, if you so desire, from the respective panels and publish the post by clicking “Publish”.
3) Widgets
The entire front page of Potenza is built using widgets, we have built 9 custom widgets to help you do that. You can access them either by going to Appearance > Customize > Widgets or Appearance > Widgets.
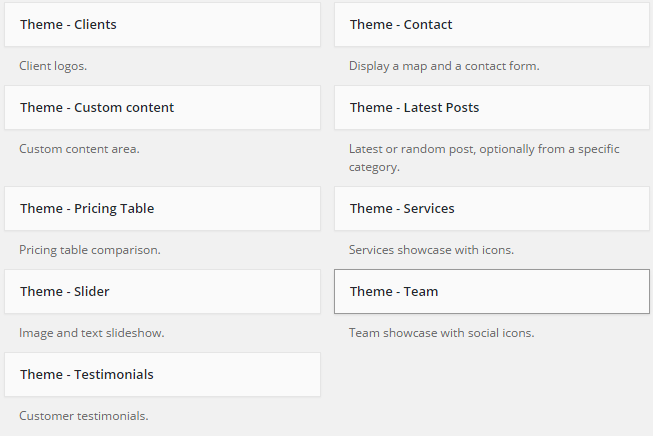
Let’s have a look how they work.
Theme – Slider
This widget will help you create slider items. Add the widget to the Homepage sidebar, select the slideshow speed and toggle the automatic slide functionality and press the Add Item button to add your first slide.
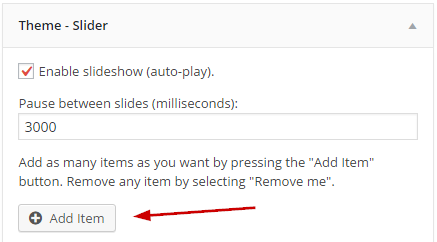
Fill in all the required information, like title, subtitle, button text and button URL and click the Select Image button to upload the slider image.
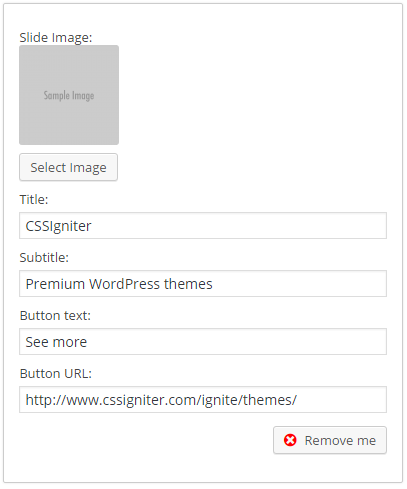
Next click the Add Item again to add another slide, continue as needed and once done click the save button.
Theme – Custom Content
This widget is built to help you add content to your front page, whether it is an introductory text, a bio or any other text you might want to include. Its functionality is pretty straight forward, you add the widget to the homepage sidebar, fill in all the info you need, click the Select Image button to upload an image (optional) and save the widget.

Theme – Services
Let’s see about displaying services next. Add the widget to the homepage sidebar, fill in the title, subtitle, select the text alignment and click the Add Item button.
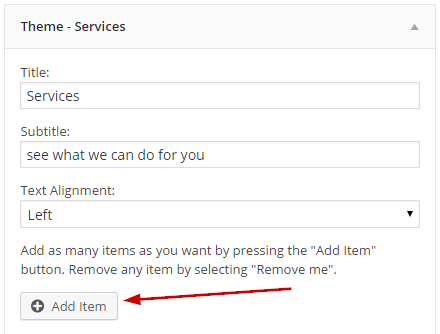
Give the service item a title, add the text, select an image for it from the Font Awesome set and proceed with adding your next service, once done, save the widget.
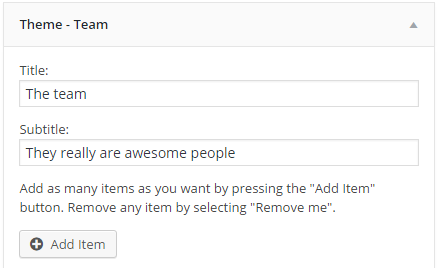
Theme – Team
Products do not create themselves so let’s introduce the people who did create them. Add the widget to the homepage sidebar, fill in title and subtitle and click the Add Item button.
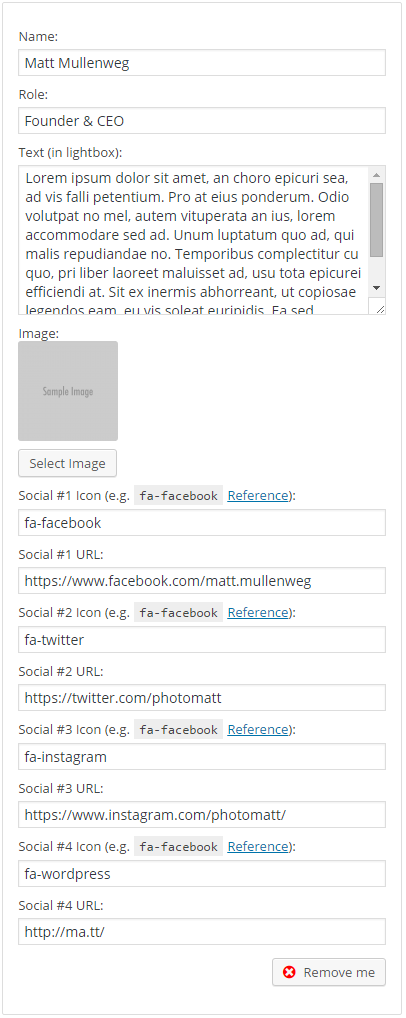
Next fill in all the relevant info for each team member. You can add name, title, a small bio which will appear when the team item is clicked and links to four social profiles. Images for the profiles are provided by the Font Awesome set. Add as many items as necessary and save the widget.
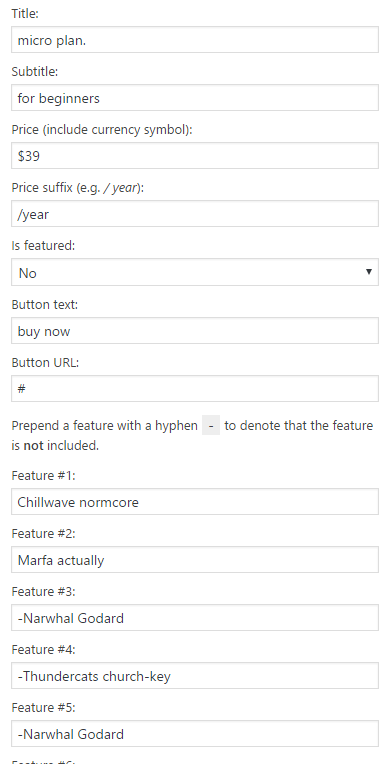
Theme – Pricing Table
To create a pricing table, add the widget to the homepage sidebar, fill in the title, subtitle and click the Add Item button
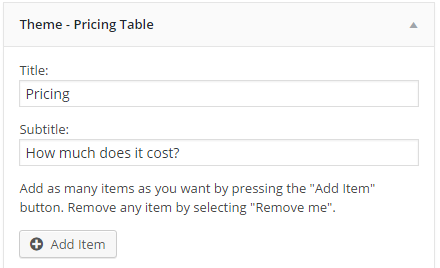
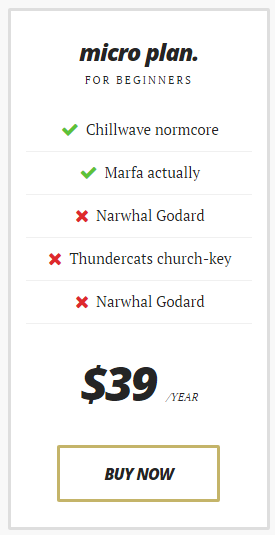
Set up the pricing item by filling all related information. Marking the item as featured will make it appear emphasized with a border surrounding it. You can add up to 8 features for each pricing item, placing a dash or minus sign before the text will display it as not available/included in the package.
this is how the above pricing item will look like
Theme – Clients
To display your clients on the front page, add the widget to the homepage sidebar, fill in the title, subtitle and click the Add Item button
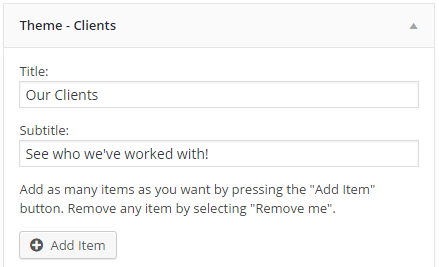
Upload your client’s logo as the image and provide the URL to their website, after you are finished adding the items, save the widget.

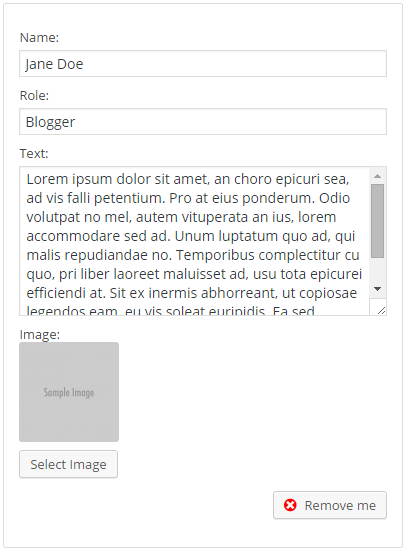
Theme – Testimonials
To display your testimonials add the widget to the homepage sidebar, fill in the title, subtitle and click the Add Item button
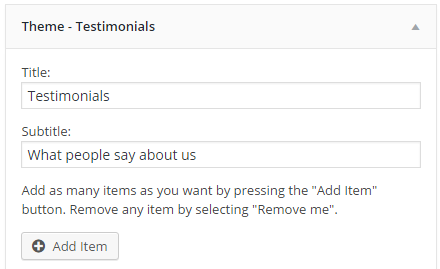
Upload the testimonial author’s image, their name, role and testimonial text. Once you have added all testimonials, save the widget.
Theme – Contact
Use this widget to let people know how they can get in touch with you. Add it to the homepage sidebar and fill in all the required info. Follow the instructions on the widget to help you find the coordinates of your location. The contact form shortcode can be provided by a contact form plugin such as Contact Form 7

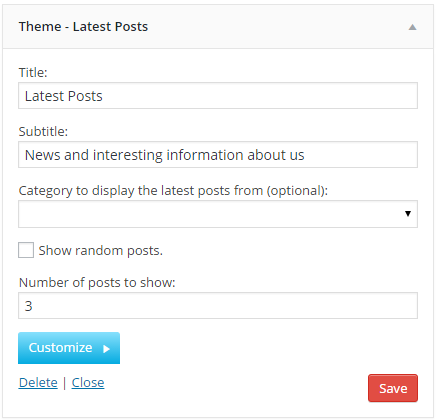
Theme – Latest Posts
Our last custom widget will allow you to display your latest blog posts. Add it to the homepage sidebar, fill in the required information and save it.
Customize the widget’s appearance.
At the bottom of each widget you will notice a blue button titled Customize. Clicking it will give you access to the widget customization panel.
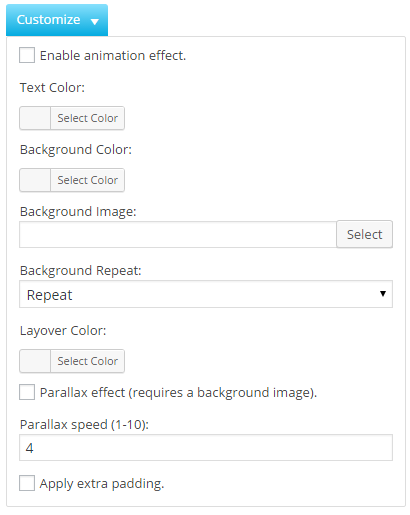
Here you can toggle animation effects for the widget, change text & background color, upload a background image with optional parallax effect, apply an overlay to the background image and add extra padding if you need your widgets more spaced out.
4) Customizing the appearance
All theme customization is done via WordPress’s built in customizer. If you haven’t used it or want to learn more about it, please read this article.
Go to Appearance > Customize and you will see this

TIP: any changes you make in the tabs below will be previewed live on the site which appears in right side of the screen, however to save these changes you need to click the Save & Publish button on the top of the bar, if you have made a change but see the button grayed out (for example changed the font size of a heading), move the cursor outside the input box, for example, to the next input box, then the button should be clickable again.
Let’s take a look at the options each tab gives you.
Header Options
Here you can toggle the tagline, sticky header and logo padding. Additionally you can modify the colors of various header elements.
Menus
Here you can create and assign menus to the theme. See below for more info on how to add items to your menu. To learn more about menu creation check out the Codex’s menu user guide here.
Site Identity
In this tab you can modify the site’s title, tagline, logo, footer logo and site icon.
Layout Options
Here you can toggle the blog sidebar, you can also configure the length of the automatic excerpt and choose between numbered and older/newer pagination.
Typography Options
Here you will find various options regarding the theme’s typography. You can change heading, body text and widget title sizes and toggle the capitalization of various elements.
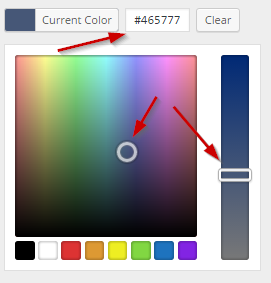
Content Colors
Are you looking to create your own unique color scheme? This tab will help you do it by allowing you to modify the colors of many elements of the content. To do that click the Select Color button and either use a hex color value in the box or use the palette to select a color.
Sidebar Colors
This tab will allow you to modify the colors of various sidebar elements to complete your custom color scheme.
Widgets
Through this tab you can add widgets to the theme’s sidebars.
Social Networks
Here you can fill in the URLs to your various social network profiles supported by the theme. These will appear on the footer automatically.
Posts Options
Here you can toggle various aspects of the single post, like the appearance of categories, tags, date, comments etc.
Footer Options
Customize the theme’s footer by changing its color scheme and toggling the social icons and adding your copyright text.
Static Front Page
If you don’t wish to have your latest posts on the front page and wish to display static content using a normal page, or want to use the looks template as your front page, you can do so here. Set the desired page as your static front page and save.
Static Front Page
Here you can change the default titles for the search results & 404 pages.
Other
In this tab we host the custom CSS panel which you can use to insert styles for elements not covered in the rest of the tabs, additionally you will find input boxes where you can place your Google Analytics tracking ID and Google Maps API key (if necessary).
5) Populating your menu
Once done adding the widgets to your homepage you will need to create a menu. To do that navigate to Appearance > Customize > Menus and create a menu.
- Check the box to make the menu your theme’s Main Menu
- Click the Add Items button
- Expand the Custom Links tab
- You will see that there are links to each of your widgets here, select one
- Click the Add to menu button
Repeat steps 4 & 5 until all your widgets are added to the menu. Click the Save/Save & Publish button on the top of he customizer panel to save the menu.

How to use the page builder template
The theme comes bundled with a page builder template which allows you to use your favorite page builder plugin on it and create unique layouts very easily.
To use that template start by going to Pages > Add New. This will create a new page. Add a title to your page and select the Page builder template from the template drop down in the Page Attributes metabox.
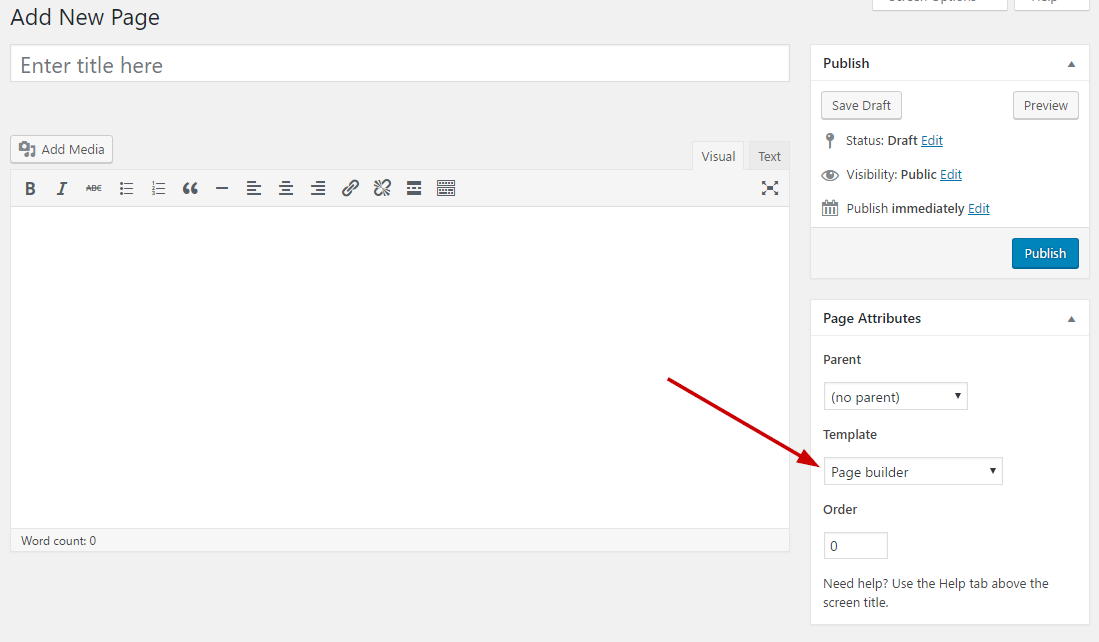
That’s it. You can now start building your page using the page builder of your choice, once done publish it and check it out.
Next Steps
Still have questions or problems setting up your CSSIgniter Theme? We will be happy to help you out! Please visit our support Hub