Search Results

185 results found.

Cousteau Pro – Legacy

Last Updated On

About Cousteau Pro

Cousteau Pro is a travel theme for WordPress. It is suited for travel agents and related professionals.

Image Sizes

The recommended image sizes are:

Post Thumbnail: 816x500px
Media Item:  555x380px
Media Item Tour:  555x790px
Media Item Media: 555x555px
Media Fullwidth: 1240x555px
Hero image: 1920x500px
Slide: 1920x850px

Notice, the original demo images are not redistributed (unless noted). Instead blurred equivalents will be imported while installing the sample content.

Getting Started

After installing the theme you will be redirected to this welcome screen. Here you can install both required and recommended plugins. While recommended plugins are optional for the theme to function, consider installing them if you want the full sample content to be imported.

Required Plugins

Figure 1: Welcome screen after installing Cousteau Pro

Here you will need to install and activate the theme specific plugin required by the theme. This will create Custom Post Types as well as various Widgets and Shortcodes. Some hosting providers block automatic installation of plugins. This means you will need to install the plugin manually as you would normally do. The plugin is located inside the /plugins/ folder in your theme archive.

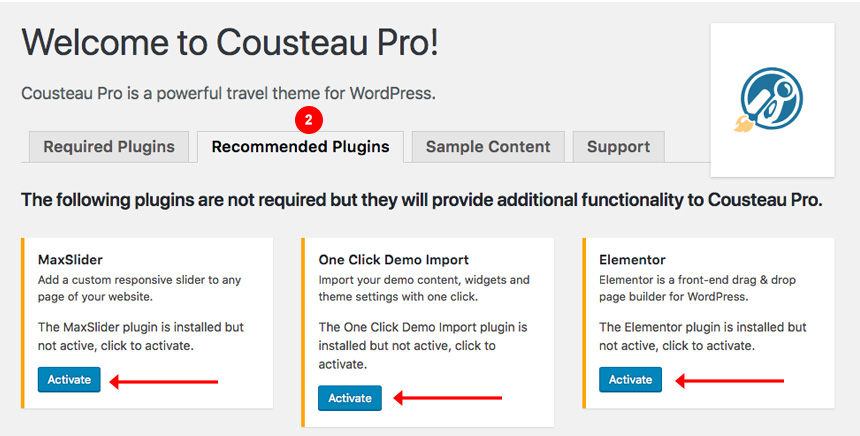
Under the Recommended Plugin tab you will find a list of supported plugins that will enhance the theme’s functionality. These are

Figure 2. Recommended Cousteau Pro plugins

  • One Click Import  Use this plugin to help you import your content with just one click.
  • MaxSlider  Use this plugin to help you create custom sliders and use them anywhere you wish shortcodes.
  • Elementor  A free page builder that delivers high-end page designs and advanced capabilities.
  • WooCommerce: To enable eCommerce functionality for your website

Contact Form plugin is not included in the Recommended Plugins List, but it’s mandatory since sample content imports several booking forms based on this plugin.

  • Contact Form 7 use this plugin to create a contact form, then copy the shortcode it gives you and paste it on a page which will serve as your contact page.
  • Alternatively, you could use WPForms plugin instead of Contact Form 7, but sample content will still import Contact Form 7 shortcodes.

If you want the Instagram widget to render, you will need to install this plugin also before installing sample content.

  • WP Instagram Widget: Use the latest version of this plugin to help you display your Instagram feed in any of the theme’s sidebars.

Installing Sample Content

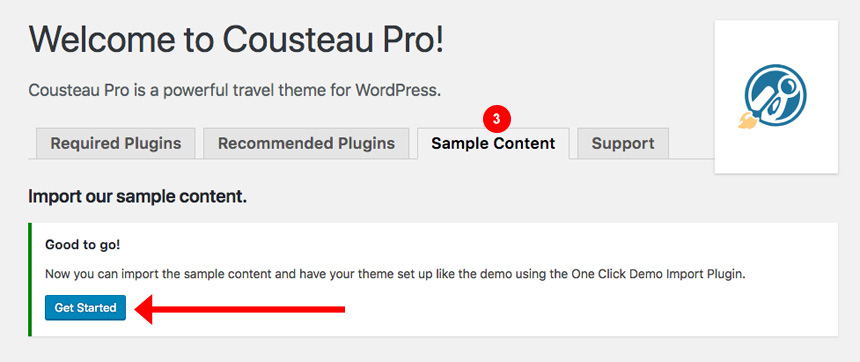
To automate the process of importing and for a better experience we have included native support for One Click Import Plugin. From the Sample Content tab, you can click the Get Started button to navigate to the sample content import screen.

Figure 3: Getting Started

You can always find the import page under Appearance → Import Demo Data.

You can install it in the Recommended Plugins tab (2) or manually from From your WordPress dashboard

      1. Visit Plugins → Add New,
      2. Search for ‘One Click Demo Import’ and install the plugin,
      3. Activate ‘One Click Demo Import’ from your Plugins page.

Figure 4. One Click import screen

Click on the Import Demo Data button and you are done!

Sometimes altering and editing sample content may go wrong. If you need a fresh start you can reset your WordPress installation using any popular reset Plugin. Beware: this will erase all data you have and not just the sample content.

This plugin requires a PHP version of at least 5.3.x, but we recommend version 5.6.x or better yet 7.x. Please contact your hosting company and ask them to update the PHP version for your site.

Customizing Your Theme

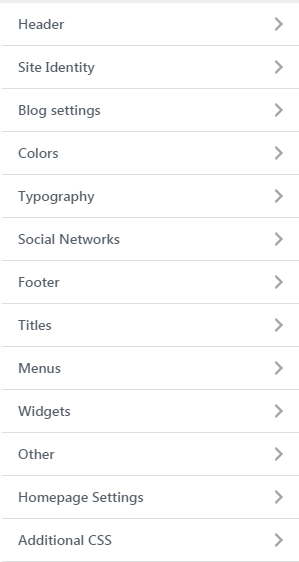
All theme’s customizations and settings can be done via WordPress’ built-in Customizer. If you haven’t used it or want to learn more about it, please read this article.

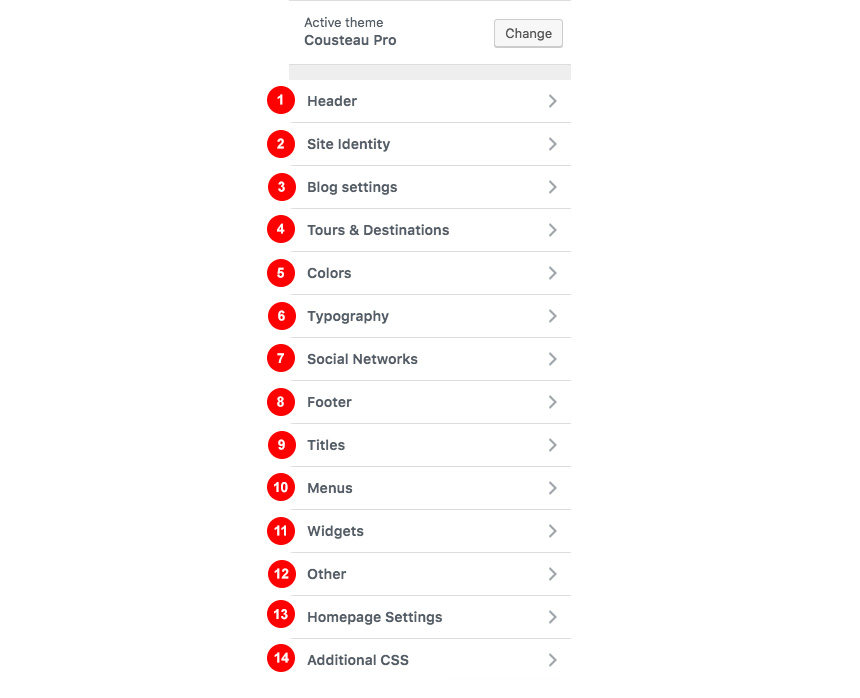
Go to Appearance > Customize and you will see this

TIP: any changes you make in the tabs below will be previewed live on the site which appears in right side of the screen, however to save these changes you need to click the Save & Publish button on the top of the bar, if you have made a change but see the button grayed out (for example changed the font size of a heading), move the cursor outside the input box, for example, to the next input box, then the button should be clickable again.

Let’s take a look at the options each tab gives you.

1. Header

Header Options are split into two sections.
In the Header style section, you can

  1. Set the logo layout you wish. In this section, you can split your menu into two smaller ones, but you will need to re-assign menus and their locations from Appearance→Customize→Menus.
  2. Change the header to be full width.

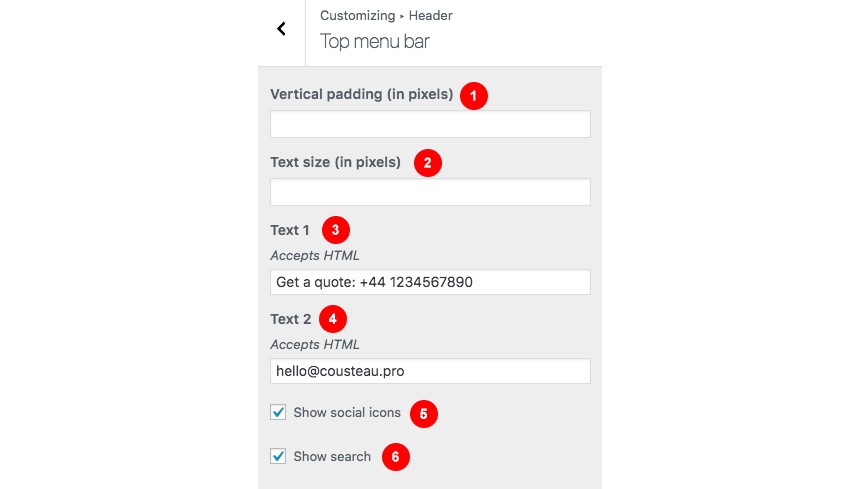
Under the Top menu bar section, you can change

  1. Vertical padding in your menu. This will create additional space before and after the top bar.
  2. Change the top bar text size.
  3. Add some custom text to it like your phone number.
  4. Add some custom text to it like your email.
  5. Show/Hide social icons. All social icons can be set from Appearance→Customize→Social Networks.
  6. Show/Hide the search bar.

In the Primary menu bar section  you can:

  1. Change the menu Vertical padding.
  2. The menu text size.
  3. Enable/Disable Sticky menu.

2. Site Identity

Here you can change the logo and favicon as well as the title and description.

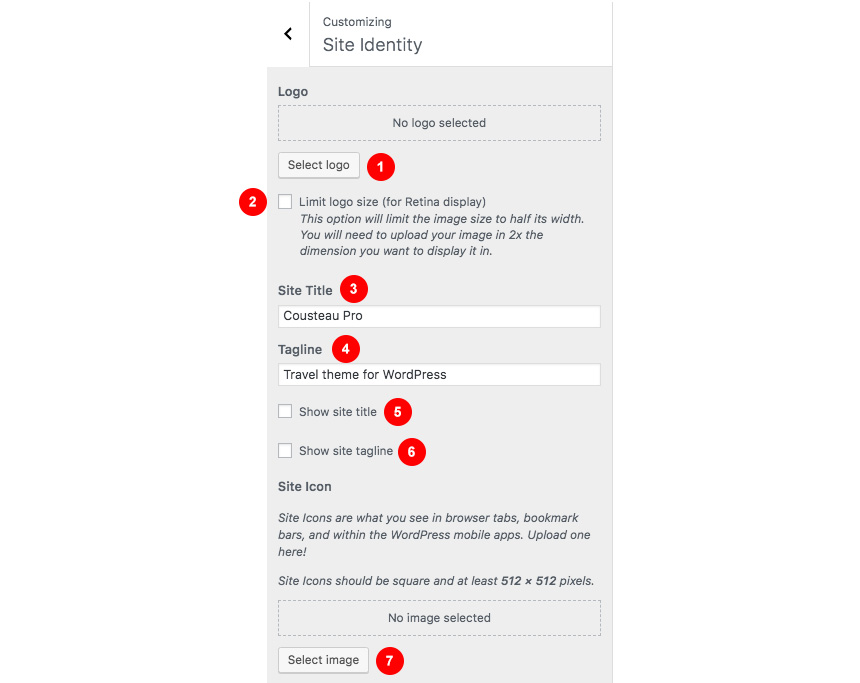
Use the appropriate fields to add your information, show or hide your site title and subtitle and upload your logo and site icon images.

  1. Upload your logo
  2. If you are uploading a retina size image (2x) this option will contain it to half of its original width
  3. Change the site title, this will be served as an alternative to the image logo
  4. Change the site subtitle (tagline)
  5. Show or hide the site title
  6. Show or hide the site tagline
  7. Upload a site icon.

3. Blog Settings

This tab allows you to customize your blog and post options.

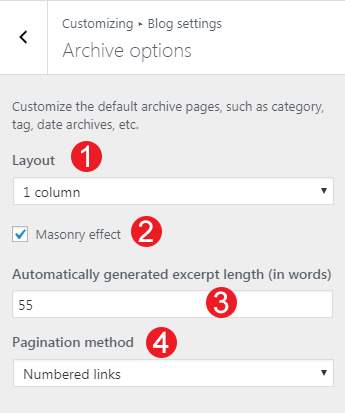
Under the Archive options, you have customized the default WordPress archive pages like category, tag, etc.

  1. Change the Layout by selecting in how many columns you need your content to appear.
  2. Show or hide the sidebar.
  3. Enable the Masonry effect in case you have articles with different content and featured image height.
  4. Select the article excerpt length.
  5. Select a pagination method.

Moving to the Post Options you can select which elements you wish your single blog posts to have.

Here you can:

  1. Show/Hide the featured image or your post.
  2. Show/Hide the date the post is published
  3. Show/Hide the author.
  4. Show/Hide Comments
  5. Show/Hide the post Category
  6. Show/Hide tags
  7. Show/Hide the author box
  8. Show/Hide related posts
  9. Show/Hide social sharing icons
  10. Enable/Disable Lightbox

4. Tours & Destinations

Through this tab you can control the Tours Search and Destination pages options.

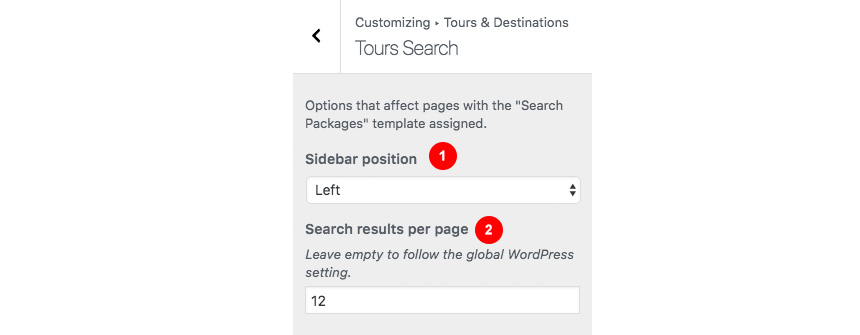
In the Tours Search section you can control the settings of the Search page. So you can change

  1. The sidebar position.
  2. How many results you need per page.

While in the Destination Options you can control what’s going on in the Destination Archives

  1. Change the Destination listing layout.
  2. Show a certain amount of packages per page.
  3. Show the Content Sidebar.
  4. Show the Listing Sidebar.

5. Colors

This tab allows you to customize the colors and background images for the entire site, the top bar and header, hero section, sidebars, and the footer.

Here you can add a generic Hero Image or Video from Appearance→Colors→Hero. This will appear by default everywhere unless you have set a different hero video or image in the page Hero Section box. You can also change the footer background image and color from Appearance→Colors→Footer section.

6. Typography

Through this tab you can control the font size of key theme elements, such as headings, body, and widgets. If you want to change the default Theme fonts have a look here.

7. Menus

Here you can create and assign menus to the theme. To learn more about menu creation check out the Codex’s menu user guide here.

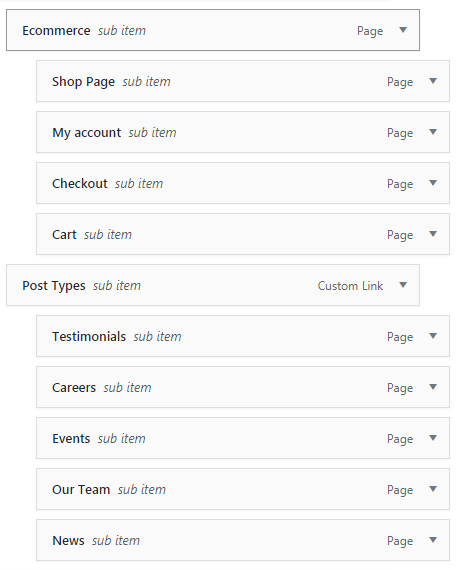
Cousteau Pro has two primary menu areas. The second one will apply only when under Customize→Header→Header Style the Centered Logo – Split Menu option is selected from the Layout dropdown.

8. Titles

In this tab you can change the titles for various theme pages, like the blog, search and 404 as well as for your related items in single Portfolio.

9. Social Networks

In this section You can add your Social Network URLs. These icons will be displayed in the Theme-Social Icons Widget automatically.

10. WooCommerce

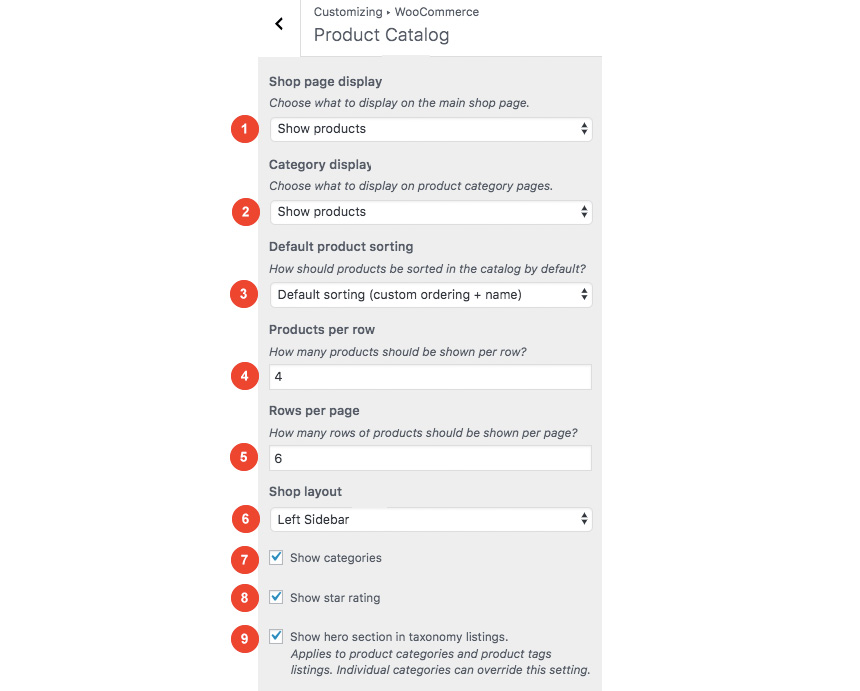
In this tab you can change the number of products on shop listing page and control your WooCommerce Settings.

Under the Product Catalog section you can;

  1. Choose what you want to render in the main shop page.
  2. Choose what you want to display in the category pages
  3. Change the default product sorting
  4. Change  products per row
  5. Select how many rows of products you need per page
  6. Change the sidebar location
  7. Show or hide, categories
  8. Show or hide  star ratings
  9. Show or hide hero sections in category/tag listings.

You can also change your Single Product layout from the Single Product Section. Here you can control if you need to have a sidebar or not in your products.

Here you can modify the credits text and your Footer Column Layout.

Under the footer style section you can

  1. Change the Layout of the footer, to render 2,3 or 4 columns.
  2. Make the footer full width.

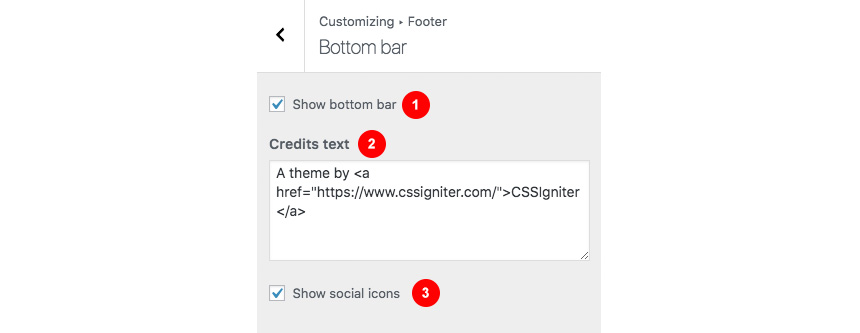
In the bottom bar section you can

  1. Show or hide the bottom bar.
  2. Add your own Credits text.
  3. Show/Hide  Social icons

12. Additional CSS

In this tab we host the custom CSS panel which you can use to insert styles for elements not covered in the rest of the tabs.

13. Other

Here you can download your sample content files.

14. Widgets

Through this tab you can add widgets to the theme’s sidebars. The theme features eight Sidebar Areas in order to provide the best option to display your content.

15. Static Front Page

Use this tab to make the Home page your static front page so you can take advantage of the homepage template we have created for you.

Making a Tour Package

Getting familiar with the Package Screen

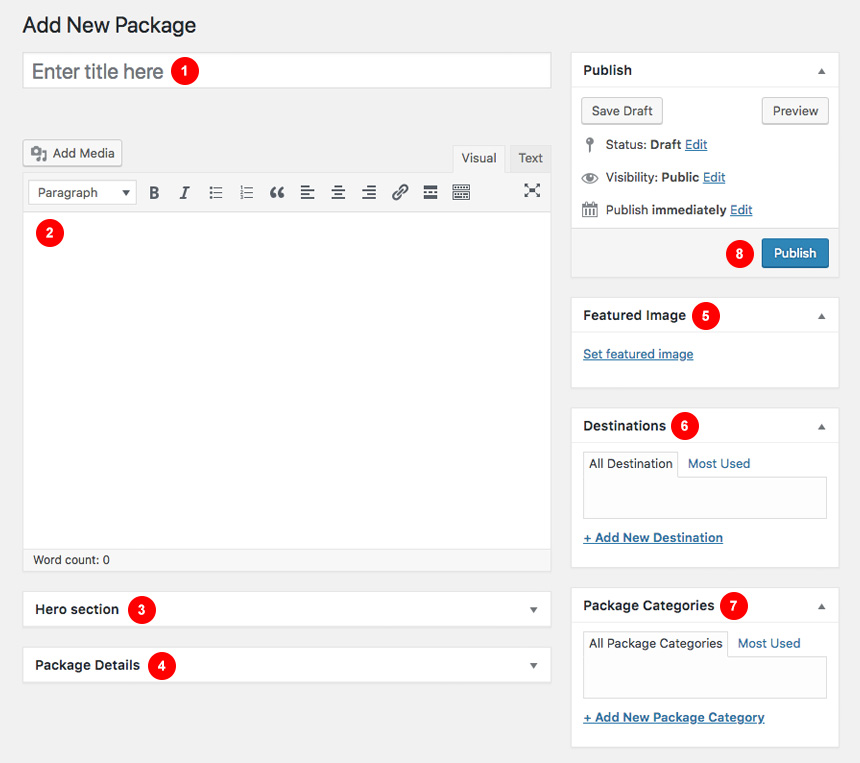
Head over to Packages→Add New. Then you should see this screen

Here you can start adding content for your package:

  1. Add a title for your Package.
  2. Add your Package Content.
  3. Add Some Content for the Package Hero Section
  4. Add More information for your Item.
  5. Select the Featured image for your item.
  6. Add or Select a Destination for your Package. Check here on how to add a new Destination.
  7. Add or Select a Package Categories.
  8. Publish your package.

Adding Package Details

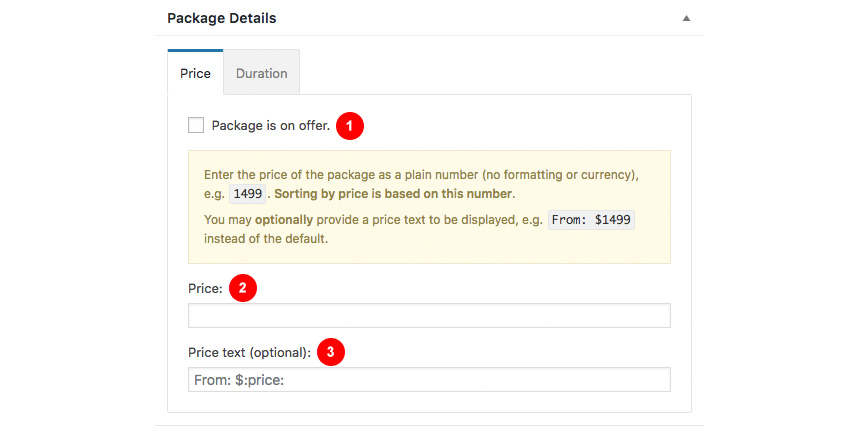
Let’s have a quick look at our Package Details section. In the Price tab, you can

  1. Select if the Package is an offer.
  2. Change the price (number).
  3. Select a price text. Notice that :price: tag will be replaced by the actual price

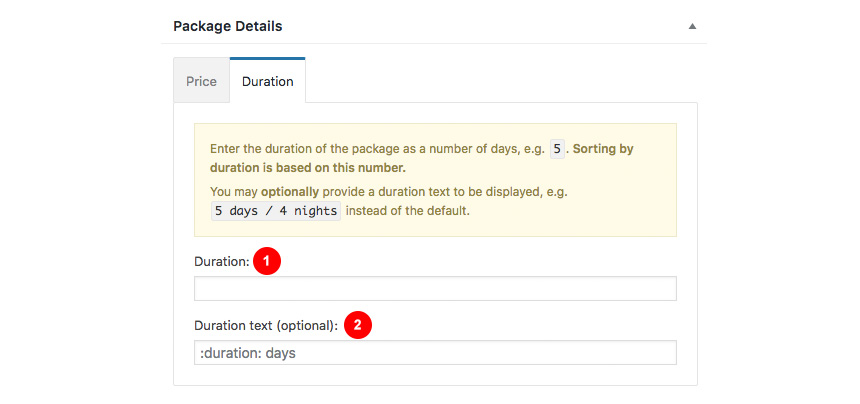
Under the Duration Tab, you can

  1. Select the Duration of the Tour.
  2. Some informational text on the duration. You can include dynamically the duration using :duration: tag.

Controlling the Package Hero Section

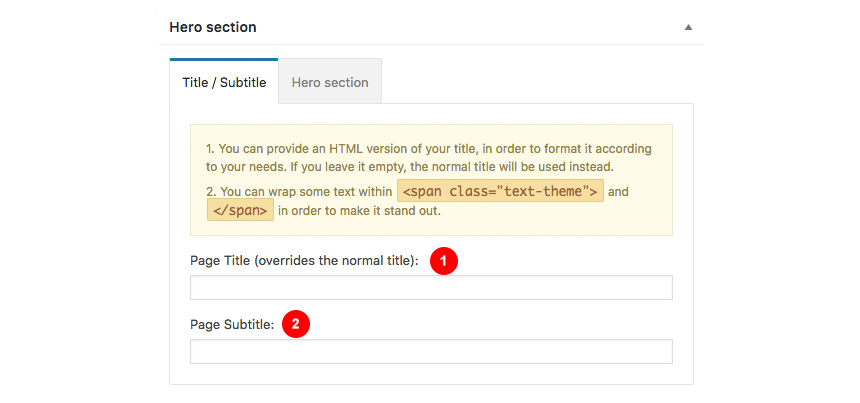
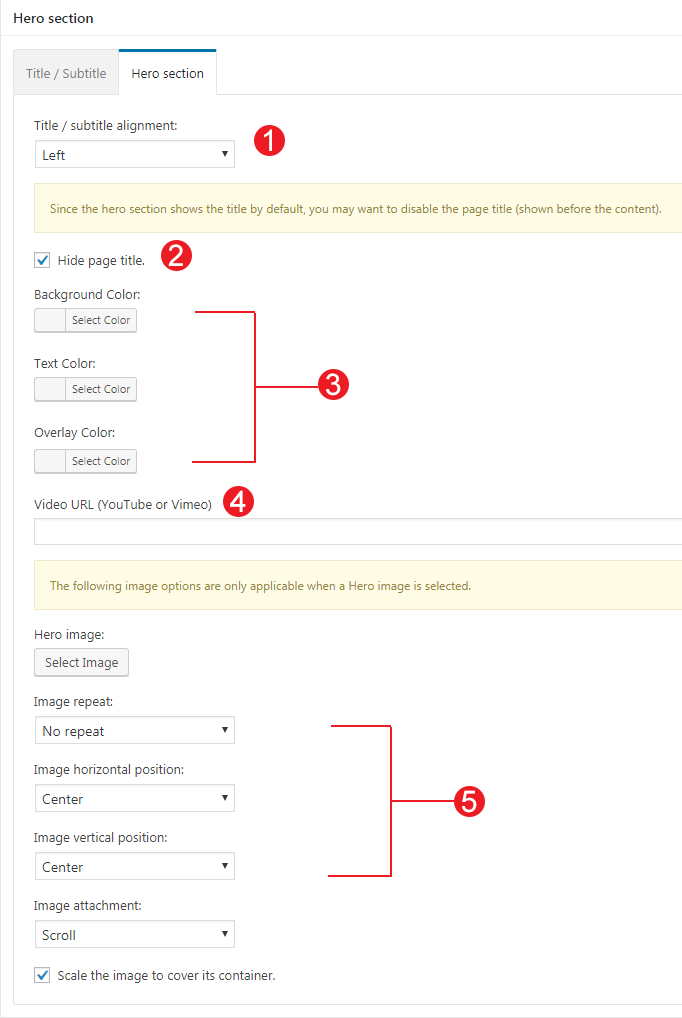
The hero section will be the same everywhere in Cousteau Pro and in general  this the basic section before the contents of your page and you can :

  1. Add a hero title.
  2. Add a hero subtitle.

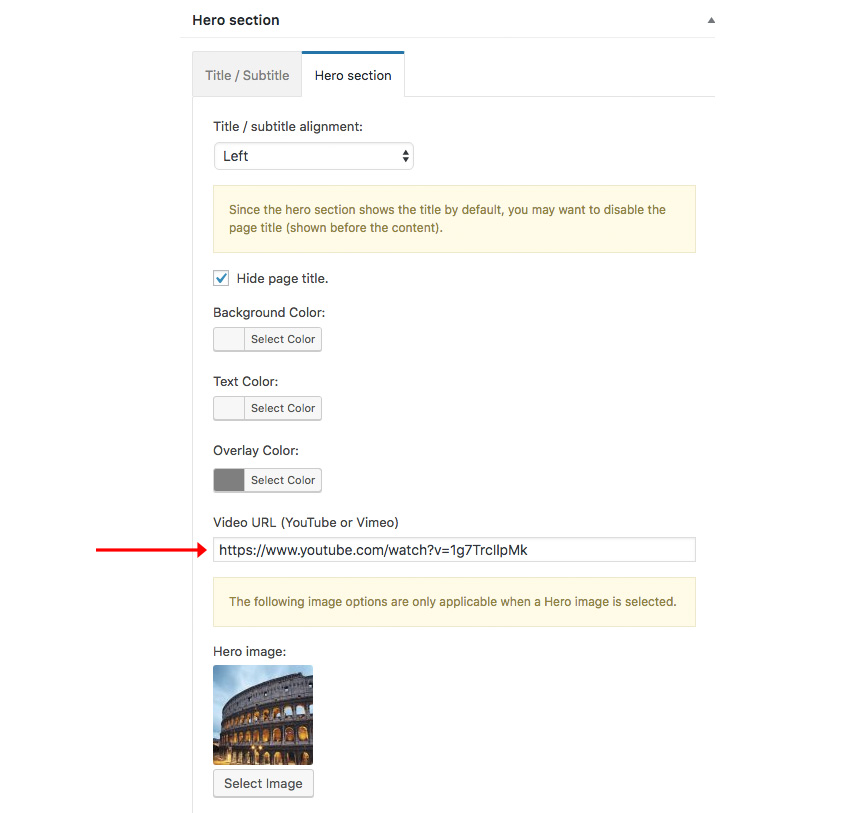
Also, you can style your Hero with a background image/video or color :

  1. Align the Title.
  2. Hide the Page title.
  3. Add a Background Color or an Overlay color in case you have a background image with the same color of your Hero title or subtitle.
  4. Add a background Video, from YouTube or Vimeo.
  5. Add a background image and change its position and screen coverage.

Creating a scrolling section of contents

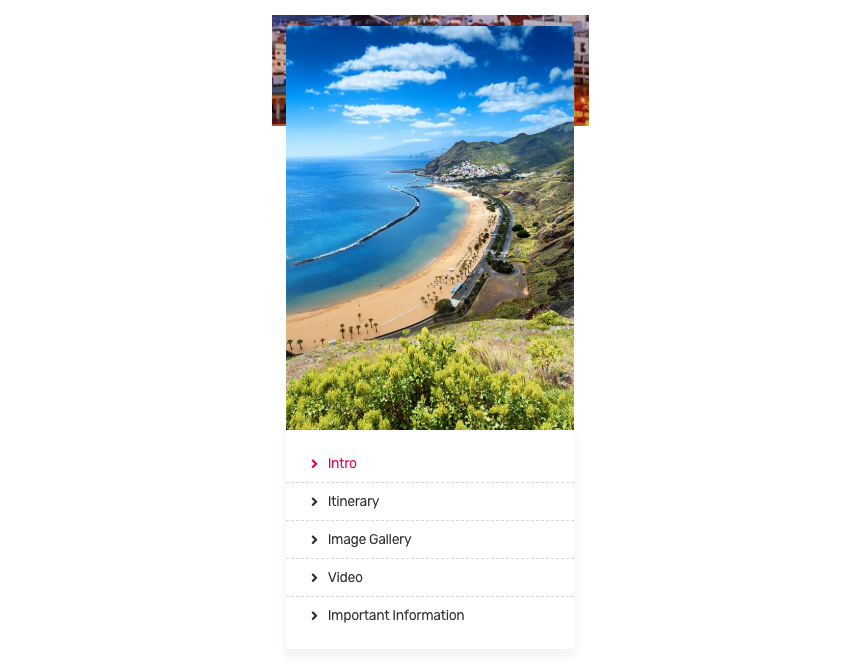
As you will notice in our demo, there is a scrolling contents section that will help your visitor navigate through your Tour highlights.

You can easily replicate this by controlling in which heading you visitor can navigate. When adding a header (H1, H2, H3, H4, H5, H6) switch to Text mode and add anchor-title as a custom class  to that header like this

<h2 class="anchor-title">Itinerary</h2>

Now, the Itinerary header will serve as an anchor point for the floating bar. Repeat this for as many headers as you wish.

Add an elevated Contact Form in Packages

You can add a custom Contact Form for your packages sidebar. If you need the same elevated effect like the one in our demo you will need to create a custom HTML widget and add before any other under Appearance→Customize→Widgets→Packages. The catch is to include a custom DIV with a class that will allow the Contact Form to render like needed. The HTML must have this structure

<div class="theme-form content-elevated">

[contact-form-7 id="XX" title="Contact form X"]

</div>

Where you can change X to your Contact Form 7 ID and the title to your preference.

Adding Destinations archives

Creating Destinations is crucial to organize your tours and content. You can add your destination from Packages→Destinations. 

After selecting your Destination name, description and slug, you can select some extra information to alter the behavior and appearance of your Destination

  1. You can select a page from which the Destination will take its default content. The featured image of this page will serve as the main image of the Destination,
  2. Here you can control the appearance of the Destination’s Hero section.
  3. You can change/set the background color
  4. Add a Hero image

Destinations as menu items

If you want to add any destination archive as a menu item you will need to navigate to Appearance→Menus and enable Destinations as menu items.

Then you can add them to your menu as you would normally do. You can check this article here on WordPress menus and how to master them.

Destination Widget Areas

Your Destination archives and Destination page has two specially reserved sidebars: Appearance→Customize→Destination Listing (next to the package listings) and Appearance→Customize→Destination Content (next to the destination content)  in which you can add any widget you want including the Theme-Contact Widget from our demo.

Adding Package Categories

From Packages→Categories you can create new categories for your Packages/Tours

Adding Products

Earlier we saw how we can install WooCommerce. Let’s take a brief look at creating products. Start by going to Products > Add Product.

  1. First we need to fill in the product title,
  2. Add the product’s description,
  3. In the Product Data metabox you will fill all the required product info, such as price, inventory, tax and shipping information and more,
  4. Fill in a short product description
  5. Add product gallery images to upload additional photos for the product,
  6. Click Set Product Image to add the product’s featured image
  7. Add Tags to your product to make filtering easier
  8. Add categories for your product

This is a brief overview of adding products to your site, the product post type is a complex one, if you haven’t worked with it before please consider reading the official documentation on how to add and manage products here.

Setup the shop page

Once you install and activate WooCommerce all the default pages will be created, including the shop listing page. To make sure this was properly configured go to WooCommerce > Settings > Products > Display and check if the Shop page is selected in the Shop Page drop down.

If the drop-down is empty, locate the Shop page and select it.  If you can’t find a page named Shop, just go to Pages > Add New create one and then set it as your shop page. Add this page to your menu to give your visitors access to the product listing.

Theme pages

Let’s start by adding the first few basic pages you are going to need. Go to Page →Add New and create the following pages:

Frontpage

To set up the homepage create a page named Home and set to it the Frontpage Template from the Page Attributes drop-down on the right. To add content to your front page go to Customize→Widgets or Appearance→Widgets and use the theme’s widgets to help you display your content. You will notice that in your Frontpage template page under the WordPress text Editor you have a Frontpage Options and a Hero section box.

Creating a Frontpage with a simple image

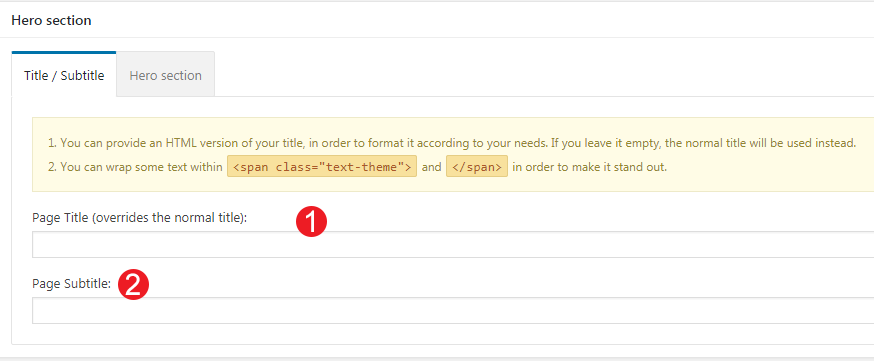
Lets create a frontpage with a Single image that will promote one Package, along with some details for that package and a call to action button. After creating the frontpage template like described above, we will add a title and a subtitle from the Hero section

  1. Add the main title for your Hero section.
  2. Add a subtitle for your Hero section.

Now let’s navigate to the Hero Section and add the main image :

  1. Set the title/subtitle alignment
  2. Hide the default page title.
  3. Select our main image.

Now, we have a title and subtitle as well as a background image but we will need some extra garnish and a call to action button. So, we will need to edit the  Frontpage Options section:

  1. Add a meta field that will appear above the hero section title.
  2. Add a second field that again will appear above the hero section title.
  3. Add a button text and,
  4. a button URL that will lead to a URL you have specified (perhaps a package).

Creating a Frontpage with a Video

If we need to add a video instead of a static background we will just need to follow the above procedure, but add under Hero Section a video URL also

The background here is used now as a placeholder if the image fails to load, or if the visitor uses a mobile device. Always in mobile devices, we avoid auto playing or playing videos in general to avoid data consumption.

Creating a Frontpage with MaxSlider

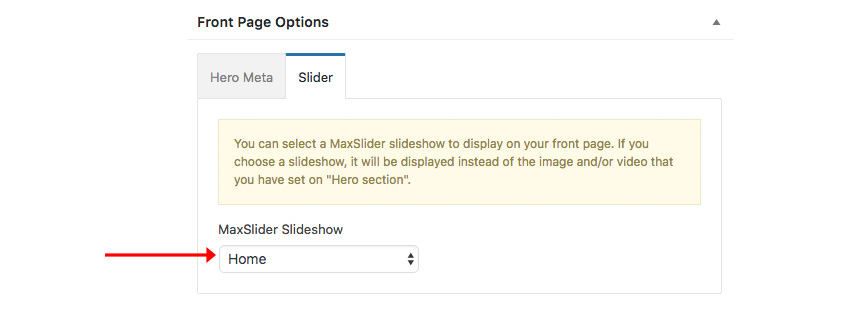
In the Frontpage Options section, you can select a MaxSlider Slideshow to appear instead of a hero image or choose not to have a slideshow at all. MaxSlider is a versatile plugin with many options for you to explore. Have a look at the plugin’s documentation here first on how to use it. You can select the MaxSlider from Slider tab under the Frontpage Options box:

Replicating the Demo frontpage with Widgets

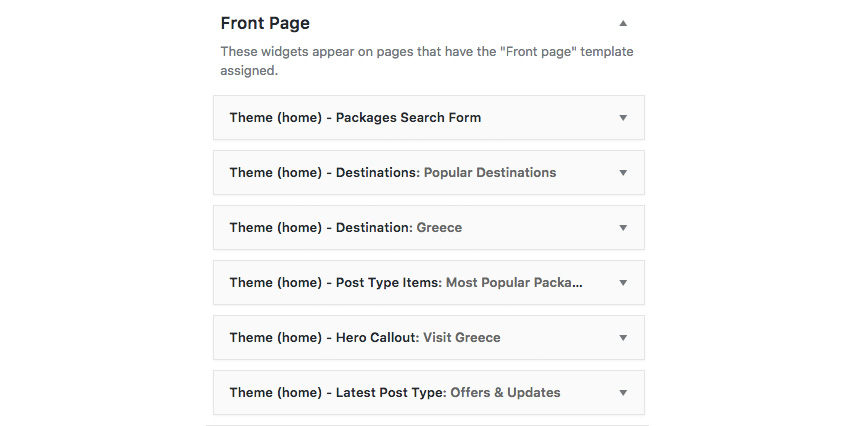
Cousteau Pro does not require any Page builder to replicate the front page. The frontpage page template provides a full-width sidebar where you can add any theme widget and bring selected portions of your content with ease. In order to fully replicate the Frontpage you will need to add these widgets

In the order that they appear we have:

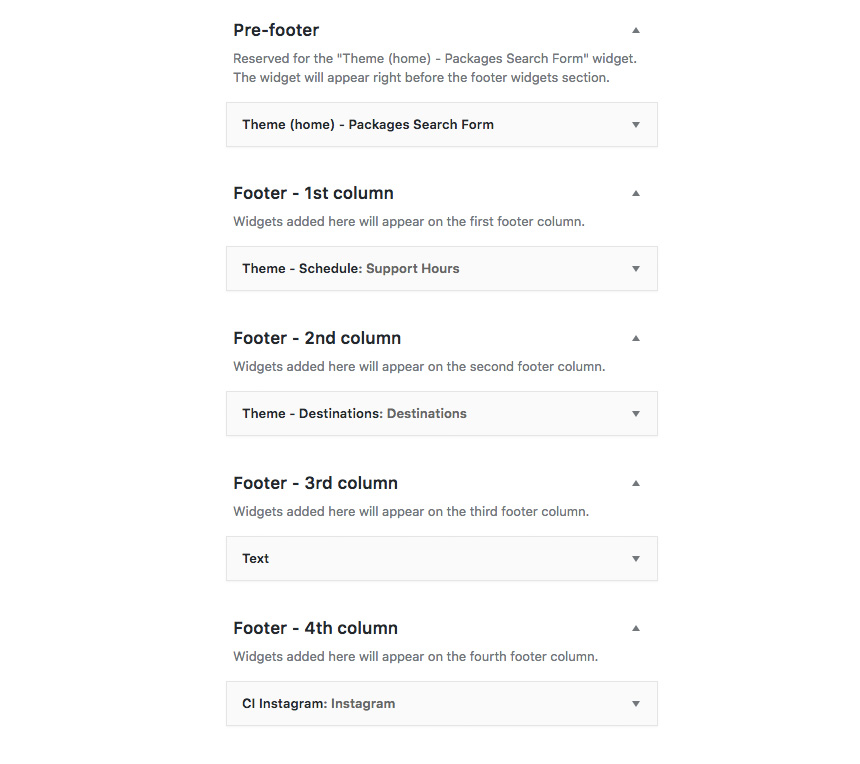
To continue with our content we will need to set up our Footer Section. You can easily modify it via Appearance→Customize→Footer, and our demo has the following structure.

The inner footer sidebar will appear just before the Footer, and in our demo, it shows the

The Footer – 1st Column area has

The Footer – 2nd Column area has

The Footer-3rd Column Sidebar has a simple text widget while the Footer-4th Column Sidebar has an Instagram Widget.

Search Packages

This is the default page that will display all your Packages / Tours when searching from the Package Search Form widget. Create a new page and select from Page Attributes the “Search Packages” page Template.

Blog

This will be your posts page. Just create and publish a blank default page named “Blog” (or whatever you wish to name it) without adding any content, no further action needed for now. You can control the looks of your Blog page from Appearance→Customize→Blog Settings. If you want to set a hero image or video for your blog page you will need to navigate to Appearance→Colors→Hero and add it  there.

FullWidth Page

In this page, you can add any content you wish without displaying the sidebar.

Widgets

We have handcrafted some custom widgets to help you better display your content. You will find them under Appearance → Customize → Widgets or Appearance → Widgets

Theme-Contact

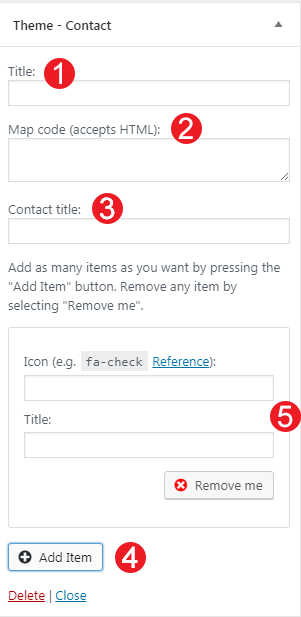
Using this widget you can create a contact box including a title a map and various complementary elements with icons that will help you add more information like telephone etc about your business.

  1. Add a title for your Contact widget.
  2. Add a map code (iframe).
  3. Add a contact title
  4. Create new complementary elements.
  5. Add an icon code  (from fontawesome.io) and some text along.

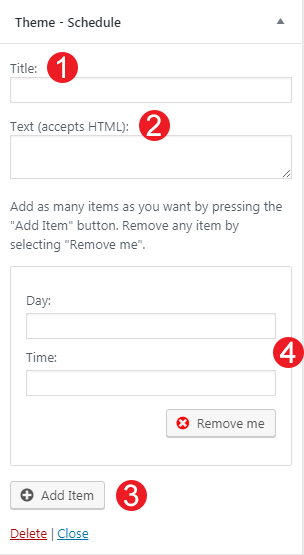
Theme-Schedule

This widget allows you to create a small Schedule table with extra contextual information.

  1. Add a title for your widget
  2. Add some complementary text. You can use HTML tags also if you wish.
  3. Add a new day/time widget.
  4. Add your day and time information for each item.

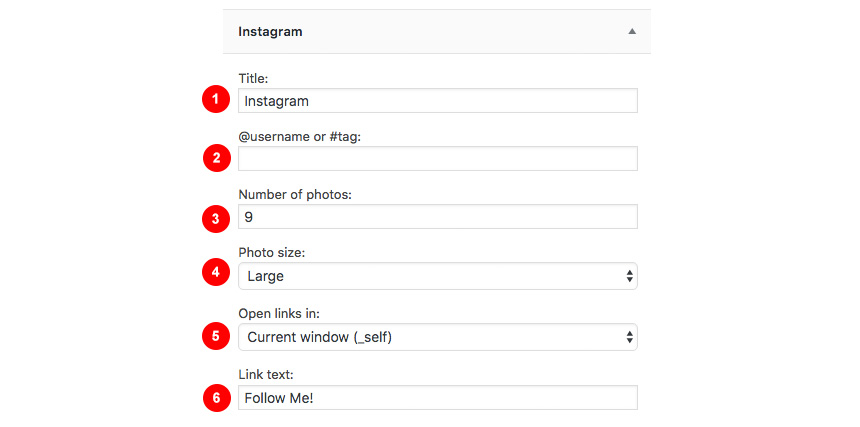
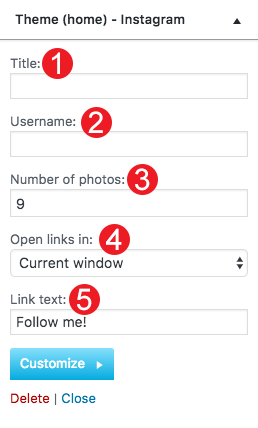
Theme(home)-Instagram

This will allow you to display your Instagram Account in your Front Page or Pre-Footer sidebar. The WP Instagram Widget must be installed and activated in order this Widget to appear

  1. Add a title for your Instagram Widget.
  2. Add your Instagram Account.
  3. Add a number of photos you wish to display.
  4. Select the Instagram Photo size.
  5. Select whether you need your images to open in the current window or open in a new tab.
  6. Change the link text.

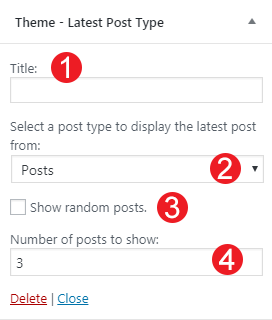
Theme-Latest Post Type

This widget is built to help you display your latest posts in any widget area you wish.

  1. Add your widget title
  2. Select the post type you want to get the latest items.
  3. Check if you need random posts instead.
  4. Add the number of posts.

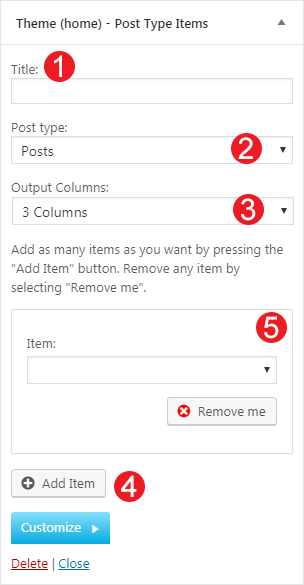
Theme(home)-Post Type Items

This widget is built to help you display any post you wish in your Homepage Widget area.

  1. Add a title.
  2. Select the post type.
  3. Select the output columns.
  4. Add the Item you wish to output.
  5. Select the Item from the drop-down menu.

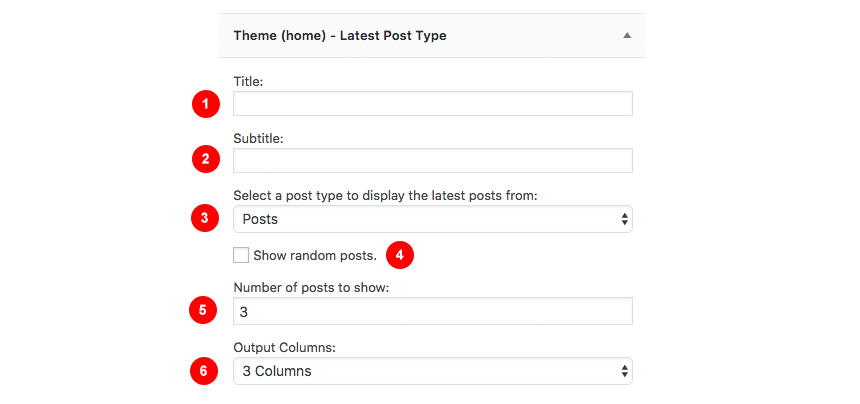
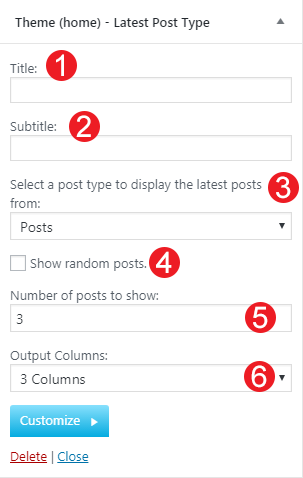
Theme(home)-Latest Post Type

This widget is built to help you display your latest posts in your Homepage Widget area.

  1. Add a title.
  2. Add a subtitle.
  3. Select the post type you want to get the latest items.
  4. Check if you need random posts instead.
  5. Add the number of posts.
  6. Select the output columns.

Theme-Social Icons

This widget displays your site’s social icons. In order to set them up, you need to visit Appearance → Customize → Social Networks and provide the appropriate URLs where desired.

Theme (home)-Hero Callout

This will allow you to display a Hero Callout specially designed for your frontpage sidebar.

  1. Add a Title for your Callout widget.
  2. Add a Subtitle for your Callout widget.
  3. Select a price and duration for your package.
  4. Select a Button text and a URL and change the text alignment.

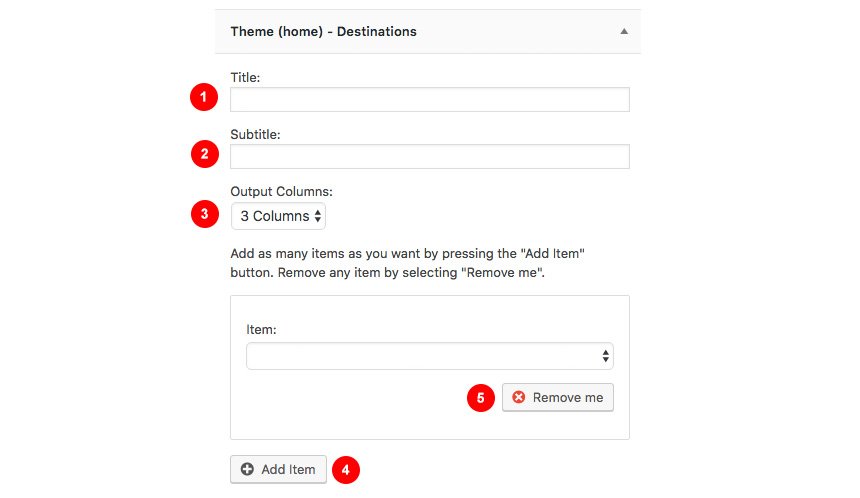
Theme (Home)-Destinations

  1. Add a Title for your Destinations widget.
  2. Add a Subtitle for your Destinations widget.
  3.  Select the columns for your Destinations.
  4. Add a new item.
  5. Select the Destination you want from the drop-down.

Theme (Home)-Destination

  1. Add a Title for your Destination widget.
  2. Add a Subtitle for your Destination widget.
  3. Select the Destination you want from the drop-down.
  4. Change the excerpt length (in words) for the selected item.

Theme (Home)-Packages Search Form

This widget is mainly used in the homepage and will generate a search/filter form. In order the widget to work you will need to select a “Search Packages” page. You can create a page like this following these instructions.

How to use the page builder template

The theme comes bundled with a page builder template which allows you to use your favorite page builder plugin on it and create unique layouts very easily.

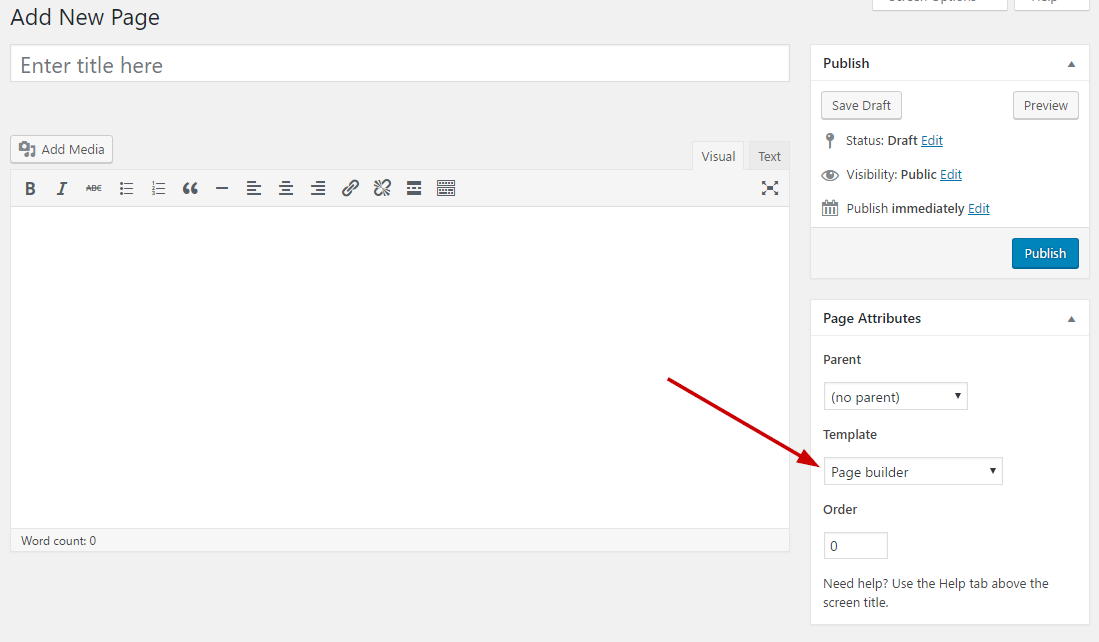
To use that template start by going to Pages → Add New. This will create a new page. Add a title to your page and select the Page builder template from the template dropdown in the Page Attributes meta box.

That’s it. You can now start building your page using the page builder of your choice, once done publish it and check it out.

Shortcodes

[package-dates]
This shortcode will render a list of packages by date.
Parameters:
post-id: integer (default, current post id)
starting-date: date in yyyy-mm-dd format (default, today).
title: string (default, “Available Dates”. Pass empty string to disable).

Next Steps

Still have questions or problems setting up your CSSIgniter Theme? We will be happy to help you out! Please visit our support Hub 

How to use external React components in your Gutenberg blocks

Last Updated On
How to use external React components in your Gutenberg blocks WordPress template

Gutenberg itself already exposes a lot of components ready to be re-used in our custom blocks. Most of these are located in wp.components and wp.blocks, and they include helpful building blocks for every Gutenberg block: Text Controls, Toggles, Tooltips, Icon Buttons, Tabs, and many many others. Gutenberg’s native component library pretty much has us covered on all basic cases, on every kind of basic UI control we might need but still there are cases where we might need to take it a step further on some kind of more specialized custom block.

Read More

Kea – Legacy

Last Updated On

About

Kea is premium Hotel theme

WordPress theme installation

The easiest way to install the theme is by accessing your WordPress admin panel, then go to Appearance > Themes. Select the Install Themes tab and click the Upload link located just below the tab’s name. Click on Browse… and select the WordPress theme zip file you just downloaded. Then click the Install Now button, and after a few seconds, your new theme should be installed. Click activate and the theme is ready to use.
In order to install the theme manually, or in case you have trouble installing it through the admin panel, you have to unzip the WordPress theme’s zip file on your computer and upload via FTP the resulting theme folder into your WordPress installation themes folder (wp-content/themes). Then, from the WordPress admin go to Appearance > Themes. The theme should be available in your themes list. Click activate.
TIP: A more visual guide can be found here.

Image Sizes

The recommended image sizes are:

Post Thumbnail: 850x567px
Media Item:  555x400px
Media Item Tall:  555px in width and unlimited in height
Media Item small: 80x80px
Brand Logo: 80 in height and unlimited in width
Full width: 1140x650px
Hero image: 1920x500px
Slide: 1920x850px

 Useful Plugins

These plugins provide functionality and features used directly (or not) by the Theme. So, it is recommended to install and activate them before importing your sample content.

  • Kea Specific plugin: You will be asked to auto-install this plugin when installing the site. You can find this under your theme /plugins/ folder.
  • One Click Import  Use this plugin to help you import your content with just one click.
  • MaxSlider  Use this plugin to help you create custom sliders and use them anywhere you wish shortcodes.
  • Elementor  A free page builder that delivers high-end page designs and advanced capabilities.
  • Contact Form 7 use this plugin to create a contact form, then copy the shortcode it gives you and paste it in an empty page.

Importing Sample Content using One Click Import

To automate the process of importing and for a better experience we have natively included support for OneClick Import Plugin. Let install it fist:

From your WordPress dashboard

  1. Visit ‘Plugins > Add New’,
  2. Search for ‘One Click Demo Import’ and install the plugin,
  3. Activate ‘One Click Demo Import’ from your Plugins page.

From WordPress.org

  1. Download ‘One Click Demo Import’.
  2. Upload the ‘one-click-demo-import’ directory to your ‘/wp-content/plugins/’ directory, using your favorite method (ftp, sftp, scp, etc…)
  3. Activate ‘One Click Demo Import’ from your Plugins page.

Once the plugin is activated you will find the actual import page in: Appearance > Import Demo Data.

 Click on the Import demo data button and you are done!

This plugin requires PHP version of at least 5.3.x, but we recommend version 5.6.x or better yet 7.x. Please contact your hosting company and ask them to update the PHP version for your site.

Theme pages

Let’s start by adding the first few basic pages you are going to need. Go to Pages > Add New and create the following pages:

Frontpage Page

To set up the homepage create a page named Home and set to it the Front page Template from the Page Attributes drop down on the right. To add content to your front page go to Customize > Widgets or Appearance > Widgets and use the theme’s widgets to help you display your content. You will notice that in your Frontpage template page under the WordPress text Editor you have a Frontpage Options section.

Hero Section

This the basic section before the contents of your page and you can :

  1. Add A Page title.
  2. Add a Page subtitle.

Also you can style your Hero with a background image / video or color :

  1. Align the Title.
  2. Hide the Page title.
  3. Add a Background Color or an Overlay color in case you have a background image with the same color of your Hero title or subtitle.
  4. Add a background Video.
  5. Add a background image and change its position  and screen coverage.

In the Frontpage Options  you can also select a MaxSlider Slideshow to appear instead of a hero image or choose not to have a slideshow at all.

MaxSlider is a versatile plugin with many options for you to explore. Have a look at the plugins documentation here first on how to use it.

Blog

This will be your posts page. Just create and publish a blank default page named “Blog” (or whatever you wish to name it) without adding any content, no further action needed for now.

Full Width Page

In this page you can add any content you wish without displaying the sidebar.

Default Page

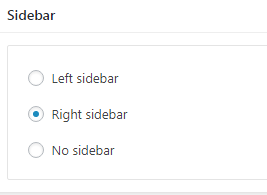
In this page you can add any content you wish but the the sidebar. You can select under Sidebar section where you need your sidebar to appear

Also, you can select whether you need to display the featured image in that page.

by checking the “Hide when viewing this post’s page” option in your Featured image box.

Header Options

The Hero Section is a generic options box you can find in All pages and will allow to to control where you need your header to appear.

Hero Section

The Hero Section is a generic options box you can find in All pages and will help your control the Hero Section for each page.

This the basic section before the contents of your page and you can :

  1. Add A Page title.
  2. Add a Page subtitle.

Also you can style your Hero with a background image / video or color :

  1. Align the Title.
  2. Hide the Page title.
  3. Add a Background Color or an Overlay color in case you have a background image with the same color of your Hero title or subtitle.
  4. Add a background Video.
  5. Add a background image and change its position  and screen coverage.

Room and Testimonial listing pages

In order to display your custom post types you will need to create a listing page for each one. Go to Pages > Add New  and create a new page selecting some its page attributes the Listing Template you need to Apply. Below you will find more information for each template.

Room Listing Template

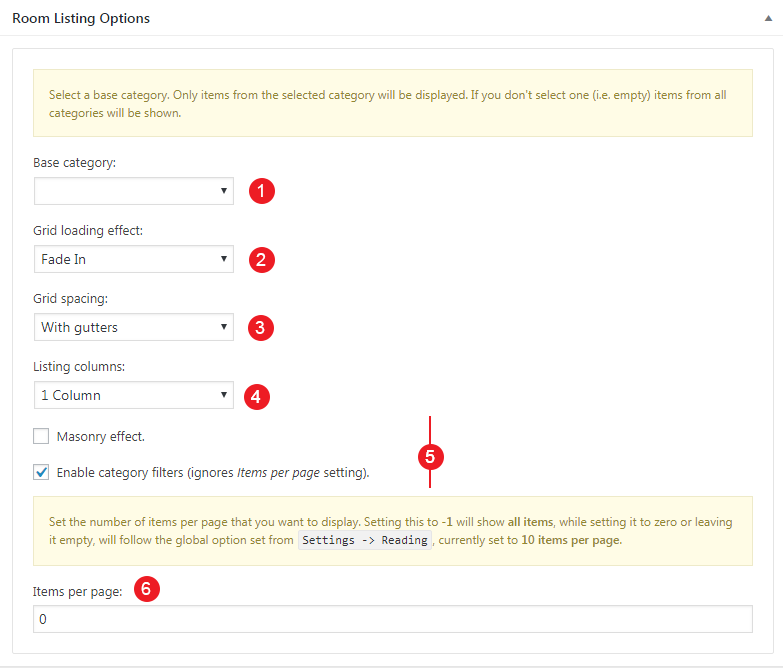
Here you can list all your Rooms from a selected category or not. Let check all the Case Studies options:

  1. Select a Base Category or leave blank if you wish all your Rooms to appear
  2. Select a loading Effect for your grid
  3. Select the spacing for your items
  4. Select the number of Columns
  5. Check if you need a masonry effect and category filtering
  6. Select how many items you need to render

Testimonials Listing Template

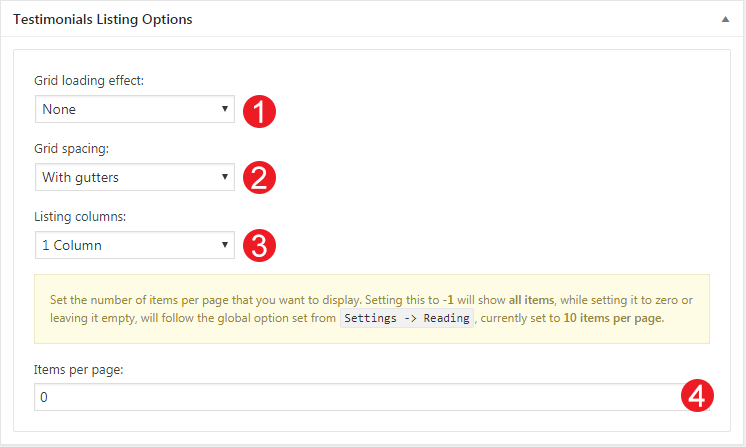
Here you can list all your Testimonials.

  1. Select a loading Effect for your grid
  2. Select the spacing for your items
  3. Select the number of Columns
  4. Select how many items you need to render

Page builder template

The theme comes bundled with a page builder template which allows you to use your favorite page builder plugin on it and create unique layouts very easily.

To use that template start by going to Pages > Add New. This will create a new page. Add a title to your page and select the Page builder template from the template drop down in the Page Attributes metabox.

That’s it. You can now start building your page using a page builder of your choice. On the theme’s demo we have used extensively the Elementor page builder plugin.

Setting up your theme

In this section we are going to have a closer look in Kea’s unique features like Portfolio, Services, Case Studies, Team Members, Jobs, Events, Testimonial Items.

Adding Room Items

To add new Service item go to Room> Add new and fill in the title, content and featured image. In the Custom Excerpt metabox you can control the content after the title in the single Room and in its listings.

In the Room information section  you can:

  1. Add a Room price (text).
  2. Add a special offer text.
  3. Show or hide the price in the Room.

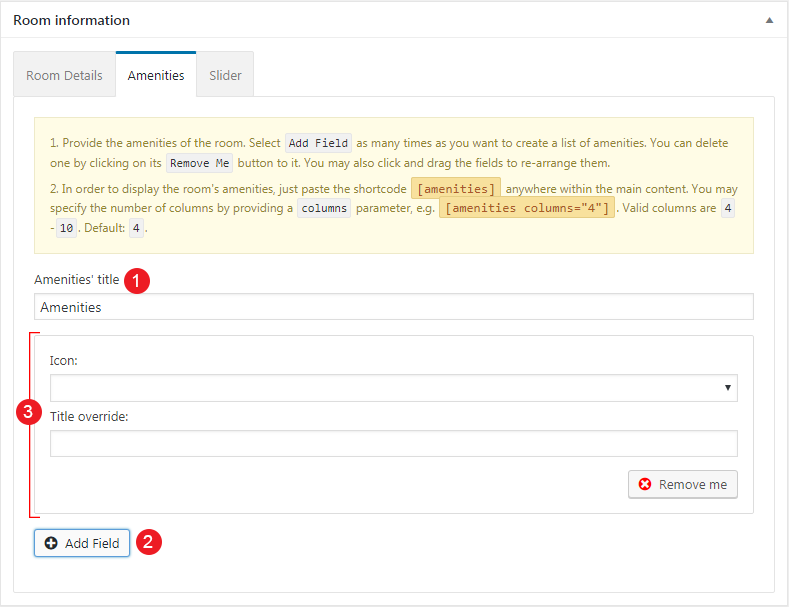
You can also add your Room amenities which you can render them anywhere inside your content using the [amenities] shortcode

  1. Add a title for your Amenities
  2. Create a new field
  3. Add an Icon and a description text.

Finally in the Slider tab you can add some images for your Room Slider.

To add new Testimonial item go to Testimonial> Add new and fill in the title, content and a featured image.

Customizing Your Theme

All theme customization is done via WordPress’s built in customizer. If you haven’t used it or want to learn more about it, please read this article.

Go to Appearance > Customize and you will see this

TIP: any changes you make in the tabs below will be previewed live on the site which appears in right side of the screen, however to save these changes you need to click the Save & Publish button on the top of the bar, if you have made a change but see the button grayed out (for example changed the font size of a heading), move the cursor outside the input box, for example, to the next input box, then the button should be clickable again.

Let’s take a look at the options each tab gives you.

Header Options are split into three sections.

In the Header style section  you can set the logo layout you wish your header to have and make it full width.

Under the Top menu bar you can add some custom text to it like your email or phone number. as well as select whether you need to show or not Search module or your social Icons.

In the Primary menu bar  you can select if you wish to have a sticky menu and change various display settings like the vertical padding of the menu and its text size.

Site Identity

Here you can  change the logo and favicon as well as the title and description. Use the appropriate fields to add your information, show or hide your site title and subtitle and upload your logo and site icon images.

Blog Settings

This tab allows you to customize your blog and post options.

Under Post Options you can select which elements you wish your single blog posts to have. This includes showing or hiding the date, the featured image, the author and author box etc. Or even enabling/disabling the Lightbox option for your galleries.

In Archive options you have customize the default WordPress archive pages like category, tag, etc.

  1. Change the Layout by selecting in how many columns you need your content to appear.
  2. Enable Masonry effect in case you have articles with different content and featured image height.
  3. Select the article excerpt length.
  4. Select a pagination method.

Colors

This tab allows you to customize the colors and background images for the entire site, the top bar and header, hero section, sidebars and the footer.

Typography

Through this tab you can control the font size and family of key theme elements, such as headings, body, and widgets. You can choose from all Google Fonts Directory.


Here you can create and assign menus to the theme. To learn more about menu creation check out the Codex’s menu user guide here.

Titles

In this tab you can change the titles for various theme pages, like the blog, search and 404 as well as for your related items in single Portfolio.

Social Networks

In this section You can add your Social Network URLs. These icons will be displayed in the Theme-Social Icons Widget automatically.

Here you can modify the credits text and your Footer Column Layout.

Additional CSS

In this tab we host the custom CSS panel which you can use to insert styles for elements not covered in the rest of the tabs.

Other

Here you can download your sample content files.

Widgets

Through this tab you can add widgets to the theme’s sidebars. The theme features eight Sidebar Areas in order to provide the best option to display your content.

Static Front Page

Use this tab to make the Home page your static front page so you can take advantage of the homepage template we have created for you.

Widgets

We have handcrafted some custom widgets to help you better display your content. You will find them under Appearance > Customize > Widgets or Appearance > Widgets

Theme-Contact

Using this widget you can create a contact box including a title a map and various complementary elements with icons that will help you add more information like telephone etc about your business.

  1. Add a title for your Contact widget.
  2. Add a map code (iframe).
  3. Add a contact title
  4. Create new complementary elements.
  5. Add an icon code  (from fontawesome.io) and some text along.

Theme-Schedule

This widget allows you to create a small Schedule table with extra contextual information.

  1. Add a title for your widget
  2. Add some complementary text. You can use HTML tags also if you wish.
  3. Add a new day/time widget.
  4. Add your day and time information for each item.

Theme(home)-Instagram

This will allow you to display your Instagram Account in your Front Page or Pre-Footer sidebar. The WP Instagram Widget must be installed and activated in order this Widget to appear

  1. Add a title for your Instagram Widget.
  2. Add your Instagram Account.
  3. Add a number of photos you wish to display.
  4. Select whether you need your images to open in the current window or open in a new tab.
  5. Change the link text.

Theme-Latest Post Type

This widget is built to help you display your latest posts  in any widget area you wish.

  1. Add a title.
  2. Select the post type you want to get the latest items.
  3. Check if you need random posts instead.
  4. Add the number of posts.

Theme(home)-Post Type Items

This widget is built to help you display any post you wish  in your Homepage Widget  area.

  1. Add a title.
  2. Select the post type.
  3. Select the output columns.
  4. Add the Item you wish to output.
  5. Select the Item from the dropdown menu.

Theme(home)-Latest Post Type

This widget is built to help you display your latest posts  in your Homepage Widget  area.

  1. Add a title.
  2. Add a subtitle.
  3. Select the post type you want to get the latest items.
  4. Check if you need random posts instead.
  5. Add the number of posts.
  6. Select the output columns.

Theme-Social Icons

This widget displays your site’s social icons. In order to set them up, you need to visit Appearance > Customize > Social Networks and provide the appropriate URLs where desired.

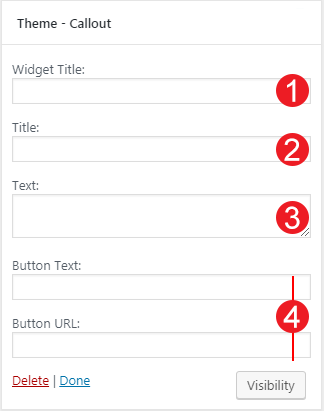
Theme (home)-Hero Callout

This will allow you to display a Hero Callout specially designed for your frontpage sidebar.

  1. Add a Title for your Callout widget.
  2. Add a Subtitle for your Callout widget.
  3. Select a Button text and a URL.
  4. Change the text alignment.

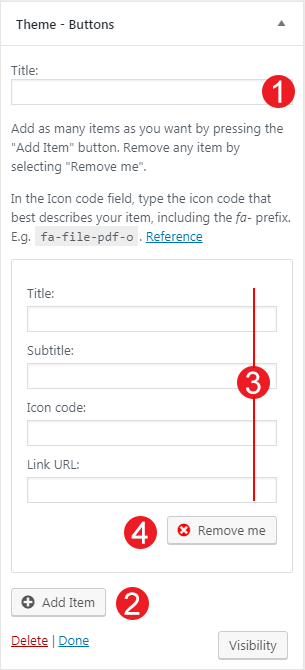
Theme-Buttons

This widget will help you render a list of buttons.

  1. Select the Widget Title.
  2. Add a new button.
  3. Add the button Properties, like title,subtitle, icon and link.
  4. Remove the button.

Theme(home)-Brands

Show a list of brands in your frontpage sidebar.

  1. Add a title and a subtitle for your widget
  2. Add a new brand item.
  3. Select your brand logo.
  4. Select a URL that your brand logo will target.
  5. Remove the brand item

Theme-Hero Callout

This will allow you to display a Hero Callout in all your sidebars.

  1. Add a Title for your Callout widget.
  2. Add a Subtitle for your Callout widget.
  3. Select a Button text and a URL.
  4. Change the text alignment.

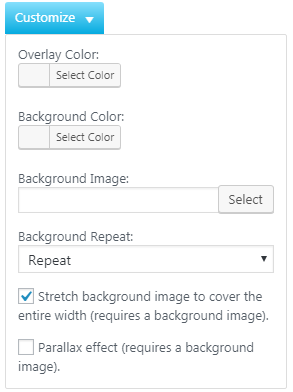
Customize Widgets

In some themes widgets, You can use the Customize button to add a background image or color. You can also create a color overlay or stretch your background image to cover the entire width of the widget. You can also enable a parallax effect for your background image.

Shortcodes

Shortcodes in WordPress are small  code like functions that allow you to do various things with little effort. The main reason to use them is to execute code inside WordPress posts, pages, and widgets without writing any code directly. They can be used in Elementor’s (or any other page builder) shortcode module.

Kea theme has two shortcodes you can use with various attributes:

[latest-post-type]

and

[amenities columns="4"]

You can display you amenities in columns

Next Steps

Still have questions or problems setting up your CSSIgniter Theme? We will be happy to help you out! Please visit our support Hub 
A CSS style guide for the default WordPress media player

Last Updated On
A CSS style guide for the default WordPress media player WordPress template

As theme authors we’re always striving to give our themes a unique design and marry them to the WordPress ecosystem by trying to provide a unified user experience, to the best possible extent. As WordPress comes with its own widgets, shortcodes, and other components, it’s important for any theme to take them into consideration and style them accordingly to its look and feel.

Most of WordPress’s native components (i.e. widgets or shortcodes) do not come with their own predefined styles (i.e. the Gallery shortcode), but other ones (especially JavaScript based ones) do so (i.e. the Audio player). In this post we’ll see how we can visually customize the default WordPress media player and make it feel at home on our theme.

Read More

Listee – Legacy

Last Updated On

Theme installation

The easiest way to install the theme, is by accessing your WordPress admin panel, then go to Appearance > Themes. Select the Install Themes tab and click the Upload link located just below the tab’s name. Click on Browse… and select the WordPress theme zip file you just downloaded. Then click the Install Now button, and after a few seconds, your new theme should be installed. Click activate and the theme is ready to use.

In order to install the theme manually, or in case you have trouble installing it through the admin panel, you have to unzip the WordPress theme’s zip file on your computer, and upload via FTP the resulting theme folder into your WordPress installation themes folder (wp-content/themes). Then, from the WordPress admin go to Appearance > Themes. The theme should be available in your themes list. Click activate.

TIP: More info on how to download and install a theme here.

WP Job Manager installation

Listee uses the WP Job Manager plugin and its custom post types to control the Business Listings. This means some basic page setup as well as setting functionality comes directly from the WP Job Manager.

To install the job manager plugin, navigate to Plugins >Add New and search for WP Job ManagerClick the button to install and activate the plugin.

Once the plugin is installed it will create three pages, the Jobs page which is the themes’s default Business listing page, the Job Dashboard page which allows a user to see all business listings they have posted at once and the Post a Job page which allows logged in users to post new business listings. You can add the latter two to the menu to allow businesses to post job listings and also access all their postings.

Initial configuration

The plugin’s configuration page can be found under Business > Settings, here you can configure the plugin to match your needs. We would suggest enabling Job Categories & Job Types which are by default disabled before importing sample content, you can also enable Multi Category & Multi Type selections, these will make your filtering system much more flexible. In the Job Submission tab you can configure the requirements for allowing users to submit business listings.

For more information the plugin’s extensive documentation can be found here.

Image Sizes

The minimum recommended image sizes for Listee are:

  • Post thumbnail: 750x500px
  • Entry items: 750x540px
  • Tall featured image:750px
  • Media Small:100x100px
  • Full Width 1140x470px
  • Hero image: 1920x500px

Useful Plugins

These plugins provide functionality and features used directly (or not) by the Theme. So, it is recommended to install and activate them before importing your sample content.

  • Contact Form 7 use this plugin to create a contact form, then copy the shortcode it gives you and paste it in a page which will serve as your contact page.
  • WP Instagram Widget: Use the latest version of this plugin to help you display your Instagram feed in any of the theme’s sidebars.
  • Elementor Page Builder:  A page builder that delivers high-end page designs and advanced capabilities, never before seen on WordPress.
  • MaxSlider: You can use our slider plugin to generate sliders for your homepage or any other page you want.

Importing Sample Content using One Click Import

To automate the process of importing and for a better experience we have natively included support for OneClick Import Plugin. Let install it fist:

From your WordPress dashboard

  1. Visit ‘Plugins > Add New’,
  2. Search for ‘One Click Demo Import’ and install the plugin,
  3. Activate ‘One Click Demo Import’ from your Plugins page.

From WordPress.org

  1. Download ‘One Click Demo Import’.
  2. Upload the ‘one-click-demo-import’ directory to your ‘/wp-content/plugins/’ directory, using your favorite method (ftp, sftp, scp, etc…)
  3. Activate ‘One Click Demo Import’ from your Plugins page.

Once the plugin is activated you will find the actual import page in: Appearance > Import Demo Data.

 Click on the Import demo data button and you are done!

This plugin requires PHP version of at least 5.3.x, but we recommend version 5.6.x or better yet 7.x. Please contact your hosting company and ask them to update the PHP version for your site.

Adding a new post

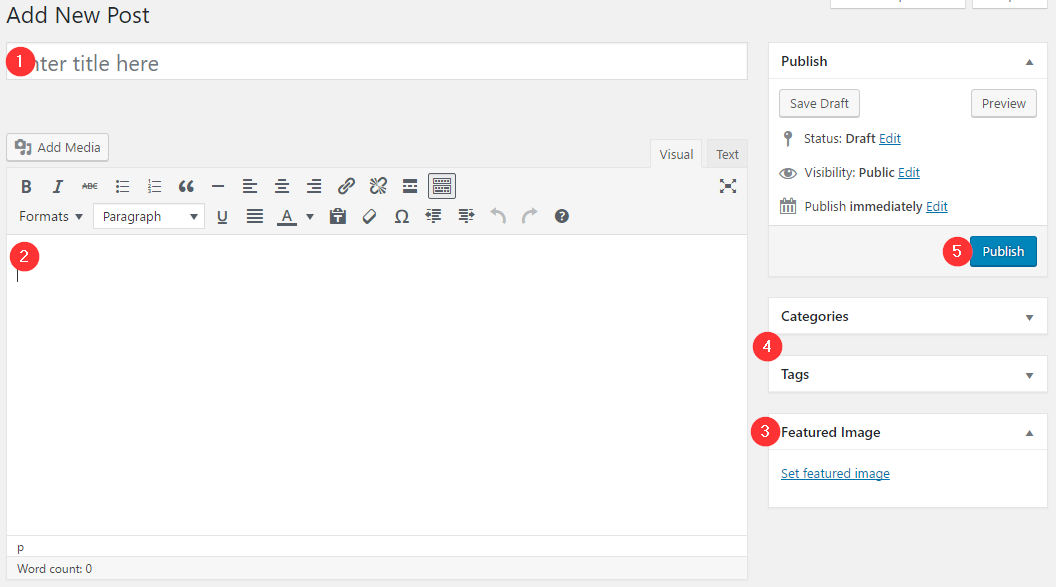
To add new posts to your blog, go to Posts > add new and proceed to:

  1. add a title to your post,
  2. enter the content in the editor,
  3. upload a featured image by clicking “Set featured image” on the Featured Image panel,
  4. add a category and/or tag to the post,
  5. once finished click the Publish button to publish the post.

new_post

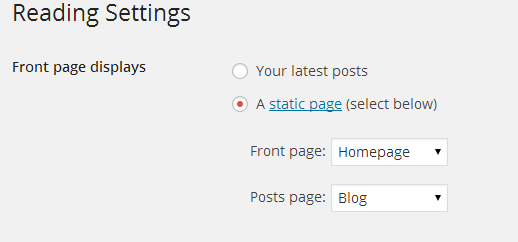
Creating a page for your posts

To setup your blog page you can go to Pages > Add New and create a page named Blog. Then navigate to Settings > Reading and set that page as your posts page.

settings_reading

Now you can add that page to your menu to give your visitors easy access to all your posts.

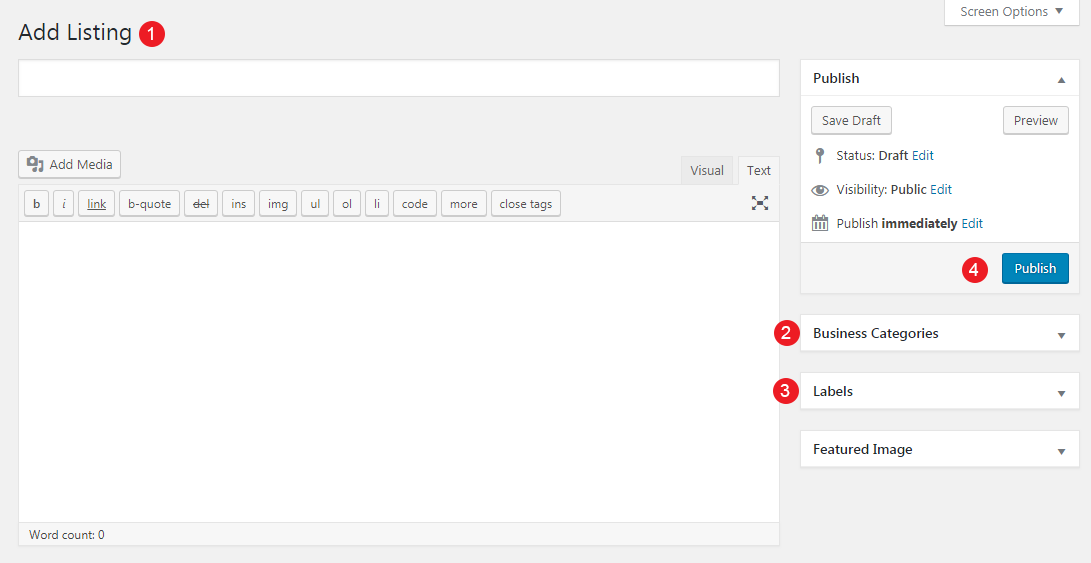
Adding a new Business Listing

To create a new Business listing go to Business Listings > Add New.

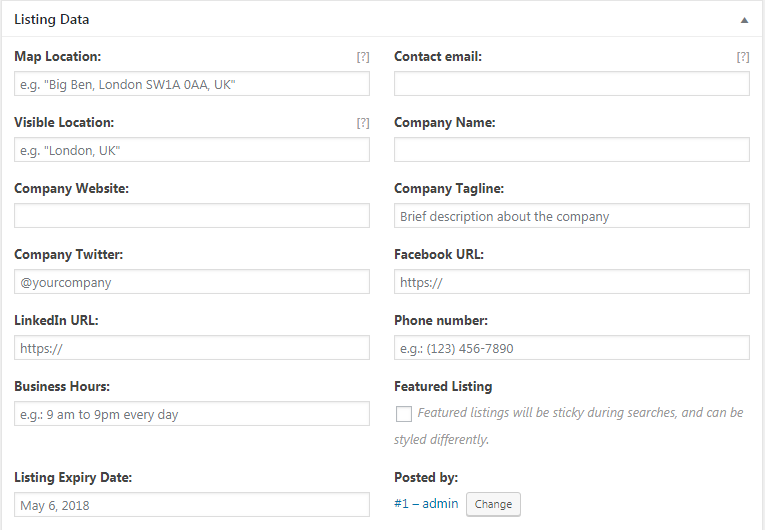
Start by adding the title, description, category, type and company logo, once done move on to the Job Data section below.

Most of the fields above are pretty self explanatory, let’s have a look at a couple that might need some explanation.  The Featured Listing box allows to to mark the listing as such, this will make it sticky during searches and it also gives you the ability to style it differently to stand out. Finally the Listing Expiry Date allows you to set an expiration date for the business listing, after that date the listing and its content won’t be visible if the Appropriate fields are selected from Businesses→Settings→Job Listings.

Once everything is filled in you can go ahead and publish the business listing.

Creating a Business Listing page

To do that create a new page and apply to it the Business Directory template from the Page Attributes panel.  This page must be Selected as a business Listing Page from Businesses→Settings→Pages.

As mentioned earlier the plugin creates a business listing page when installed, however our own listing offers a more refined filtering system as you can see on the theme’s demo, so you might want to use the custom one instead of the default.

Frontpage Page

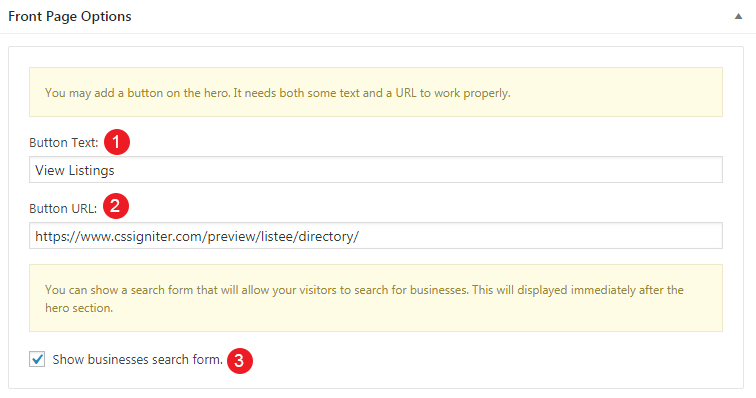
To set up the homepage create a page named Home and set to it the Front page Template from the Page Attributes drop down on the right. The frontpage except the Hero panel which appears in all pages has also a Frontpage Options setting area.

Here you can

  1. Add a Button Text in your Frontpage Hero Section
  2. Add a link to your Business Directory.
  3. Allow the Search form to render in the frontpage.

To add content to your front page go to Customize > Widgets or Appearance > Widgets and use the theme’s widgets to help you display your content. You will notice that in your Frontpage template page under the WordPress text Editor you have a Frontpage Options section.

Replicate our demo Homepage

Add in your Frontpage Widget area

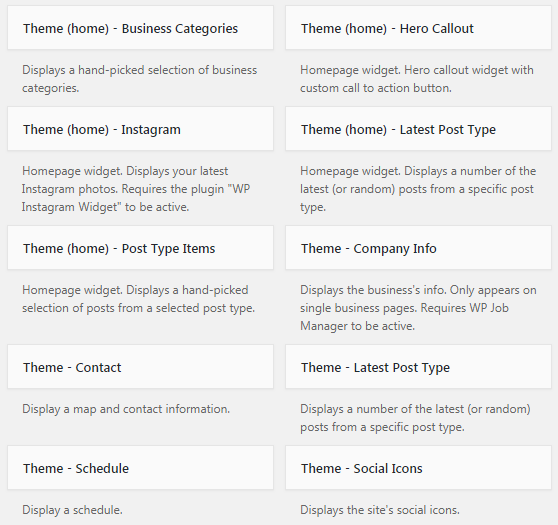
  1. Theme (home) – Post Type Items widget
  2. Theme (home) – Business Categories widget.
  3. Theme (home) – Hero Callout widget
  4. Theme (home) – Latest Post type widget

These should give you the look and feel of our demo frontpage.

Full Width Page

In this page you can add any content you wish without displaying the sidebar.

Default Page

In this page you can add any content you wish but the the sidebar. You can select under Sidebar section where you need your sidebar to appear

Also, you can select whether you need to display the featured image in that page.

Hero Section

The Hero Section is a generic options box you can find in All pages  and will help your control the Hero Section for each page.

This the basic section before the contents of your page and you can :

  1. Add A Page title.
  2. Add a Page subtitle.

Also you can style your Hero with a background image / video or color :

  1. Align the Title.
  2. Hide the Page title.
  3. Add a Background Color or an Overlay color in case you have a background image with the same color of your Hero title or subtitle.
  4. Add a background Video.
  5. Add a background image and change its position  and screen coverage.

Customizing the theme

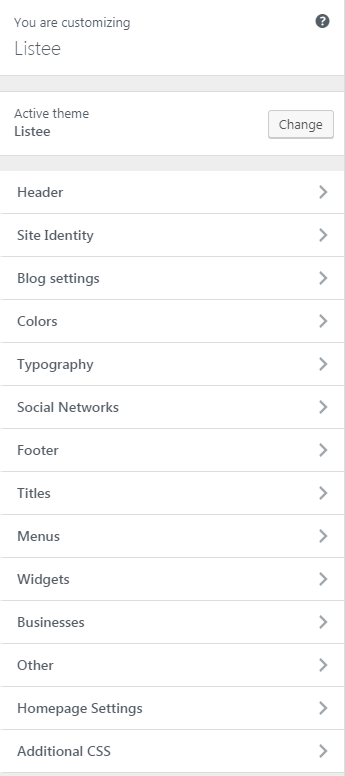
All the theme’s options can be accessed via WordPress’ customizer. Navigate to Appearance > Customize and you will be presented with this panel.

If you have used any theme from the WordPress.org theme directory you should be familiar with the usage of the customizer, if not you can read more about it here. Below we will take a look at the options each section offers.

Header Options are split into three sections. In the Header style section  you can set the logo layout you wish your header to have and make it full width.

Under the Top menu bar you can add some custom text to it like your email or phone number. as well as select whether you need to show or not Search module or your social Icons.

In the Primary menu bar  you can select if you wish to have a sticky menu and change various display settings like the vertical padding of the menu and its text size.

Site Identity

Here you can set your site’s logo, title, tagline, logo padding and site title and tagline.

Blog Settings

This tab allows you to customize your blog and post options.

Under Post Options you can select which elements you wish your single blog posts to have. This includes showing or hiding the date, the featured image, the author and author box etc. Or even enabling/disabling the Lightbox option for your galleries.

In Archive options you have customize the default WordPress archive pages like category, tag, etc.

  1. Change the Layout by selecting in how many columns you need your content to appear.
  2. Enable Masonry effect in case you have articles with different content and featured image height.
  3. Select the article excerpt length.
  4. Select a pagination method.

Colors

This tab allows you to customize the colors and background images for the entire site, the top bar and header, hero section, sidebars and the footer.

Typography

Through this tab you can control the font size of key theme elements, such as headings, body and widgets. If you want to change the default Theme fonts have a look here.

Social Networks

Here you can fill in all links to your social profiles and display them via a custom widget on any sidebar.

Titles

In this tab you can set titles for the blog section, search and 404 pages.

Here you can create and assign menus to the theme. To learn more about menu creation check out the Codex’s menu user guide here.

Blockchain provides a mini mega menu feature. If you need to enable two columns in your menu you can navigate to Appearance >Menus and add a new item

Businesses

Here you can toggle if you want the business location, phone and business hours to render.

Widgets

Through this tab you can access all the available theme sidebars and add widgets to them.

Here you can modify the credits text and your Footer Column Layout. Also, you have an option to make your footer full width.

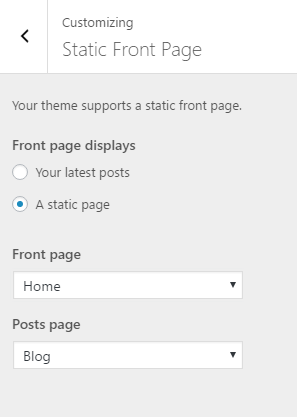
Static Front Page

static_front_page

Using this tab we can choose what gets displayed on the front page of our site. For example if we want to create a homepage using a page builder we will need to create a new page using the Page Builder template, name it home and set it as our Front Page above. The Posts Page is the page that will display our post listing, as discussed earlier in the post creation section.

Other

Here, you can find the sample content files and enable/disable Google Maps from your Listing Directory.The Google Maps API must only be loaded once in each page. Since many plugins may try to load it as well, you might want to disable it from the theme to avoid potential errors. Please note that you need to set a API key in WP Job Manager’s settings, found in Dashboard >Businesses > Settings. Have a look here on generating a Google Maps API key along with Geocoding which is required by the theme.

How to use the page builder template

The theme comes bundled with a page builder template which allows you to use your favorite page builder plugin on it and create unique layouts very easily.

To use that template start by going to Pages > Add New. This will create a new page. Add a title to your page and select the Page builder template from the template drop down in the Page Attributes metabox.

ci_page_builder_template

That’s it. You can now start building your page using a page builder of your choice. On the theme’s demo we have used extensively the Elementor page builder plugin.

Widgets

The theme comes with mangy custom widgets which allow you to display all major aspects of your content in any sidebar your wish. Notice some widget have (home) tag shown, which means they are meant to be used in the homepage widget area.

Theme-Contact

Using this widget you can create a contact box including a title a map and various complementary elements with icons that will help you add more information like telephone etc about your business.

  1. Add a title for your Contact widget.
  2. Add a map code (iframe).
  3. Add a contact title
  4. Create new complementary elements.
  5. Add an icon code  (from fontawesome.io) and some text along.

Theme-Schedule

This widget allows you to create a small Schedule table with extra contextual information.

  1. Add a title for your widget
  2. Add some complementary text. You can use HTML tags also if you wish.
  3. Add a new day/time widget.
  4. Add your day and time information for each item.

Theme-Social Icons

This widget displays your site’s social icons. In order to set them up, you need to visit Appearance > Customize > Social Networks and provide the appropriate URLs where desired.

Theme (home)-Hero Callout

This will allow you to display a Hero Callout specially designed for your frontpage sidebar.

  1. Add a Title for your Callout widget.
  2. Add a Subtitle for your Callout widget.
  3. Select a Button text and a URL.
  4. Change the text alignment.

Theme(home)-Post Type Items

This widget is built to help you display any post you wish  in your Homepage Widget  area.

  1. Add a title.
  2. Select the post type.
  3. Select the output columns.
  4. Add the Item you wish to output.
  5. Select the Item from the dropdown menu.

Theme(home)-Latest Post Type

This widget is built to help you display your latest posts  in your Homepage Widget  area.

  1. Add a title.
  2. Add a subtitle.
  3. Select the post type you want to get the latest items.
  4. Check if you need random posts instead.
  5. Add the number of posts.
  6. Select the output columns.

Theme-Company info

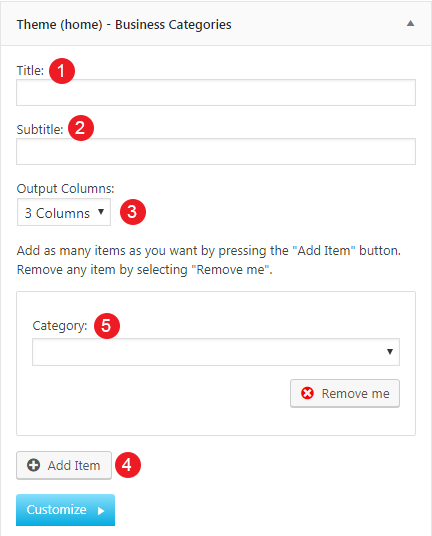
This widget displays the company information for the current business viewed.

Theme(home)-Business Categories

This widget is built to help you display your business categories  in your Homepage Widget  area.

  1. Add a title.
  2. Add a subtitle.
  3. Select the columns in which the categories will appear
  4. Create a new item
  5. Select your Listing Category

Additional Information & Common Questions

Where can I create Menu Buttons?

If you would like to create buttons on the menu you can use the nav-button class. For info on how to apply it, please read this small guide. (No styling needed on your part, just add the class and save the menu).

Why my Listing Map does not appear?

Please make sure you have enabled Google Maps from Appearance→Customize→Maps by Enabling the Google Maps API and checking the “Show map” option. Google Maps require an API key and Listee need the Geocoding feature enabled on top of this key. Have a look here on how to generate a valid API key.

You can navigate to Businesses→Categories and click the “Edit” button on the category you wish to edit. Then select a description and a featured image and save your changes.

How can I create a Business Submission page?

Create a new Page from Submit Business Form Page Then add this shortcode

[submit_job_form]

inside your content and save your changes. Select this page as a Submit Business Form Page from Businesses→Settings→Pages.

Why Elementor does not work in the frontpage template?

The frontpage template is actually a widgetized area, which you can Control by adding / editing widgets from Appearance→Widgets→Frontpage or Appearance→Customize→Widgets→Frontpage. If you want to create your own landing page as a frontpage, check this guide.

Support

Still have questions or problems setting up your CSSIgniter Theme? We will be happy to help you out! Please visit our support Hub 
How to convert a GMT/UTC timestamp to local time in WordPress

Last Updated On
How to convert a GMT/UTC timestamp to local time in WordPress WordPress template

WordPress goes to great lengths in order to provide us with a localized environment, displaying dates and times in the correct format and even language. However, since it uses its own timezone setting, some native PHP functions are no longer applicable (or don’t return correct results), such as the date() function which returns a date/time string depending on the timezone configuration of PHP itself, ignoring the WordPress setting.

Read More

Things to consider when updating a WordPress theme for Gutenberg

Last Updated On
Things to consider when updating a WordPress theme for Gutenberg WordPress template

With Gutenberg getting close to being ready for a beta release and ultimately being merged into core WP, its API and patterns are at a level mature enough that theme authors (and theme shops!) can start planning ahead for the inevitable adoption of the new block system.

In this post we’ll see what the average theme author should have in mind when updating a theme for Gutenberg compatibility and ponder about the future in theme and plugin editing.

Read More

Project Gutenberg – Technology decisions

Last Updated On
Project Gutenberg – Technology decisions WordPress template

Gutenberg, the new and modular editing experience for WordPress, has been in rapid development throughout the past year and will soon arrive to our WordPress installations. Gutenberg will be released along with WordPress 5.0 (which is the next major release), and although no official date has been set for that, it’s safe to assume that it’s not very far away especially judging by the remaining features for MVP completion.

Read More

Blockchain – Legacy

Last Updated On

About

Blockchain is premium Business theme for Cryptocurrency professionals and enthusiasts.

WordPress theme installation

The easiest way to install the theme is by accessing your WordPress admin panel, then go to Appearance > Themes. Select the Install Themes tab and click the Upload link located just below the tab’s name. Click on Browse… and select the WordPress theme zip file you just downloaded. Then click the Install Now button, and after a few seconds, your new theme should be installed. Click activate and the theme is ready to use.
In order to install the theme manually, or in case you have trouble installing it through the admin panel, you have to unzip the WordPress theme’s zip file on your computer and upload via FTP the resulting theme folder into your WordPress installation themes folder (wp-content/themes). Then, from the WordPress admin go to Appearance > Themes. The theme should be available in your themes list. Click activate.
TIP: A more visual guide can be found here.

Image Sizes

The recommended image sizes are:

Post Thumbnail: 850x567px
Media Item:  555x400px
Media Item Tall:  555px in width and unlimited in height
Media Item small: 80x80px
Full width: 1140x650px
Hero image: 1920x500px
Slide: 1920x850px

 Useful Plugins

These plugins provide functionality and features used directly (or not) by the Theme. So, it is recommended to install and activate them before importing your sample content.

  • Blockchain Specific plugin: You will be asked to auto install this plugin when installing the site. You can find this under your theme /plugins/ folder.
  • One Click Import  Use this plugin to help you import your content with just one click.
  • MaxSlider  Use this plugin to help you create custom sliders and use them anywhere you wish shortcodes.
  • Elementor  A free page builder that delivers high-end page designs and advanced capabilities.
  • WPForms use this plugin to create a contact form, then copy the shortcode it gives you and paste it in an empty page.
  • Woocommerce: Enable eCommerce functionality for your website.
    Translating Blockchain
  • WPML: Blockchain supports natively WPML. With WPML you can translate pages, posts, custom types, taxonomy, menus and even the theme’s texts.

Importing Sample Content using One Click Import

To automate the process of importing and for a better experience we have natively included support for OneClick Import Plugin. Let install it fist:

From your WordPress dashboard

  1. Visit ‘Plugins > Add New’,
  2. Search for ‘One Click Demo Import’ and install the plugin,
  3. Activate ‘One Click Demo Import’ from your Plugins page.

From WordPress.org

  1. Download ‘One Click Demo Import’.
  2. Upload the ‘one-click-demo-import’ directory to your ‘/wp-content/plugins/’ directory, using your favorite method (ftp, sftp, scp, etc…)
  3. Activate ‘One Click Demo Import’ from your Plugins page.

Once the plugin is activated you will find the actual import page in: Appearance > Import Demo Data.

 Click on the Import demo data button and you are done!

This plugin requires PHP version of at least 5.3.x, but we recommend version 5.6.x or better yet 7.x. Please contact your hosting company and ask them to update the PHP version for your site.

Installing WooCommerce

To enable eCommerce functionality for your website you need to install and activate the WooCommerce plugin by WooThemes. You can download the plugin free of charge from the WordPress Plugin Repository.

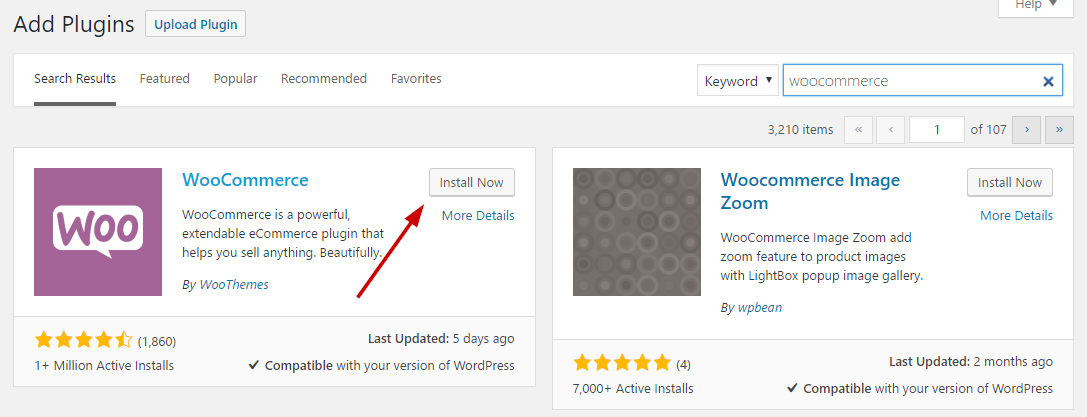
Go to Plugins > Add New and search for WooCommerce. Once the results come back, click the Install Now button.

wc_install

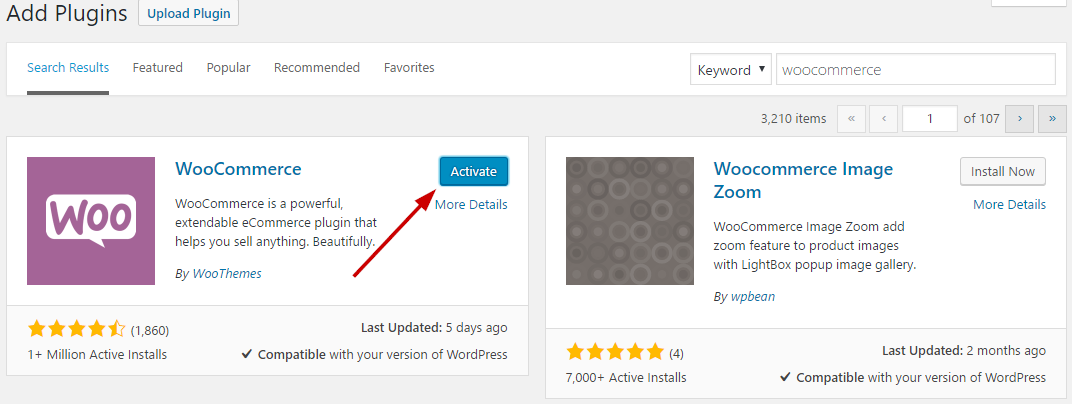
Once the installation is finished, click the Activate button to activate the plugin.

wc_activate

For detailed installation and usage instructions please refer to the plugin’s documentation.

Once you have installed and activated the WooCommerce plugin please install its pages by clicking on the button that WooCommerce provides on its banner. This will likely create a duplicate of some pages along with the pages install by the sample content but its a needed step. You can delete the old pages that came with the sample content or use them instead by going to WooCommerce > Settings > Pages and assign them anew.

Theme pages

Let’s start by adding the first few basic pages you are going to need. Go to Pages > Add New and create the following pages:

Frontpage Page

To set up the homepage create a page named Home and set to it the Front page Template from the Page Attributes drop down on the right. To add content to your front page go to Customize > Widgets or Appearance > Widgets and use the theme’s widgets to help you display your content. You will notice that in your Frontpage template page under the WordPress text Editor you have a Frontpage Options section.

Replicate our demo Homepage

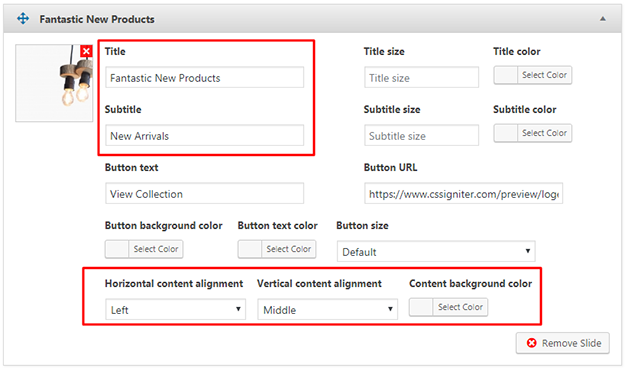
First we need to create a new slider from Max Slider >Add New. Then, add three slides selecting your title and subtitle alignment

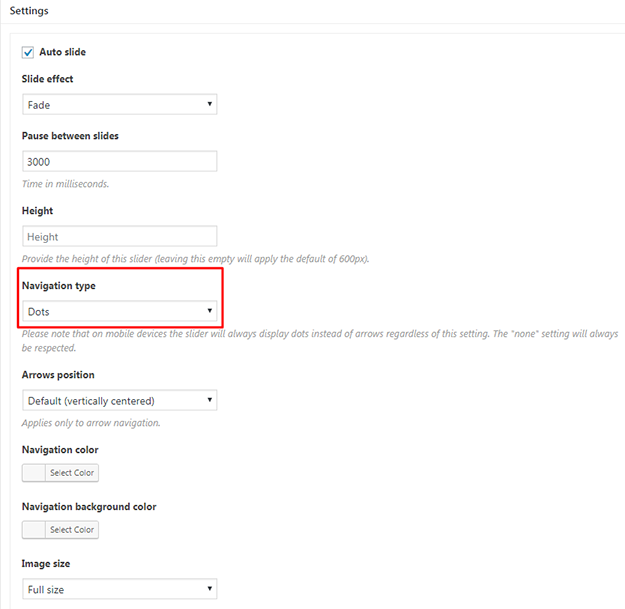
and select the dots navigation under the Settings section.

MaxSlider is a versatile plugin with many options for you to explore. Have a look at the plugins documentation here first.  Don’t forget to actually select your slider in your Frontpage (Pages > All Pages)  from the drop down menu under the Frontpage Options  Slider tab as mentioned above.

Continuing with the content under the slider, the frontpage is a widget ready area in which you can add any widget you need from Appearance >Customize >Widgets >Frontpage. To recreate our original frontpage you will need to add 6 widgets. These are:

Blog

This will be your posts page. Just create and publish a blank default page named “Blog” (or whatever you wish to name it) without adding any content, no further action needed for now.

Full Width Page

In this page you can add any content you wish without displaying the sidebar.

Default Page

In this page you can add any content you wish but the the sidebar. You can select under Sidebar section where you need your sidebar to appear

Also, you can select whether you need to display the featured image in that page.

by checking the “Hide when viewing this post’s page” option in your Featured image box.

Header Options

The Hero Section is a generic options box you can find in All pages and will allow to to control where you need your header to appear.

Hero Section

The Hero Section is a generic options box you can find in All pages and will help your control the Hero Section for each page.

This the basic section before the contents of your page and you can :

  1. Add A Page title.
  2. Add a Page subtitle.

Also you can style your Hero with a background image / video or color :

  1. Align the Title.
  2. Hide the Page title.
  3. Add a Background Color or an Overlay color in case you have a background image with the same color of your Hero title or subtitle.
  4. Add a background Video.
  5. Add a background image and change its position  and screen coverage.

Custom post type listing pages

In order to display your custom post types you will need to create a listing page for each one. Go to Pages > Add New  and create a new page selecting some its page attributes the Listing Template you need to Apply. Below you will find more information for each template.

Case Studies Listing

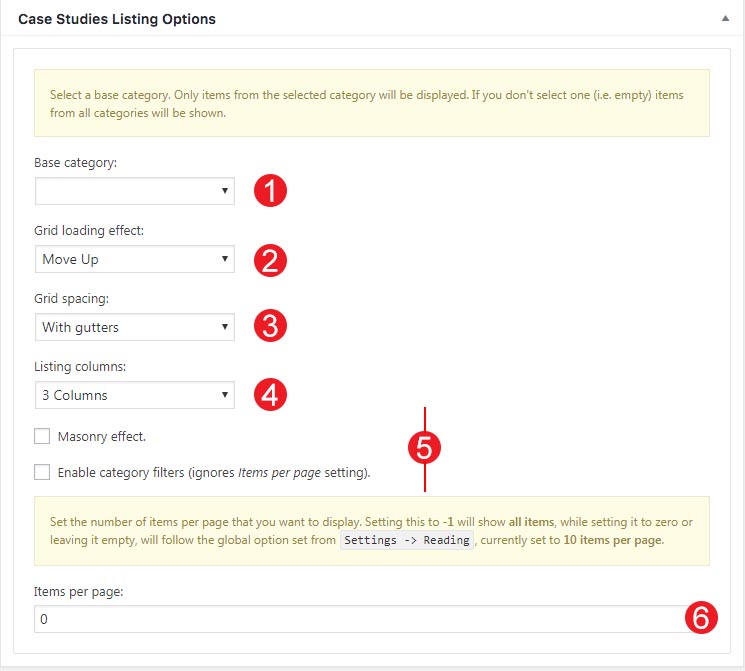
Here you can list all your Case Studies from a selected category or not. Let check all the Case Studies options:

  1. Select a Base Category or leave blank if you wish all your case studies to appear
  2. Select a loading Effect for your grid
  3. Select the spacing for your items
  4. Select the number of Columns
  5. Check if you need a masonry effect and category filtering
  6. Select how many items you need to render

Testimonials Listing

Here you can list all your Testimonials.

  1. Select a loading Effect for your grid
  2. Select the spacing for your items
  3. Select the number of Columns
  4. Select how many items you need to render

Jobs Listing

Here you can list all your Jobs posts.

Events Listing

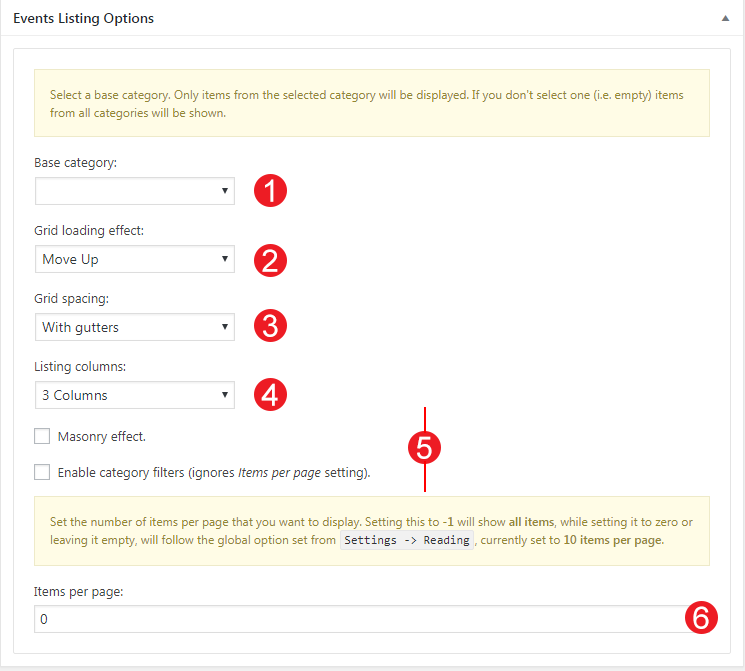
Here you can list all your Events from a selected category or not. Let check all the Events options:

  1. Select a Base Category or leave blank if you wish all your items to appear
  2. Select a loading Effect for your grid
  3. Select the spacing for your items
  4. Select the number of Columns
  5. Check if you need a masonry effect and category filtering
  6. Select how many items you need to render

Teams Listing

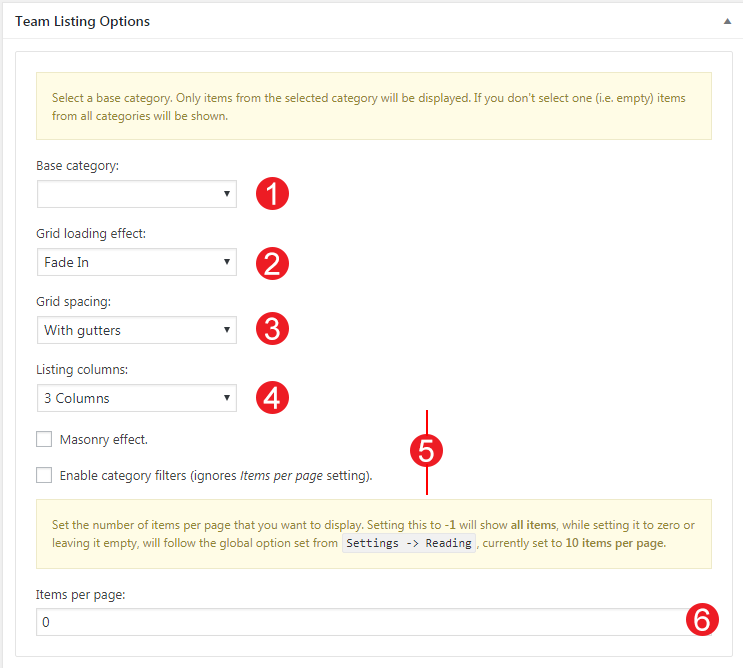
Here you can list all your Team Members from a selected category or not. Let check all the Team options:

  1. Select a Base Category or leave blank if you wish all your items  to appear
  2. Select a loading Effect for your grid
  3. Select the spacing for your items
  4. Select the number of Columns
  5. Check if you need a masonry effect and category filtering
  6. Select how many items you need to render

Portfolio Listing

Here you can list all your Portfolio from a selected category or not. Let check all the Porfolio options:

  1. Select a Base Category or leave blank if you wish all your items  to appear
  2. Select a loading Effect for your grid
  3. Select the spacing for your items
  4. Select the number of Columns
  5. Check if you need a masonry effect and category filtering
  6. Select how many items you need to render

Services Listing

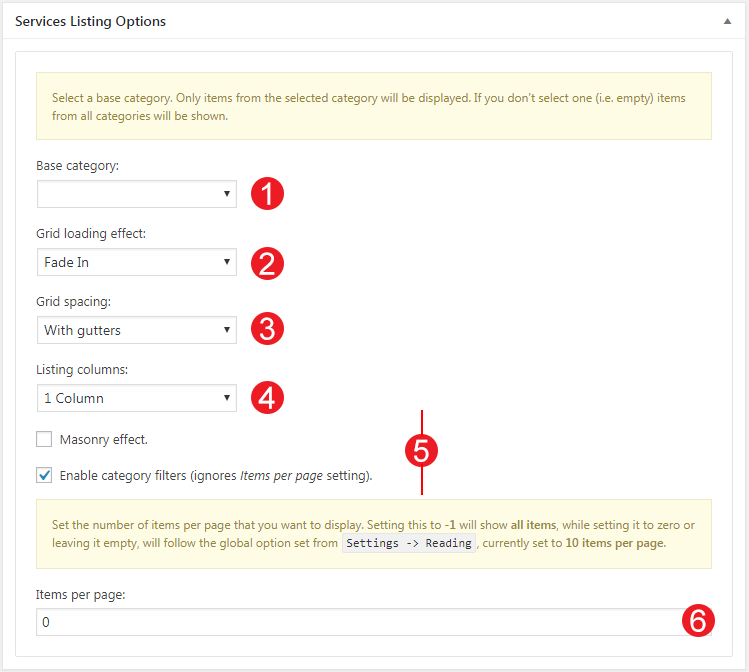
Here you can list all your Services from a selected category or not. Let check all the Services options:

  1. Select a Base Category or leave blank if you wish all your items to appear
  2. Select a loading Effect for your grid
  3. Select the spacing for your items
  4. Select the number of Columns
  5. Check if you need a masonry effect and category filtering
  6. Select how many items you need to render

Page builder template

The theme comes bundled with a page builder template which allows you to use your favorite page builder plugin on it and create unique layouts very easily.

To use that template start by going to Pages > Add New. This will create a new page. Add a title to your page and select the Page builder template from the template drop down in the Page Attributes metabox.

That’s it. You can now start building your page using a page builder of your choice. On the theme’s demo we have used extensively the Elementor page builder plugin.

Setting up your theme

In this section we are going to have a closer look in Blockchain’s unique features like Portfolio, Services, Case Studies, Team Members, Jobs, Events, Testimonial Items.

Adding Services Items

To add new Service item go to Service > Add new and fill in the title, content and featured image. Next, in the Custom Excerpt metabox you can control the content after the title in the single Service and in its listings.

Adding Portfolio Items

To add new Portfolio item go to Portfolio > Add new and fill in the title, content and featured image. Next, in the Custom Excerpt metabox you can control the content after the title in the single Portfolio pages and in its listings.

Adding Team Members

To add new Team Member go to Team Member> Add new and fill in the title, content and featured image. Next, in the Custom Excerpt metabox you can control the content after the title in the single Portfolio pages and in its listings.

Adding Job Items

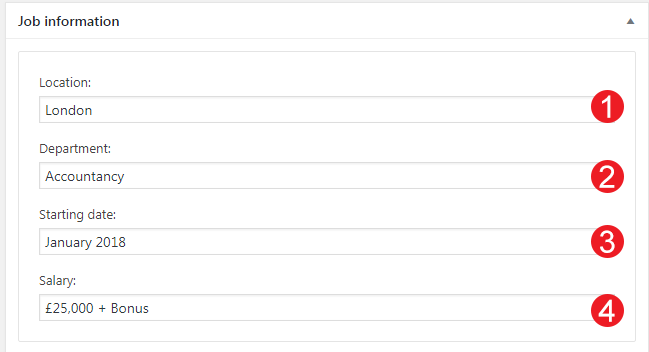
To add new Job go to Jobs > Add new and fill in the title, content and featured image. Next, in the Custom Excerpt metabox you can control the content after the title in the single Portfolio pages and in its listings. Under Job Information box you can add additional Info for your job listing.

  1. Add the City the Job is located.
  2. Add the type of Job,
  3. Select a Starting date.
  4. Add a salary status.

Adding Events

To add new Event go to Events > Add new and fill in the title, content and featured image. Next, in the Custom Excerpt metabox you can control the content after the title in the single Portfolio pages and in its listings. Under Event Information box you can add additional fields for your Event.

  1. Add the event date.
  2. Add the event time.
  3. Select the event Location

Adding Testimonial Items

To add new Testimonial item go to Testimonial> Add new and fill in the title, content and a featured image.

Adding Case Studies

To add new Case Study item go to Case Studies > Add new and fill in the title, content and featured image. Next, in the Custom Excerpt metabox you can control the content after the title in the single Portfolio pages and in its listings.

Customizing Your Theme

All theme customization is done via WordPress’s built in customizer. If you haven’t used it or want to learn more about it, please read this article.

Go to Appearance > Customize and you will see this

TIP: any changes you make in the tabs below will be previewed live on the site which appears in right side of the screen, however to save these changes you need to click the Save & Publish button on the top of the bar, if you have made a change but see the button grayed out (for example changed the font size of a heading), move the cursor outside the input box, for example, to the next input box, then the button should be clickable again.

Let’s take a look at the options each tab gives you.

Header Options are split into three sections.

In the Header style section  you can set the logo layout you wish your header to have and make it full width.

Under the Top menu bar you can add some custom text to it like your email or phone number. as well as select whether you need to show or not Search module or your social Icons.

In the Primary menu bar  you can select if you wish to have a sticky menu and change various display settings like the vertical padding of the menu and its text size.

Site Identity

Here you can  change the logo and favicon as well as the title and description. Use the appropriate fields to add your information, show or hide your site title and subtitle and upload your logo and site icon images.

Blog Settings

This tab allows you to customize your blog and post options.

Under Post Options you can select which elements you wish your single blog posts to have. This includes showing or hiding the date, the featured image, the author and author box etc. Or even enabling/disabling the Lightbox option for your galleries.

In Archive options you have customize the default WordPress archive pages like category, tag, etc.

  1. Change the Layout by selecting in how many columns you need your content to appear.
  2. Enable Masonry effect in case you have articles with different content and featured image height.
  3. Select the article excerpt length.
  4. Select a pagination method.

Colors

This tab allows you to customize the colors and background images for the entire site, the top bar and header, hero section, sidebars and the footer.

Typography

Through this tab you can control the font size of key theme elements, such as headings, body and widgets. If you want to change the default Theme fonts have a look here.

Here you can create and assign menus to the theme. To learn more about menu creation check out the Codex’s menu user guide here.

Blockchain provides a mini mega menu feature. If you need to enable two columns in your menu you can navigate to Appearance >Menus and add a new item

with the CSS Class mega-menu. You can enable the CSS Classes box from Screen Options. For more info have a look this article http://www.cssigniter.com/docs/article/screen-options/

Now you can create a menu structure like this

as a child to your Mega menu item.

Titles

In this tab you can change the titles for various theme pages, like the blog, search and 404 as well as for your related items in single Portfolio.

Social Networks

In this section You can add your Social Network URLs. These icons will be displayed in the Theme-Social Icons Widget automatically.

Here you can modify the credits text and your Footer Column Layout.

Additional CSS

In this tab we host the custom CSS panel which you can use to insert styles for elements not covered in the rest of the tabs.

Other

Here you can download your sample content files.

Widgets

Through this tab you can add widgets to the theme’s sidebars. The theme features eight Sidebar Areas in order to provide the best option to display your content.

Static Front Page

Use this tab to make the Home page your static front page so you can take advantage of the homepage template we have created for you.

Woocommerce

In this tab you can change the number of products on shop listing page and control your Woocommerce Settings.

Widgets

We have handcrafted some custom widgets to help you better display your content. You will find them under Appearance > Customize > Widgets or Appearance > Widgets

Theme-Contact

Using this widget you can create a contact box including a title a map and various complementary elements with icons that will help you add more information like telephone etc about your business.

  1. Add a title for your Contact widget.
  2. Add a map code (iframe).
  3. Add a contact title
  4. Create new complementary elements.
  5. Add an icon code  (from fontawesome.io) and some text along.

Theme-Schedule

This widget allows you to create a small Schedule table with extra contextual information.

  1. Add a title for your widget
  2. Add some complementary text. You can use HTML tags also if you wish.
  3. Add a new day/time widget.
  4. Add your day and time information for each item.

Theme(home)-Instagram

This will allow you to display your Instagram Account in your Front Page or Pre-Footer sidebar. The WP Instagram Widget must be installed and activated in order this Widget to appear

  1. Add a title for your Instagram Widget.
  2. Add your Instagram Account.
  3. Add a number of photos you wish to display.
  4. Select whether you need your images to open in the current window or open in a new tab.
  5. Change the link text.

Theme-Latest Post Type

This widget is built to help you display your latest posts  in any widget area you wish.

  1. Add a title.
  2. Select the post type you want to get the latest items.
  3. Check if you need random posts instead.
  4. Add the number of posts.

Theme(home)-Post Type Items

This widget is built to help you display any post you wish  in your Homepage Widget  area.

  1. Add a title.
  2. Select the post type.
  3. Select the output columns.
  4. Add the Item you wish to output.
  5. Select the Item from the dropdown menu.

Theme(home)-Latest Post Type

This widget is built to help you display your latest posts  in your Homepage Widget  area.

  1. Add a title.
  2. Add a subtitle.
  3. Select the post type you want to get the latest items.
  4. Check if you need random posts instead.
  5. Add the number of posts.
  6. Select the output columns.

Theme-Social Icons

This widget displays your site’s social icons. In order to set them up, you need to visit Appearance > Customize > Social Networks and provide the appropriate URLs where desired.

Theme-Top Crypto Ticker

This widget will display a ticker of the top cryptocurrencies.

  1. Add a title for your Widget
  2. Select the number of top cryptocurrencies
  3. Select the number to currencies your need to skip
  4. Difference in price from past time.
  5. Display cryptocurrency price equivalent in USD or any other currency

Theme-Single Crypto Symbol

Shows only one Cryptocurrency status.

  1. Select the Title of your widget
  2. Select the cryptocurrency you are interested in.
  3. Display cryptocurrency price equivalent in USD or any other currency

Theme (home)-Hero Callout

This will allow you to display a Hero Callout specially designed for your frontpage sidebar.

  1. Add a Title for your Callout widget.
  2. Add a Subtitle for your Callout widget.
  3. Select a Button text and a URL.
  4. Change the text alignment.

Theme-Buttons

This widget will help you render a list of buttons.

  1. Select the Widget Title.
  2. Add a new button.
  3. Add the button Properties, like title,subtitle, icon and link.
  4. Remove the button.

Theme(home)-Brands

Show a list of brands in your frontpage sidebar.

  1. Add a title and a subtitle for your widget
  2. Add a new brand item.
  3. Select your brand logo.
  4. Select a URL that your brand logo will target.
  5. Remove the brand item

Theme-Hero Callout

This will allow you to display a Hero Callout in all your sidebars.

  1. Add a Title for your Callout widget.
  2. Add a Subtitle for your Callout widget.
  3. Select a Button text and a URL.
  4. Change the text alignment.

Customize Widgets

In some themes widgets, You can use the Customize button to add a background image or color. You can also create a color overlay or stretch your background image to cover the entire width of the widget. You can also enable a parallax effect for your background image.

Shortcodes

Shortcodes in WordPress are small  code like functions that allow you to do various things with little effort. The main reason to use them is to execute code inside WordPress posts, pages, and widgets without writing any code directly. They can be used in Elementor’s (or any other page builder) shortcode module.

Blockchain theme has many shortcodes you can use with various attributes:

[crypto-table]

Shows a cryptocurrency table with various functions.

Attributes you can use
limit: Limit the number of results. Default 15.
start: Start offset. start=”10″ will display from 11th onwards.
fiat: Fiat currency to convert to. Default USD.

How to translate Blockchain using WPML

  • Translating pages
  • Translating post types
  • Translating texts from the Blockchain theme.
  • Translating menus
  • Translating  Widgets
  • Translating MaxSlider sliders

Blockchain is designed to be fully compatible with WPML and 100% translatable. Make sure that the WPML Multilingual CMS, WPML String Translation, WPML Translation Management, and WPML Media Translation plugins are activated. If you need to find more details on translating page please refer to the WPML’s Getting Started Guide.

Translating Pages

Translating Pages is quite easy with WPML. First navigate to Pages→All Pages and select the page you want to translate. Then you will notice in your page the Language section

Here you can

  1. Select if you want to use the new WPML’s Transaltion Editor
  2. Translate the page in any language you want.
  3. Select the correct template after translating the page.

Translate the Frontpage

Frontpage in Blockchain consists of a large widgetized area, so translating it as you would normaly do in a simple page will not have the wanted results, thus we will need to translate also our widgets in the Frontpage Sidebar.

  1. Select the language you want to translate
  2. Select the correct template when creating a new translation.

Translating widgets can be handled using two different methods, either having different widgets for different languages of following this guide.

Translating the Frontpage Slider

Blockchain uses free MaxSlider, which is also designed and maintained by CSSIgniter.

To translate your sliders created using the MaxSlider, you will need to navigate to MaxSlider → Add New. Create a new slider like described here and save it. Now, from MaxSlider→MaxSlider choose  the slider that you want to translate. In this example, we will translate the our Frontpage slide. Click the plus icon under the language you want to translate your slider into (1).

In the edit Slider Screen you can translate your slides or change their settings for the specific language you want.

When clicking on any plus sign a new Slider will be created that will serve as your translated slider. This is actually a new item:

  1. Add a new title of your preference
  2. Change to your translated content
  3. Translate when you finish in the missing languages.

Notice you can copy all your content from the English version of the Slider. This will make you translation tasks easier, since you probably need to keep the same image and settings.

Remember your new translated slider has a different shortcode now, which you will need to use.

Especially when you using the Frontpage Template and translating it, you will need to select the translated slider item from your Frontpage Options

Translate Post types and Taxonomies

Using Blockchain you can easily translate all post types that come along with Blockchain. WPML provides the Translatable – use translation if available or fallback to default language mode. It automatically displays the translation of the post type if it is available. Otherwise, it will display the post in the default language. This means that users can simply show the original content if no translation is available, without the need to duplicate the content. To control the translation mode for each post types, please use the following steps:

  1. Go to the WPML → Settings page.
  2. Scroll down to Post Types Translation.
  3. Select the option Translatable – use translation if available or fallback to original language for the chosen post types.

Have a look here  for more information on translating Slugs.

WPML comes with a taxonomies translation tool under WPML→Taxonomy translation. Here you can

  1. Select the taxonomy type you wan to translate
  2. Translate all items in that particular taxonomy
  3. Translate the taxonomy itself

Translating Text

String Translation will help you quickly locate all theme’s strings under the blockchain domain. First you will need to install the  String  Translation Plugin from WPML. Then navigate to WPML→Themes and plugins localization and make sure the main tool responsible for string translation is WPML String Translation plugin.

Then under   WPML→String Translation you can start translating all theme related string by selecting under the blockchain domain. You must do the same for the Blockchain theme specific plugin also.

Another option WPML provides is to make Custom Post type slugs and taxonomies to be treated as strings. You will need to enable this option from WPML→Settings!

To learn more how the string tranlation  tool work check WPML official documentation page about translating strings.

Translating menus

WPML makes translating menus and syncing between languages a quite easy procedure. Navigate to Appearance→Menus and select in which language you want to translate your main (or any) menu.

  1. Select the menu you want to translate
  2. Click on any of the languages you have setup to create a new menu.
  3. Sync menus between languages

For further information on translating menus, please check the complete menus translation tutorial.

Translating Widgets

With WPML, you can display different widgets for different languages (1)

Have a look here for additional information on translating widgets.

Translating Products (WooCommerce) using WPML

Blockchain supports WooCommerce natively providing a nice e-commerce experience. WPML handles product translation using WooCommerce Multilingual  plugin which comes bundled with WPML. After installing the plugin and finishing the installation guide, you can navigate to Woocommerce→Woocommerce Multilingual and start translating your products their attibutes and terms as well as your product categories. Before getting started make sure you have Woocommerce pages translated. First,  you will need from Woocommerce→Woocommerce Multilingual  translate your product attributes.  Click on the Attributes tab and

  1. Select the Attribute you want to translate
  2. Translate the terms of this attribute
  3. Translate the attribute label and slug

Then head over to the Categories tab. Here  you can

  1. Filter you categories
  2. Translate you category to your installed languages

Finally in the Product tabs you can start working on your Product translation.

  1. Filter your products
  2. Translate these products using the WPML translation editor

WPML’s translation editor will help you quickly translate your product contents and taxonomy.

WPML’s translation manager is enabled by default in Products, posts, pages and custom post types. You can still translate your Products using the default WPML way though by directly editing the product directly.

How to use the page builder template

The theme comes bundled with a page builder template which allows you to use your favorite page builder plugin on it and create unique layouts very easily.

To use that template start by going to Pages > Add New. This will create a new page. Add a title to your page and select the Page builder template from the template drop down in the Page Attributes metabox.

ci_page_builder_template

That’s it. You can now start building your page using the page builder of your choice, once done publish it and check it out.

Next Steps

Still have questions or problems setting up your CSSIgniter Theme? We will be happy to help you out! Please visit our support Hub 

WordPress CSS Customizer – Using the DevTools and CSS to customize your theme – Practical examples

Last Updated On
WordPress CSS Customizer – Using the DevTools and CSS to customize your theme – Practical examples WordPress template

WordPress themes nowadays are usually packed with appearance options which allow theme users to give a personal note of style to their websites and modify them at their will, without touching a single line of code.

Our themes here at CSSIgniter carry dozens and dozens of color and typography customizer settings and for the vast majority of use cases they are more than enough to completely change a website’s appearance. However, there are still times that we get support tickets requiring help on more involved customizations, and we deal that by providing custom styles for our users’ requests on a case by case scenario.

For a few versions now, the WordPress Customizer comes with a powerful native CSS editor which allows anyone to apply custom CSS styles on their WordPress website. This post is aimed at entry-level website owners who are curious enough to delve a bit more into browser developer tools and how to use them, along with the CSS editor, in order to customizer their WordPress theme beyond its delivered capabilities. Although I assume that basic browser developer tools familiarity exists, I’ll give a quick intro on them below.

Read More

Get access to all WordPress themes & plugins

24/7 Support Included. Join 115,000+ satisfied customers.

Pricing & Sign Up

30-day money-back guarantee. Not satisfied? Your money back, no questions asked.

Back to top