WordPress CSS Customizer – Using the DevTools and CSS to customize your theme – Practical examples
WordPress themes nowadays are usually packed with appearance options which allow theme users to give a personal note of style to their websites and modify them at their will, without touching a single line of code.
Our themes here at CSSIgniter carry dozens and dozens of color and typography customizer settings and for the vast majority of use cases they are more than enough to completely change a website’s appearance. However, there are still times that we get support tickets requiring help on more involved customizations, and we deal that by providing custom styles for our users’ requests on a case by case scenario.
For a few versions now, the WordPress Customizer comes with a powerful native CSS editor which allows anyone to apply custom CSS styles on their WordPress website. This post is aimed at entry-level website owners who are curious enough to delve a bit more into browser developer tools and how to use them, along with the CSS editor, in order to customizer their WordPress theme beyond its delivered capabilities. Although I assume that basic browser developer tools familiarity exists, I’ll give a quick intro on them below.
Browser DevTools
Every browser comes with its so called “developer tools”; basically a panel that allows us to inspect pretty much everything a website does and how it behaves while in use. For this quick tutorial we’ll be mostly interested in basic functionality, such as inspecting our website’s HTML structure and its CSS.
Although my personal preference in DevTools are the ones provided by Chrome, the simple instructions we’ll describe can be followed using any (desktop) browser. You can try them out right now if you’ve never seen them before, simply right click on this page and click on “Inspect Element”. You’ll immediately see the DevTools panel popping up.
If you’re not at all familiar with DevTools whatsoever, I recommend, at minimum, going through the official Chrome DevTools intro tutorial which goes over their basic functionality.
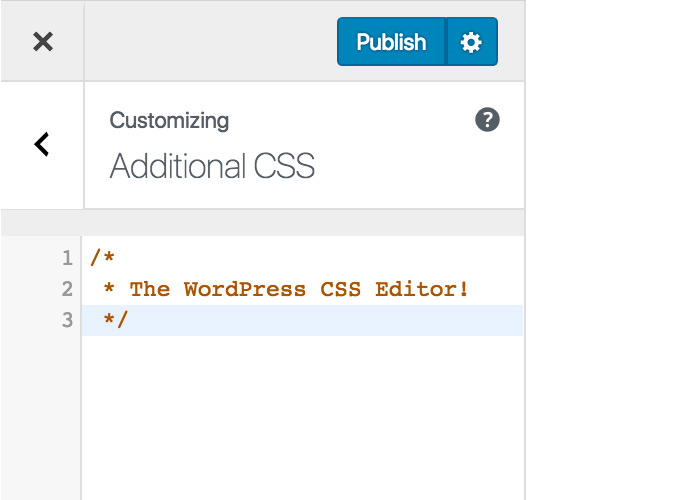
The WordPress CSS Editor
The CSS Editor is accessible by first going to the Customizer (under Appearance > Customize from your admin dashboard main menu on the left) and then navigating to “Additional CSS” (should be at the very bottom). You should see an empty text area (which is actually a full blown CSS editor with code format support!). We’ll be using this great tool to add our custom theme styles!
Let’s see now how we can utilize the above and achieve solutions for our most asked questions (with regards to styling) on our support forums.
How to style an element differently in a particular page
This is a question that comes up extremely often, and we don’t even need the DevTools to target a particular page or post in a WordPress website.
For any page or post WordPress assigns a special CSS class in the <body> element of the current website.
For pages the class is of the form: page-id-XXX where XXX is the page’s numeric ID. For posts the class is of the form: postid-XXX where XXX is similarly the posts’s numeric ID.
For example, if we wanted to provide a different page background color to a page with ID 52 we’d insert the following line in the CSS editor:
Finding the ID of a post, page, or custom post type is also simple. Inside the WordPress admin dashboard, simply edit the page or post and have a look at the browser’s address bar. The ID will be the only number in the URL, exactly after the part that says ?post=.
e.g.: http://mysite.com/wp-admin/post.php?post=17&action=edit
In this case, if it’s a post, the <body> CSS selector will be .postid-17 and if it’s a page .page-id-17.
Using the above we could, say, style all widgets on this page a bit differently than the rest of our website like so:
And voilà, all widgets in this page will now have a red background! Pretty nifty.
How to target a specific widget on a sidebar
Also a popular question, sometimes you just need that widget to stand out, and there’s really no way around it than custom styles (especially with native WordPress widgets).
Thankfully, WordPress provides an ID attribute for every widget that we assign on a widgetized area. This ID is guaranteed to be unique across our website and can be safely used to target the specific widget. To find this ID we’ll need to use the DevTools.
All we have to do is move our mouse pointer over the widget we wish to inspect, right click on it and then hit “Inspect Element”. The DevTools will immediately open and have our website’s HTML tree (more or less) expanded to the widget’s markup. It’s not always accurate but it will provide with a good approximation so that we don’t have to manually expand every node until we reach what we need.
Another (quicker) way is to use the DevTools shortcut: for Chrome it’s cmd + shift + C (for macOS) and ctrl + shift + C (for Windows). The shortcut will open up DevTools and allow us to visually hone in our the element we’re looking for.
Once we locate the widget we just look at its HTML id attribute:

Here we have a text widget, on the TwentySeventeen theme. Its id is text-3 so all we need to do is insert the following on our CSS Editor:
And there we have it, bright red background with white letters, surely noone will miss it ;)
What if we wanted to style it like that only on a specific page? We already know how! Find the page ID as per above and combine our knowledge!
How to target the first paragraph of a post
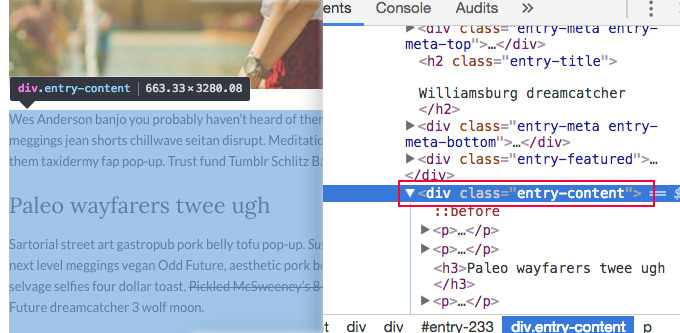
This one’s a bit trickier as it depends on the theme, rather than WordPress itself. For this task we’ll need to visit a post (on the front-end) and inspect its main content area. In the vast majority of cases (and if the theme is respectfully coded) we’ll find a wrapping div as the immediate parent enclosing all the post’s content.
As a tip, most themes (including the default ones WordPress comes with) usually use the class .entry-content, while .content is also popular.
Here’s a screenshot from one of our own themes, Olsen:
After we locate this wrapper element the CSS selector we need to use is pretty straightforward:
This selector basically translates to “find the first paragraph element that is a direct descendant of .entry-content elements”. The > symbol is called a “child combinator” and allows us to select only direct children of the preceding element. The :first-of-type pseudo-selector grabs just the first element that matches the specific type we provide, in our case a paragraph.
How to target PNG images
Is that even possible? Why yes it is! And not just PNG images, any kind of filetype we want. All we need is the CSS attribute selector and one if its modifiers:
Yeap, that’s a valid CSS selector and it targets every element with an src attribute (such as images) where the value of that attribute ends with .png (the $ modifier searches only for suffixes).
Another way of going about it would be with [src*=".png"]. This might be safer in case your images are suffixed with a query string for cache reasons or whatever. The star modifier matches any occurrences of the supplied substring regardless of its position in the attribute value.
Attribute selectors are really powerful, I highly recommend learning all of them in the MDN documentation here.
Similarly, for example, we could give unique styles to all external links:
Or even target links based on their URL:
How to target all form buttons
This one gets asked a lot, mainly because many WordPress form plugins come with basic styles, no styles at all, or ugly styles and it’s understandable that we’ll want to match their look with our theme’s. This is much more elementary and the CSS is rather simple:
Keep in mind that in some cases this might not be enough due to Specificity. In cases like that it would be useful to locate an ID or a class of the form itself and append it on the above selectors (overcoming the specificity of the plugin styles).
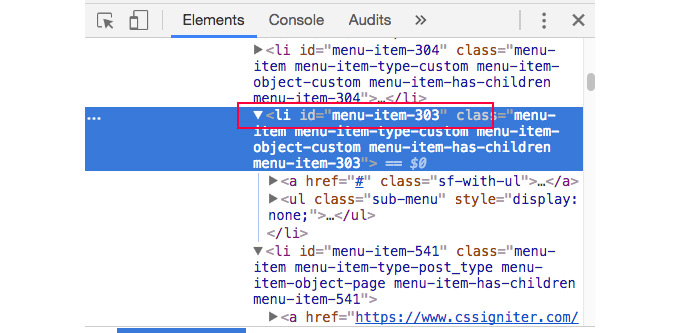
How to target specific menu items
Another very popular question. It’s very common to want to provide different styles (colors or typography) to different menu items on your navigation bar. Thankfully (again) WordPress adds unique IDs to every single menu item. Let’s simply inspect the navigation menu of our website using the tricks we learned before and find out what’s the ID of the element holding our menu item.
Don’t neglect to use the child modifier, otherwise all links nested under the sub-menus of that menu item will also be red!
And there we have it. What other areas of your website(s) do you find yourself wanting to re-style when setting up on a new WordPress theme? Let me know in the comments and I’ll be sure to update the post to include them!
3 responses to “WordPress CSS Customizer – Using the DevTools and CSS to customize your theme – Practical examples”
I can not use the background-image css on certain pages of the theme, how does it apply?
Heya! Can you give me an example of what you’re trying to do?
Example of the oxium theme itself, in the artist category, specifically https://www.cssigniter.com/preview/oxium/artist/rainbow/, I would like to apply a different “image” background, (in other artists as well) I can not by css?