Documentation for Listee – Legacy
Theme installation
The easiest way to install the theme, is by accessing your WordPress admin panel, then go to Appearance > Themes. Select the Install Themes tab and click the Upload link located just below the tab’s name. Click on Browse… and select the WordPress theme zip file you just downloaded. Then click the Install Now button, and after a few seconds, your new theme should be installed. Click activate and the theme is ready to use.
In order to install the theme manually, or in case you have trouble installing it through the admin panel, you have to unzip the WordPress theme’s zip file on your computer, and upload via FTP the resulting theme folder into your WordPress installation themes folder (wp-content/themes). Then, from the WordPress admin go to Appearance > Themes. The theme should be available in your themes list. Click activate.
TIP: More info on how to download and install a theme here.
WP Job Manager installation
Listee uses the WP Job Manager plugin and its custom post types to control the Business Listings. This means some basic page setup as well as setting functionality comes directly from the WP Job Manager.
To install the job manager plugin, navigate to Plugins >Add New and search for WP Job Manager. Click the button to install and activate the plugin.
Once the plugin is installed it will create three pages, the Jobs page which is the themes’s default Business listing page, the Job Dashboard page which allows a user to see all business listings they have posted at once and the Post a Job page which allows logged in users to post new business listings. You can add the latter two to the menu to allow businesses to post job listings and also access all their postings.
Initial configuration
The plugin’s configuration page can be found under Business > Settings, here you can configure the plugin to match your needs. We would suggest enabling Job Categories & Job Types which are by default disabled before importing sample content, you can also enable Multi Category & Multi Type selections, these will make your filtering system much more flexible. In the Job Submission tab you can configure the requirements for allowing users to submit business listings.
For more information the plugin’s extensive documentation can be found here.
Image Sizes
The minimum recommended image sizes for Listee are:
- Post thumbnail: 750x500px
- Entry items: 750x540px
- Tall featured image:750px
- Media Small:100x100px
- Full Width 1140x470px
- Hero image: 1920x500px
Useful Plugins
These plugins provide functionality and features used directly (or not) by the Theme. So, it is recommended to install and activate them before importing your sample content.
- Contact Form 7 use this plugin to create a contact form, then copy the shortcode it gives you and paste it in a page which will serve as your contact page.
- WP Instagram Widget: Use the latest version of this plugin to help you display your Instagram feed in any of the theme’s sidebars.
- Elementor Page Builder: A page builder that delivers high-end page designs and advanced capabilities, never before seen on WordPress.
- MaxSlider: You can use our slider plugin to generate sliders for your homepage or any other page you want.
Importing Sample Content using One Click Import
To automate the process of importing and for a better experience we have natively included support for OneClick Import Plugin. Let install it fist:
From your WordPress dashboard
- Visit ‘Plugins > Add New’,
- Search for ‘One Click Demo Import’ and install the plugin,
- Activate ‘One Click Demo Import’ from your Plugins page.
From WordPress.org
- Download ‘One Click Demo Import’.
- Upload the ‘one-click-demo-import’ directory to your ‘/wp-content/plugins/’ directory, using your favorite method (ftp, sftp, scp, etc…)
- Activate ‘One Click Demo Import’ from your Plugins page.
Once the plugin is activated you will find the actual import page in: Appearance > Import Demo Data.
Click on the Import demo data button and you are done!
This plugin requires PHP version of at least 5.3.x, but we recommend version 5.6.x or better yet 7.x. Please contact your hosting company and ask them to update the PHP version for your site.
Adding a new post
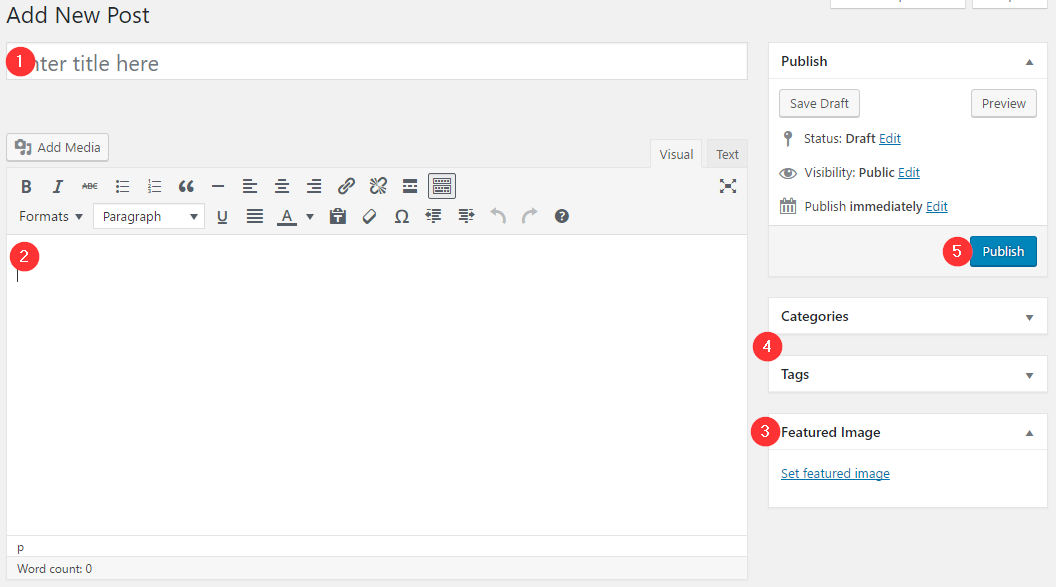
To add new posts to your blog, go to Posts > add new and proceed to:
- add a title to your post,
- enter the content in the editor,
- upload a featured image by clicking “Set featured image” on the Featured Image panel,
- add a category and/or tag to the post,
- once finished click the Publish button to publish the post.
Creating a page for your posts
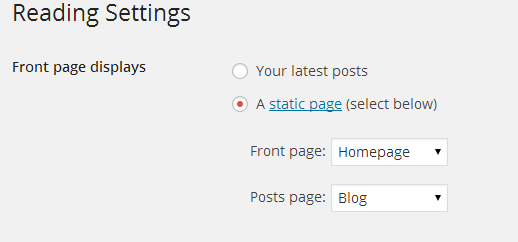
To setup your blog page you can go to Pages > Add New and create a page named Blog. Then navigate to Settings > Reading and set that page as your posts page.
Now you can add that page to your menu to give your visitors easy access to all your posts.
Adding a new Business Listing
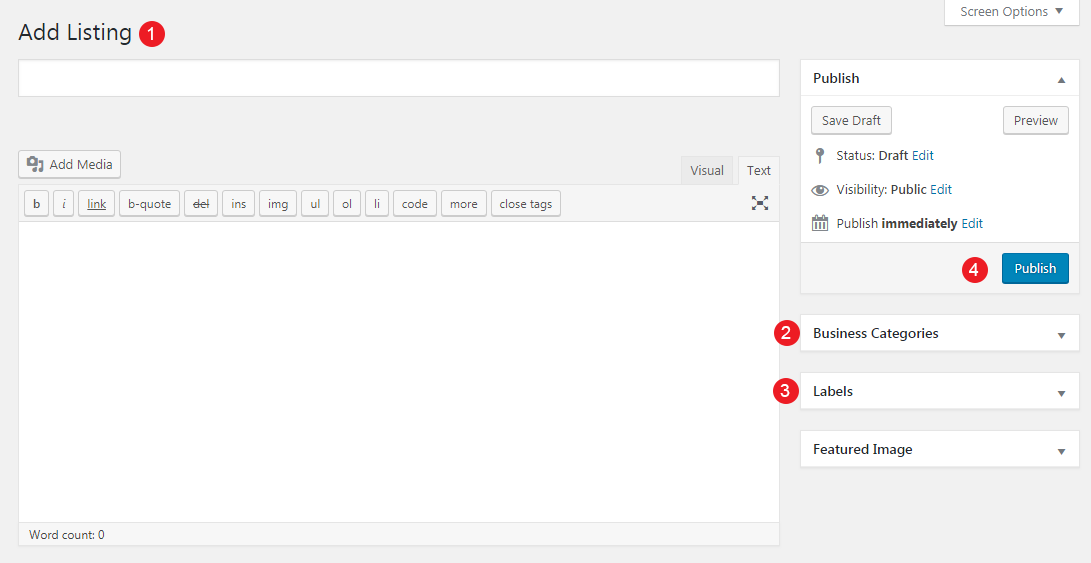
To create a new Business listing go to Business Listings > Add New.
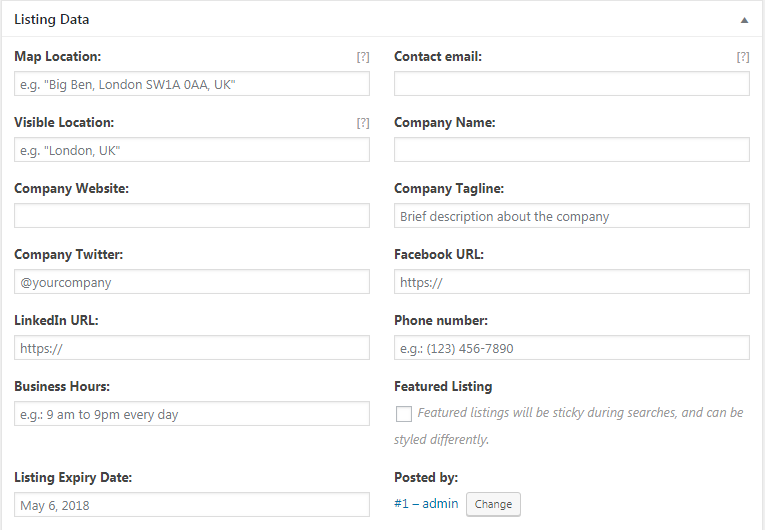
Start by adding the title, description, category, type and company logo, once done move on to the Job Data section below.
Most of the fields above are pretty self explanatory, let’s have a look at a couple that might need some explanation. The Featured Listing box allows to to mark the listing as such, this will make it sticky during searches and it also gives you the ability to style it differently to stand out. Finally the Listing Expiry Date allows you to set an expiration date for the business listing, after that date the listing and its content won’t be visible if the Appropriate fields are selected from Businesses→Settings→Job Listings.
Once everything is filled in you can go ahead and publish the business listing.
Creating a Business Listing page
To do that create a new page and apply to it the Business Directory template from the Page Attributes panel. This page must be Selected as a business Listing Page from Businesses→Settings→Pages.
As mentioned earlier the plugin creates a business listing page when installed, however our own listing offers a more refined filtering system as you can see on the theme’s demo, so you might want to use the custom one instead of the default.
Frontpage Page
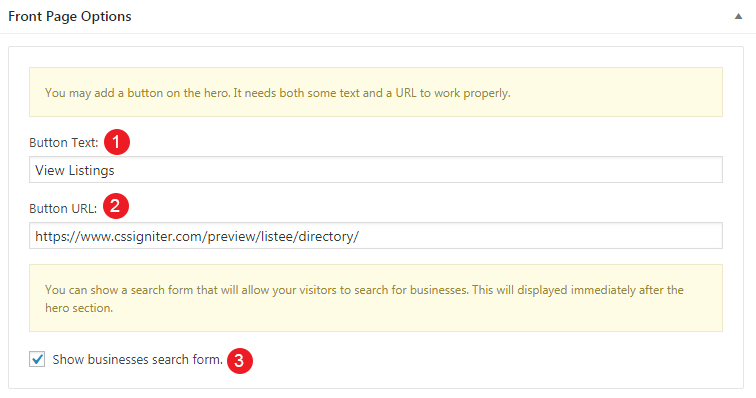
To set up the homepage create a page named Home and set to it the Front page Template from the Page Attributes drop down on the right. The frontpage except the Hero panel which appears in all pages has also a Frontpage Options setting area.
Here you can
- Add a Button Text in your Frontpage Hero Section
- Add a link to your Business Directory.
- Allow the Search form to render in the frontpage.
To add content to your front page go to Customize > Widgets or Appearance > Widgets and use the theme’s widgets to help you display your content. You will notice that in your Frontpage template page under the WordPress text Editor you have a Frontpage Options section.
Replicate our demo Homepage
Add in your Frontpage Widget area
- Theme (home) – Post Type Items widget
- Theme (home) – Business Categories widget.
- Theme (home) – Hero Callout widget
- Theme (home) – Latest Post type widget
These should give you the look and feel of our demo frontpage.
Full Width Page
In this page you can add any content you wish without displaying the sidebar.
Default Page
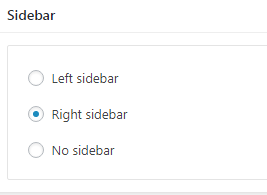
In this page you can add any content you wish but the the sidebar. You can select under Sidebar section where you need your sidebar to appear
Also, you can select whether you need to display the featured image in that page.
Hero Section
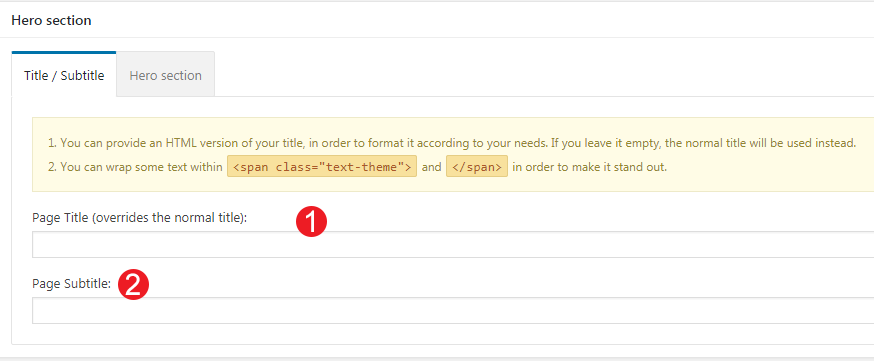
The Hero Section is a generic options box you can find in All pages and will help your control the Hero Section for each page.
This the basic section before the contents of your page and you can :
- Add A Page title.
- Add a Page subtitle.
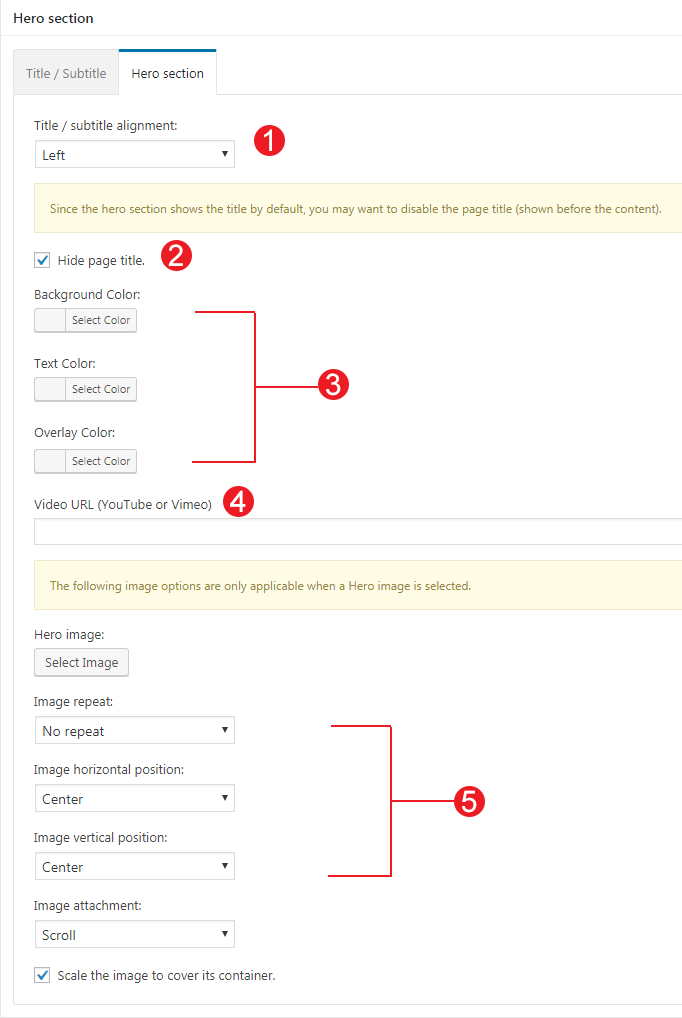
Also you can style your Hero with a background image / video or color :
- Align the Title.
- Hide the Page title.
- Add a Background Color or an Overlay color in case you have a background image with the same color of your Hero title or subtitle.
- Add a background Video.
- Add a background image and change its position and screen coverage.
Customizing the theme
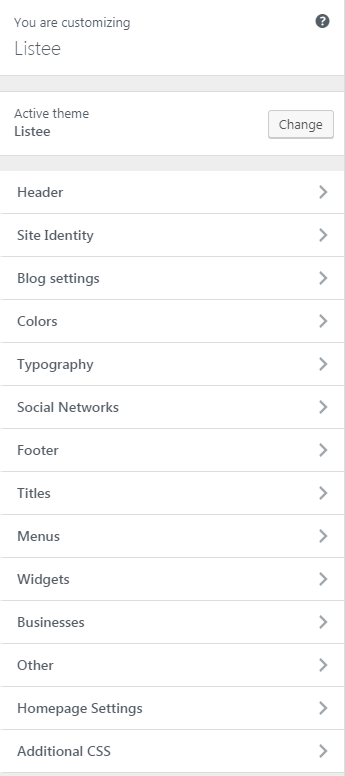
All the theme’s options can be accessed via WordPress’ customizer. Navigate to Appearance > Customize and you will be presented with this panel.
If you have used any theme from the WordPress.org theme directory you should be familiar with the usage of the customizer, if not you can read more about it here. Below we will take a look at the options each section offers.
Header
Header Options are split into three sections. In the Header style section you can set the logo layout you wish your header to have and make it full width.
Under the Top menu bar you can add some custom text to it like your email or phone number. as well as select whether you need to show or not Search module or your social Icons.
In the Primary menu bar you can select if you wish to have a sticky menu and change various display settings like the vertical padding of the menu and its text size.
Site Identity
Here you can set your site’s logo, title, tagline, logo padding and site title and tagline.
Blog Settings
This tab allows you to customize your blog and post options.
Under Post Options you can select which elements you wish your single blog posts to have. This includes showing or hiding the date, the featured image, the author and author box etc. Or even enabling/disabling the Lightbox option for your galleries.
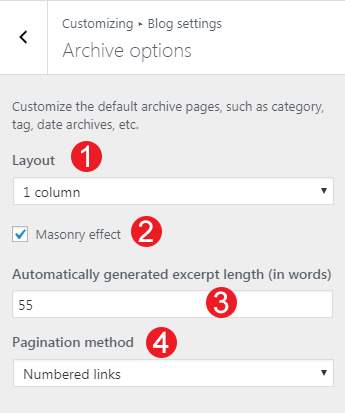
In Archive options you have customize the default WordPress archive pages like category, tag, etc.
- Change the Layout by selecting in how many columns you need your content to appear.
- Enable Masonry effect in case you have articles with different content and featured image height.
- Select the article excerpt length.
- Select a pagination method.
Colors
This tab allows you to customize the colors and background images for the entire site, the top bar and header, hero section, sidebars and the footer.
Typography
Through this tab you can control the font size of key theme elements, such as headings, body and widgets. If you want to change the default Theme fonts have a look here.
Social Networks
Here you can fill in all links to your social profiles and display them via a custom widget on any sidebar.
Titles
In this tab you can set titles for the blog section, search and 404 pages.
Menus
Here you can create and assign menus to the theme. To learn more about menu creation check out the Codex’s menu user guide here.
Blockchain provides a mini mega menu feature. If you need to enable two columns in your menu you can navigate to Appearance >Menus and add a new item
Businesses
Here you can toggle if you want the business location, phone and business hours to render.
Widgets
Through this tab you can access all the available theme sidebars and add widgets to them.
Footer
Here you can modify the credits text and your Footer Column Layout. Also, you have an option to make your footer full width.
Static Front Page
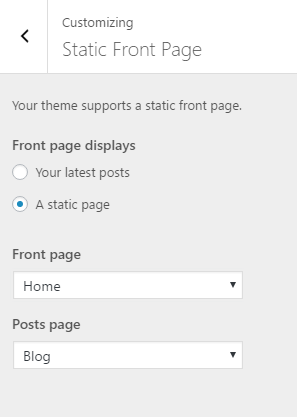
Using this tab we can choose what gets displayed on the front page of our site. For example if we want to create a homepage using a page builder we will need to create a new page using the Page Builder template, name it home and set it as our Front Page above. The Posts Page is the page that will display our post listing, as discussed earlier in the post creation section.
Other
Here, you can find the sample content files and enable/disable Google Maps from your Listing Directory.The Google Maps API must only be loaded once in each page. Since many plugins may try to load it as well, you might want to disable it from the theme to avoid potential errors. Please note that you need to set a API key in WP Job Manager’s settings, found in Dashboard >Businesses > Settings. Have a look here on generating a Google Maps API key along with Geocoding which is required by the theme.
How to use the page builder template
The theme comes bundled with a page builder template which allows you to use your favorite page builder plugin on it and create unique layouts very easily.
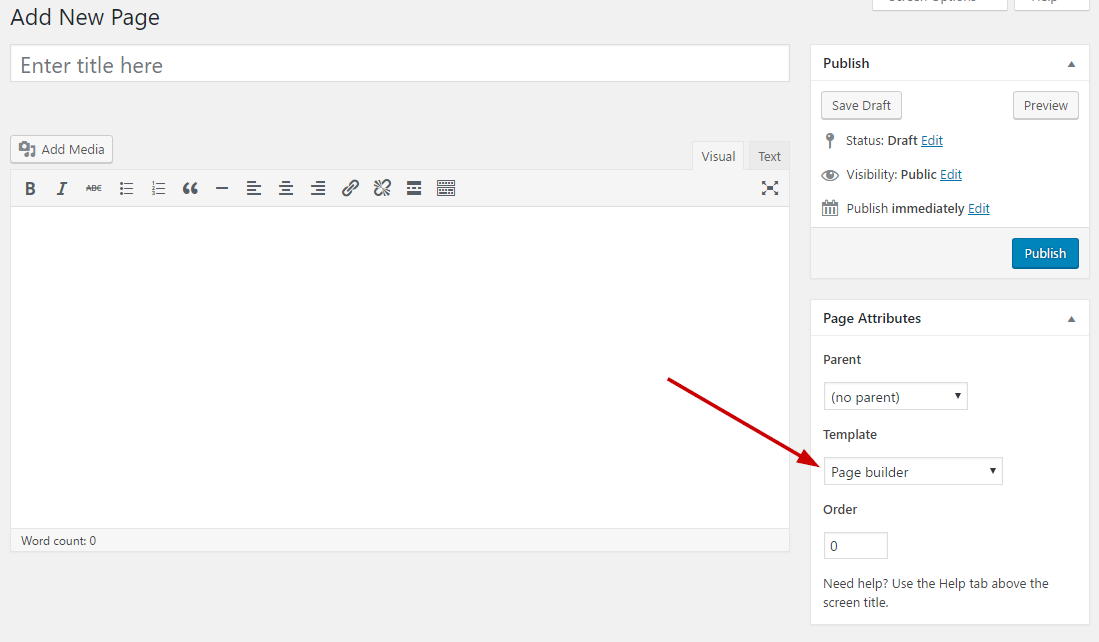
To use that template start by going to Pages > Add New. This will create a new page. Add a title to your page and select the Page builder template from the template drop down in the Page Attributes metabox.
That’s it. You can now start building your page using a page builder of your choice. On the theme’s demo we have used extensively the Elementor page builder plugin.
Widgets
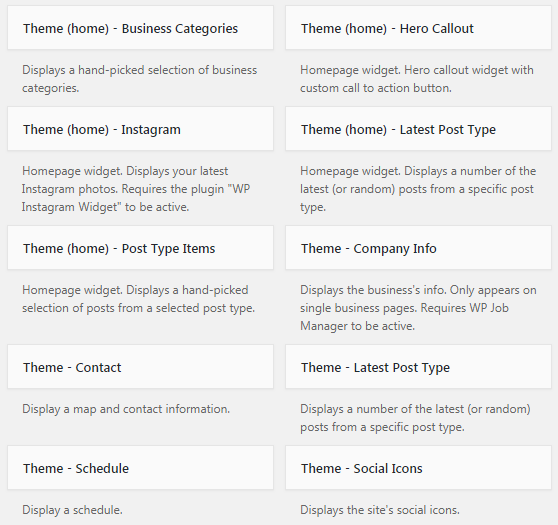
The theme comes with mangy custom widgets which allow you to display all major aspects of your content in any sidebar your wish. Notice some widget have (home) tag shown, which means they are meant to be used in the homepage widget area.
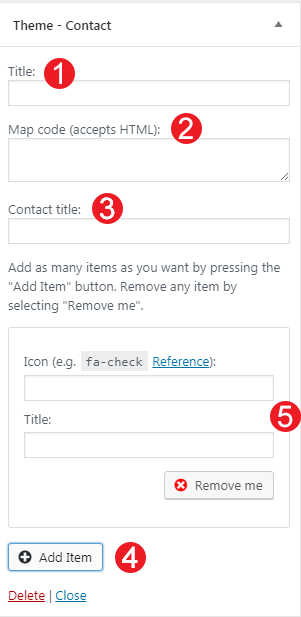
Theme-Contact
Using this widget you can create a contact box including a title a map and various complementary elements with icons that will help you add more information like telephone etc about your business.
- Add a title for your Contact widget.
- Add a map code (iframe).
- Add a contact title
- Create new complementary elements.
- Add an icon code (from fontawesome.io) and some text along.
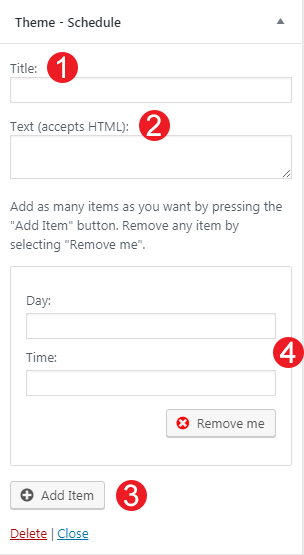
Theme-Schedule
This widget allows you to create a small Schedule table with extra contextual information.
- Add a title for your widget
- Add some complementary text. You can use HTML tags also if you wish.
- Add a new day/time widget.
- Add your day and time information for each item.
Theme-Social Icons
This widget displays your site’s social icons. In order to set them up, you need to visit Appearance > Customize > Social Networks and provide the appropriate URLs where desired.
Theme (home)-Hero Callout
This will allow you to display a Hero Callout specially designed for your frontpage sidebar.
- Add a Title for your Callout widget.
- Add a Subtitle for your Callout widget.
- Select a Button text and a URL.
- Change the text alignment.
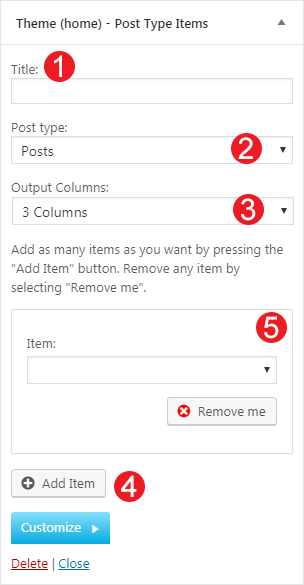
Theme(home)-Post Type Items
This widget is built to help you display any post you wish in your Homepage Widget area.
- Add a title.
- Select the post type.
- Select the output columns.
- Add the Item you wish to output.
- Select the Item from the dropdown menu.
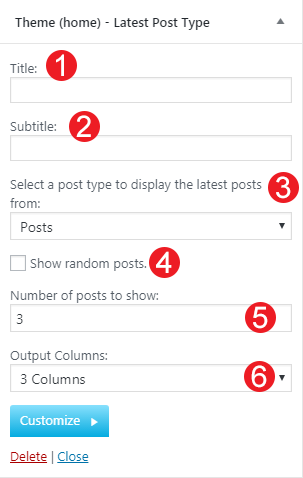
Theme(home)-Latest Post Type
This widget is built to help you display your latest posts in your Homepage Widget area.
- Add a title.
- Add a subtitle.
- Select the post type you want to get the latest items.
- Check if you need random posts instead.
- Add the number of posts.
- Select the output columns.
Theme-Company info
This widget displays the company information for the current business viewed.
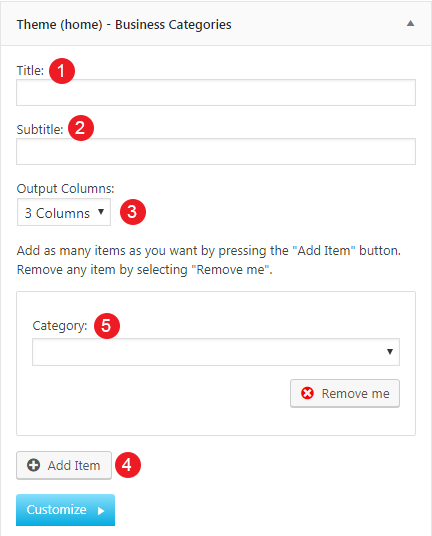
Theme(home)-Business Categories
This widget is built to help you display your business categories in your Homepage Widget area.
- Add a title.
- Add a subtitle.
- Select the columns in which the categories will appear
- Create a new item
- Select your Listing Category
Additional Information & Common Questions
Where can I create Menu Buttons?
If you would like to create buttons on the menu you can use the nav-button class. For info on how to apply it, please read this small guide. (No styling needed on your part, just add the class and save the menu).
Why my Listing Map does not appear?
Please make sure you have enabled Google Maps from Appearance→Customize→Maps by Enabling the Google Maps API and checking the “Show map” option. Google Maps require an API key and Listee need the Geocoding feature enabled on top of this key. Have a look here on how to generate a valid API key.
How can I add description and a featured image for my Business Categories?
You can navigate to Businesses→Categories and click the “Edit” button on the category you wish to edit. Then select a description and a featured image and save your changes.
How can I create a Business Submission page?
Create a new Page from Submit Business Form Page Then add this shortcode
[submit_job_form]
inside your content and save your changes. Select this page as a Submit Business Form Page from Businesses→Settings→Pages.
Why Elementor does not work in the frontpage template?
The frontpage template is actually a widgetized area, which you can Control by adding / editing widgets from Appearance→Widgets→Frontpage or Appearance→Customize→Widgets→Frontpage. If you want to create your own landing page as a frontpage, check this guide.
Support
Still have questions or problems setting up your CSSIgniter Theme? We will be happy to help you out! Please visit our support Hub

