How to Make a WordPress Website in 2020
Whether you are a small business owner, an artist or just a hobbyist, having an online presence can only be beneficial for you. Having your own website means you can easily showcase and sell your work and products, communicate your interests worldwide and meet other like-minded people who can help you improve your craft. Pretty much anyone can benefit from having a website, even individuals; a personal blog allows you to express your self, perhaps vent, and connect with other people through your daily life’s musings.
OK, say you decided to create a website, what do you do now? Well, in this guide we’re going to show you how you can create a website from scratch, all by yourself, yes, that’s right, no professionals involved and no coding needed. But why would you want to build your website yourself and not hire a team of experts to avoid the hassle? Well, there are a few reasons.
- First, let’s face it, it’s going to be cheaper, you will be investing your time and not having to pay designers and developers to do the work for you.
- The skills you will acquire during this process will help you update your site with new features and functionality if you so desire in the future.
- Additionally, these skills will make your communication with web professionals more effective, should you choose down the road to scale or redesign your site.
- Finally, it will be time efficient to make minor modifications yourself, instead of having to explain them to someone else and waiting for them to implement them.
Do the above sound interesting? Let’s begin then!
Sure! embarking on the journey to create your own website can be an appealing prospect, offering cost savings and a valuable skill set for future updates and communication with web professionals. However, it’s important to acknowledge that while building your website from scratch can be fulfilling, experts in SEO and digital marketing bring a unique advantage. Their expertise ensures that your website is not only functional but also strategically optimized for search engines like Google, ultimately enhancing your online visibility and ranking. So, before delving into the intricacies of building your website independently, consider how the guidance of SEO professionals can help your online presence thrive in a competitive digital landscape.
What do I need to build a WordPress website?
- Grab a domain name from namecheap.com
- Purchase a hosting package from SiteGround and point your domain to it.
- Install WordPress
- Select and install a theme
- Install some essential plugins
- Start adding content!
- That’s it, your site is done!
Let’s get started
There is no better time than right now to start building your site. That’s why we have created this guide. We have broken it down into seven simple sections beginning from platform selection, continuing with infrastructure, configuration and content generation, all without any prior knowledge required and without a single line of code, amazing!
Table of contents
Choose a platform for your WordPress site
There are two main paths you can take here. You can either use one of the many site building platforms out there, such as SquareSpace, Wix, or even WordPress.com, and the other is to self-host your site.
Site building platforms have the advantage of having a very smooth on-boarding procedure; you sign-up tick a few boxes, select a layout for your site and you are ready to start adding your content, everything else is handled for you behind the scenes. However there are some drawbacks that come mostly in the form of restrictions of what you can do with your site. Depending on the provider you might be limited as to what designs you can select for your site, the number of visitors you can have per month, eCommerce availability, limited ways to incorporate new functionality to your site, restricted or non-existent monetization of your site etc. Many of these features are listed as optional extras and can significantly increase the bill, depending on how many of them you might want to use.
The most important drawback though is not cost or missing functionality. It is the fact that your site and all its content is subject to ever changing and many times confusing terms of service, which include the right for the platform to delete your account, even without notifying you, if they deem that their terms of service have been violated in any form. This means that it’s possible you wake up one morning and your site, along with all your hard work is gone. We don’t want that, do we?
This is why we would strongly recommend to self-host your site. This way you have absolute freedom when it comes to layout, content and functionality, plus you own your content.
To self host your site you will most likely need to utilize a content management system, or CMS for short. A CMS is a piece of software which allows users to create, manage and modify content on a website without the need for coding knowledge. There are many popular and other less known CMSs out there, but only one powers almost one third of all active websites, and it’s none other than WordPress.
Some of the key advantages of WordPress that lead us to prefer it as our site building platform are the following:
- It is extremely popular and has a very active and helpful community behind it. This makes asking for help and finding solutions to any problem you might encounter, pretty easy.
- It’s FOSS.
- It comes at no cost to download, install and use it.
- It is fast, SEO optimized and secure.
- It has thousands of themes and plugins to choose from, to get any layout and functionality you might want.
Now that we have settled on self-hosting our site on WordPress, let’s proceed with building our site.
Creating the site, the technical stuff
To create our site we will need two key components: one is the domain name, which is what the users will type to their browser’s address bar to visit our site. Think it like a street address, if you will. The second thing is a server to host all the files related to our website. this is what we generally refer to as hosting; you can think of this as the actual building, behind the street address, which houses your business. Let’s start with the domain name.
Choose and register a domain name
First we need to pick the domain name for our site. Below we’ll outline some simple but important rules to help you make a better choice.
- Start with a popular top level domain (this is the thing after the dot on any web address). Usually you would like to go with .com since it’s the most recognizable and has a global reach. If you are set on a domain name and it’s not available on .com you could opt for .net, or if you are targeting one country you could go with the country’s top level domain, for example .fr, .de, .es and so on.
- Keep it short. The longer the domain name the more difficult it would be for people to remember it. Help them out by choosing a short domain name, if possible less than 10 characters long.
- If you can include a relevant keyword in the name it can be beneficial, however since this is not really required, you can skip it. Whatever you do, don’t go too far and makeup a domain name consisting exclusively from keywords; these tend to be very bland and forgettable, and offer no real benefit.
- Your domain name should be easy to pronounce and spell, easy to remember and brandable. This is the hardest part of the entire procedure and could take up most of your time. Brainstorm, come up with potential candidates, check availability (both as a domain name, but also as a handle on social media if you plan on using them), rinse and repeat until you find the right one.
- Use only letters in the domain name. While numbers and hyphens are allowed in domain names it’s better not to use them since they will make your domain less memorable and harder to spell.
These are some basic rules on how to choose your domain name. Read them, start your search and good luck. Just keep in mind that if your site takes off it’s extremely hard to change your domain without a significant hit on your site’s popularity, so think long and hard before you pull the trigger and be prepared to “get married” to your domain.
Need some help and/or some inspiration to find the perfect domain name? Check out this online domain name generator by istiwp. Just add a couple of keywords in the search box and it will generate dozens of combinations for you in no time, perhaps you’ll find what you’re looking for among them.
Now that the hard part is over and we have our domain name, it’s time to register it. Luckily this part is much faster. We will be using namecheap.com to register our domain. The first thing we need to do is register for an account, use this link to sign up to namecheap.
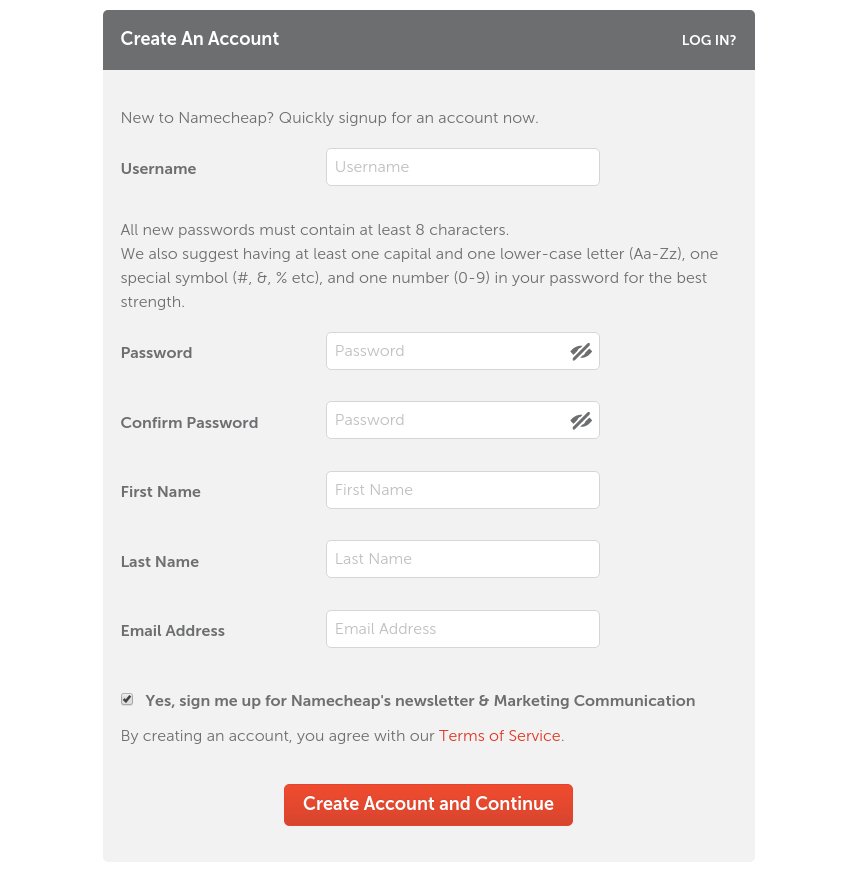
Namecheap sign up form
Signing up is pretty much the same as any other site. Enter your username, password and other info and click the button.
Once you have an account you can navigate to the namecheap homepage. Type your domain name in the search box and click the search button.
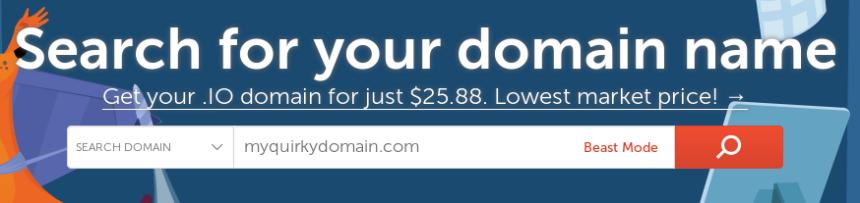
In the next page you will see if the domain name is available and how much it costs. If it’s not available, you will get suggestions for similar domain names or for the same domain name with a different top level domain.

Just click the Add to cart button to add your domain to the cart and then the view cart button to proceed.
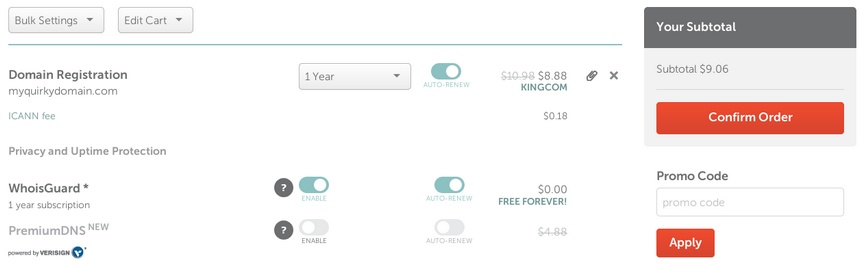
The next screen allows you to register your domain for multiple years up-front and offers some other optional extras. Click to confirm the order and advance.
It’s time to fill in our financial details in order to proceed with the payment. Do so and click to continue.
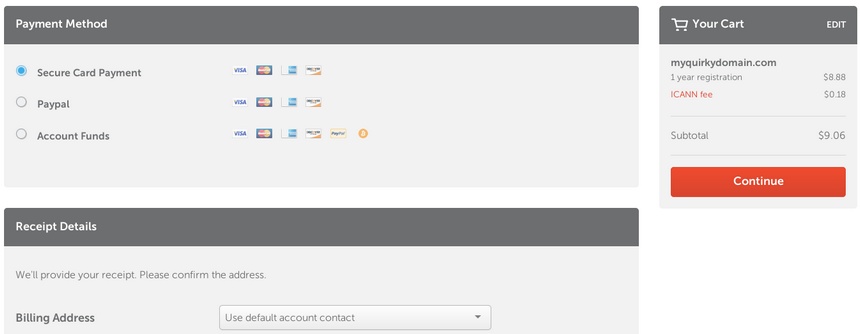
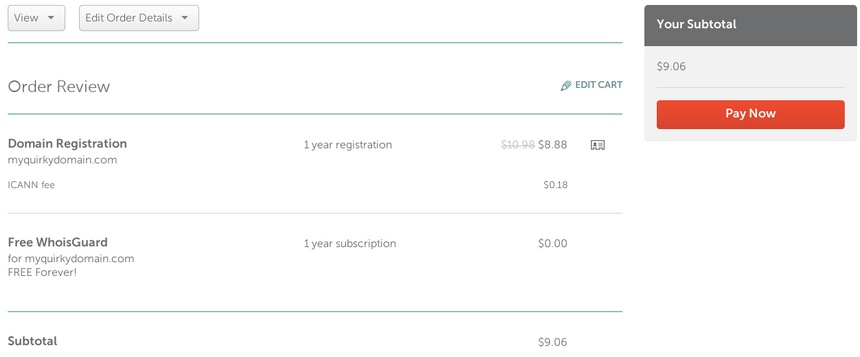
In the final screen you have a chance to review your order before paying. Make sure everything is all right and click the pay now button. That’s it, you have registered your domain!
If you require even more detailed information on how to register your domain, check out this article.
Get a hosting server, install WordPress and connect your domain name
There are two main ways you can host your WordPress site. By far the most popular one, and the one we’re going to go with in this tutorial, is shared hosting. Shared hosting means that the server that hosts your site also hosts the sites of other users; think of it as an office building which houses many businesses. Usually on a good shared hosting service you only have to deal with your site’s maintenance, making sure everything is up-to-date, and most other things will be handled by the host. Some providers also offer a branch of shared hosting called managed hosting. This is a service that handles everything for you; you just have to update your content, nothing else. WordPress updates and everything related to the infrastructure required is handled by the provider’s team. Good managed hosting tends to be expensive but the peace of mind you get in return by knowing that your site is in good hands is worth the trouble, especially if your site grows big.
For the sake of completeness we’ll briefly mention the other available method to host your site. This is by renting your own server, either virtual or even bare-metal, becoming the server administrator and dealing with everything yourself. This, as you might imagine, is quite tricky, so it’s best to avoid it if you don’t know what you’re doing.
There are thousands of web hosting providers out there, all with varying price points, features and level of service provided. It can be pretty difficult to choose one, that’s why we’re going to take the easy way out and pick one of the hosting providers recommended by WordPress itself, SiteGround. SiteGround has made their name in the WordPress community as being fast, reliable, secure, relatively inexpensive and with great customer support. All very desirable traits on a hosting provider. Interested in learning more about the options available out there when it comes to hosting? Read through this comparison of the 10 best WordPress hosting companies which includes comprehensive reviews of each one of them.
Selecting a hosting plan
SiteGround offers three different plans when it comes to WordPress hosting, these are seen below.

SiteGround hosting plans
For more information on what each plan provides you can check them out here. The great thing with all these plans is that they are managed, you will handle the content and SiteGround will take care of all the rest. Since we’re just starting up we’ll go with the StartUp plan. Go ahead and click the Get Plan button.
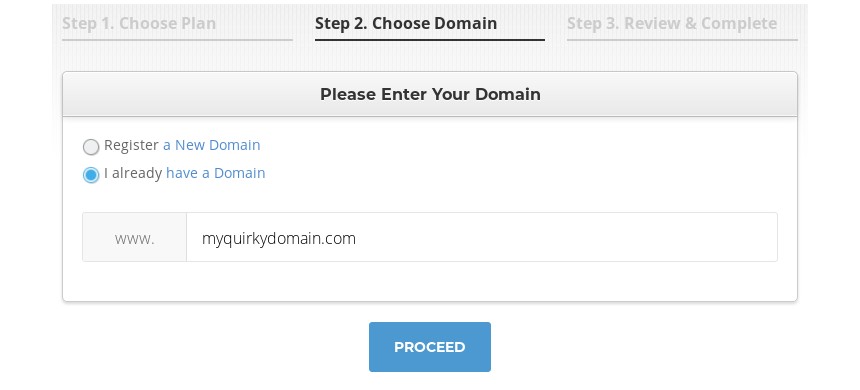
In the next step we have to choose our domain. Since we have already registered a domain name check the I already have a domain radio button, fill in the domain we registered previously and click proceed.
In the last step you will have to fill in all your contact and payment information. Please note that for first time customers there is a special price on the plan, which is valid only for the duration of your first invoice. In the Purchase Information section of the page you can extend this duration for up to three years.
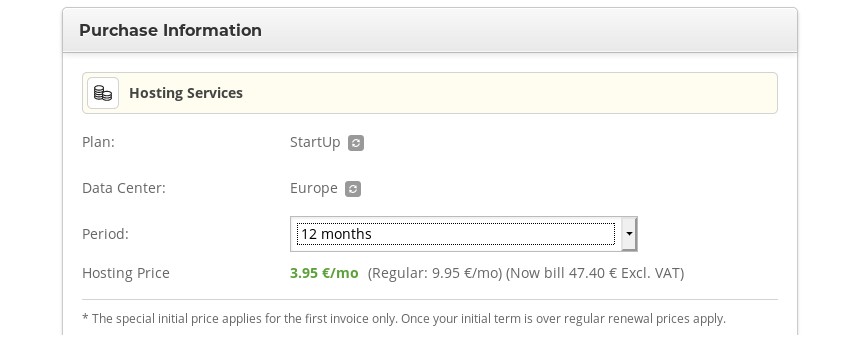
Select plan duration
After filling up all the necessary information click the Pay Now button to complete the purchase.
Once the payment is completed you can head to https://my.siteground.com/ and login using the email and password you fill in during the registration.
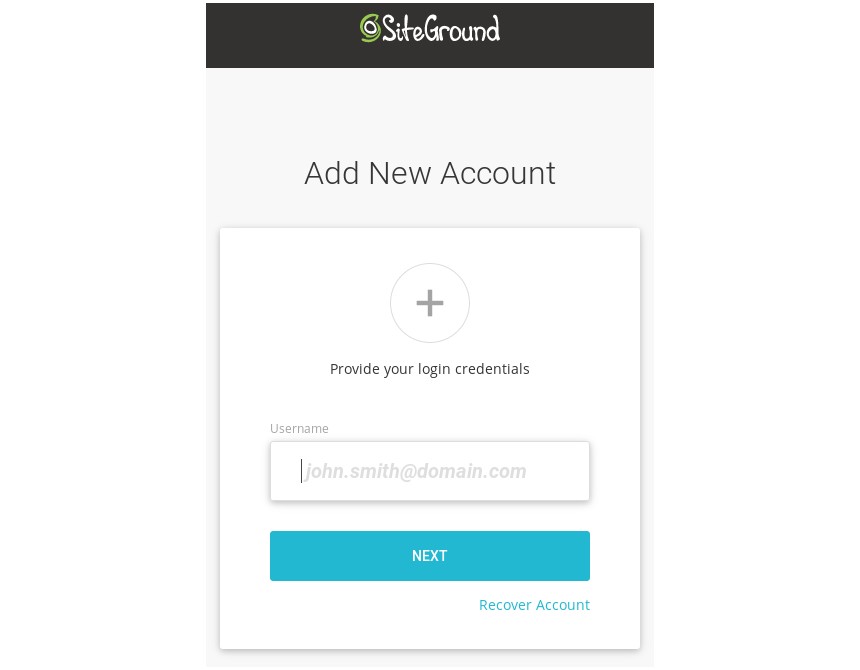
SiteGround login
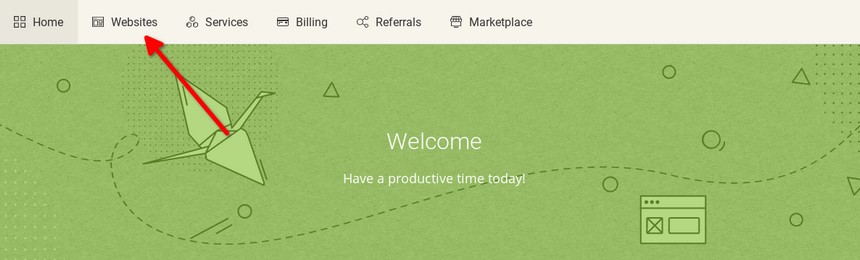
After you login use the menu to navigate to the Websites tab.
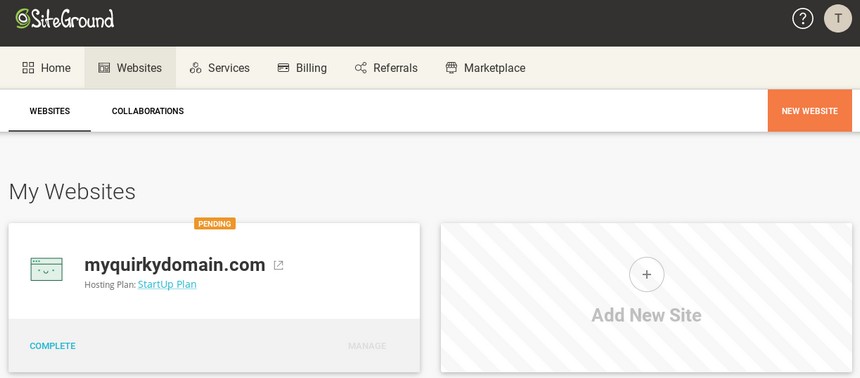
In the websites tab you will see a card with your selected domain name marked as pending. Click the complete link to proceed.
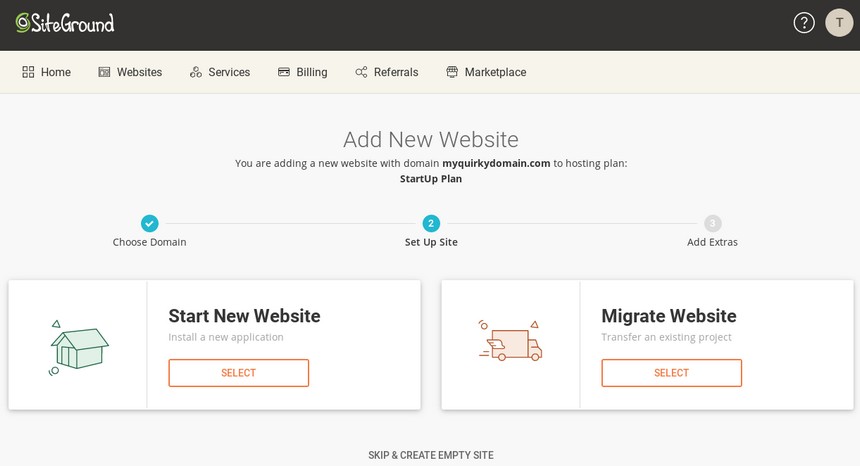
Select the Start New Website option.
Next select to install WordPress. If you are planning on setting up an eCommerce site you might want to install WordPress with WooCommerce, but this is optional, WooCommerce can always be installed later.

Next you need to fill in an email and a password which will be used to access your WordPress installation. These can, and at least the password, should be different than the ones you used to register to SiteGround.
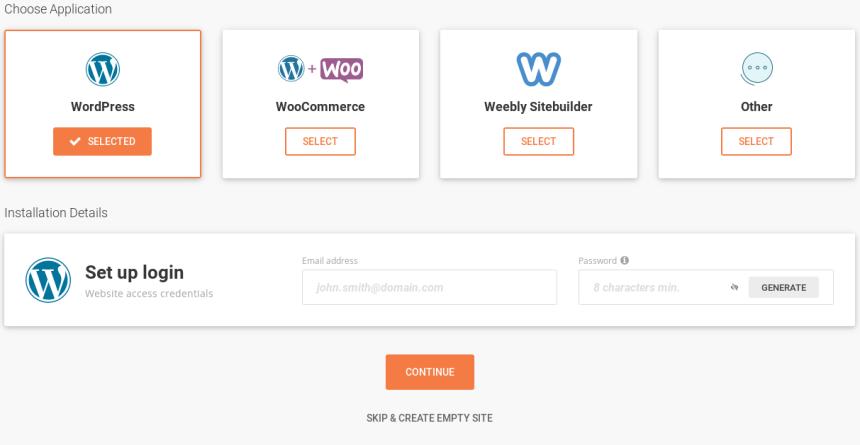
The final screen offers some optional extras. Just click Finish to complete the installation.

Once everything is done you will be greeted with this success screen.
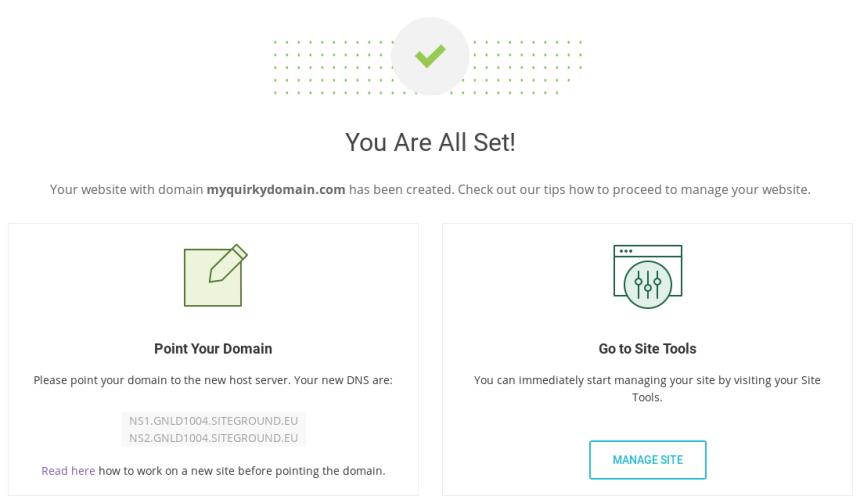
Note down the two nameserver URLs you see on the Point Your Domain card. We will need these to point our domain to our hosting server. To do that you will need to login to your namecheap dashboard. In the dashboard click Manage on the domain name we registered earlier.

In the next page scroll to the nameserver section and from the drop down select Custom DNS.
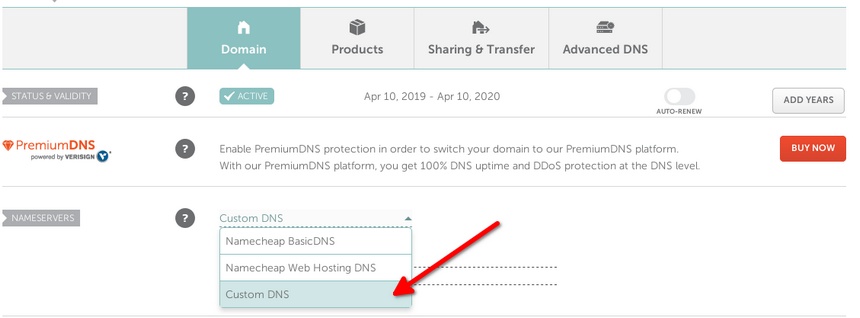
Next fill in the two custom DNS URLs we grabbed from SiteGround and click the green check-mark to apply them.

That’s it, now our domain is pointed to our hosting service. Why did we need to do that you might ask. Think of the domain name system as something like a phone book. You need the number to call someone but it’s much easier to remember their name and then lookup their number than to remember hundreds of numbers for all the people you know. The domain name system is the equivalent for web addresses. Computers communicate between them using IP addresses which are a bunch of numbers on the current popular protocol and even more unreadable in the upcoming one, to make our lives easier we create readable web addresses for our sites and point them to the correct IP addresses so computers know where to sent us when we request a certain URL.
Your site is now reachable through the domain name you register. Please note that it might take up to 24 hours for all DNS servers across the world to sync, so it might be unreachable even after pointing it properly, just be patient.
Meet the WordPress dashboard
Once DNS propagation is completed you can log in to your WordPress dashboard by navigating to https://yoursite.com/login you will be greeted by the WordPress login screen.

Fill in your credentials and click to log in to the WordPress dashboard.
After your first login you will be greeted by SiteGround’s on-boarding procedure which guides you through a limited selection of recommended themes and plugins, you can safely skip it by clicking EXIT since we will be going through all the necessary steps below.
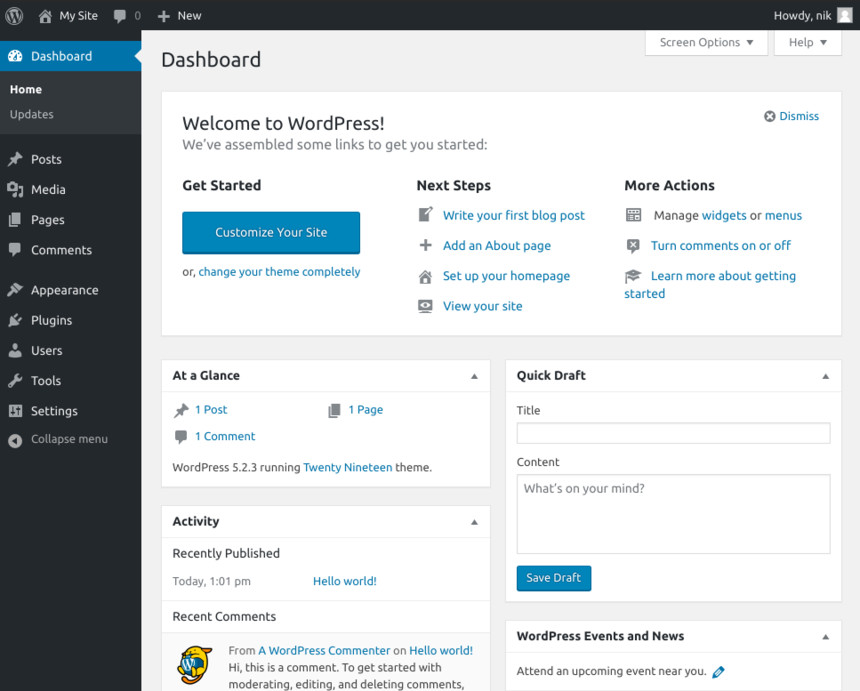
The WordPress dashboard
After you login to your newly created site you will be greeted by the WordPress dashboard. You should really have a look around and get familiar with it because you will be spending a lot of time here managing and improving your site. Let’s have a quick run down of the main dashboard sections, from top to bottom.
- Dashboard: In this section you can get information on your site, start new drafts, learn about WordPress events and more.
- Posts: Here you can create, edit, delete and categorize posts.
- Media: The media section offers you an overview of all media uploaded to your site and gives you some tools to manage them.
- Pages: Pretty much the same as posts, but for your site’s pages.
- Comments: If you decide to use comments on your site this is where you will approve, reply, or delete comments from.
- Appearance: This panel houses everything related to your site’s appearance customization. You can access the Customizer, widgets, menus, the theme editor and more.
- Plugins: From here you can install, manage or remove plugins.
- Users: Manage all users registered to your site and modify your profile.
- Tools: Various tools such as import & export content, user data related settings and more can be found here.
- Settings: Finally this section contains all WordPress related settings such as comment settings, reading settings, permalink settings and more.
Now that we have an idea of how things are in the WordPress dashboard we’ll take care of some basic configuration options.
Start by navigating to Settings > General

WordPress general settings
Start by modifying your site’s title and tagline if you wish so and move on to the timezone setup, configure things to match your location and click the blue Save Changes button at the bottom of the page.
Next navigate to Settings > Reading and make sure that the Discourage search engines from indexing this site option is unchecked.

Search engine settings
Our next stop is Settings > Discussion
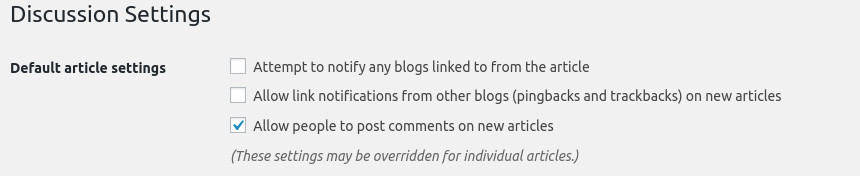
Comment settings
Here you will need to disable the first two options from the Default article settings. The third option controls whether comments are enabled on the site or not, if you wish to have comments, leave it as is, if not, disable it as well. Then save your changes as usual.
Our final stop is Settings > Permalinks where we will set our site’s permalinks to Post name. This will make our permalinks (the URLs) more readable by people. Make the switch and save the changes.

Permalink settings
Select and install a WordPress theme
Now to the fun part, theme selection. Here you get to decide how your site will look like.
The appearance of a WordPress site is governed by something called a theme. These themes are interchangeable which means that within a few minutes you can install and activate another theme if you are not satisfied any more by the one you have, or you are just bored of it.
There are thousands of themes out there to choose from. Themes can be free, but there are also those called premium themes which come at a price, but offer more functionality and more intricate designs than their free counterparts. WordPress itself hosts a huge repository of great free themes which can be found here. You can also see them if you navigate to Appearance > Themes from your dashboard and click the Add new button.
Add a new theme
In the next screen you will be presented with some featured themes, however there are tons more which you can find using the search function. For example here we search for a very popular blogging theme Olsen Light.

Install a free theme
After you find the theme you are looking for you can install it by clicking the button, it’s that easy.
When it comes to premium themes things are a bit more complicated. There is no single place where you can find all the premium themes. Most premium theme authors have their own stores to sell their themes.
How to pick a theme
How can you pick just one theme though? They are so many after all! We’re here to help. We’re going to give you some pointers to make it easier.
- First of all the theme must be pretty, you wouldn’t use something you don’t like to showcase your business.
- It needs to work well both on desktops and mobile devices. Most, if not all themes, provide demos which you can checkout on all devices to make sure they look good.
- It needs to be lightweight and snappy. Having your theme slow down your site is not something you want. Again check out the demo to see if it’s quick enough.
- Choose a theme that is purpose built for your sites niche. Avoid multipurpose themes, these tend to do everything acceptably. Prefer something that does one thing great.
- Make sure the theme comes from a reputable author that supports their products, because as a beginner you are bound to need help at some point, it’s great if you have someone to help you. If you are going with a free theme from the WordPress repository you can browse the theme’s support forums to see if the author is active and if they provide sufficient answers to people’s questions. If you are going with a premium theme don’t be afraid to ask a couple of pre-sale questions to see if they are responsive, also you can check the author’s social media pages for reviews.
These are some basic rules you need to keep in mind when selecting a theme.
Install and setup your theme
For this guide we’re going to go with our very popular premium theme Convert. Convert is business oriented theme with WooCommerce compatibility, so if you are planning to sell anything, it has got you covered.
To get the theme head on to our downloads section, scroll down to locate Convert and click the WordPress button.

Download Convert
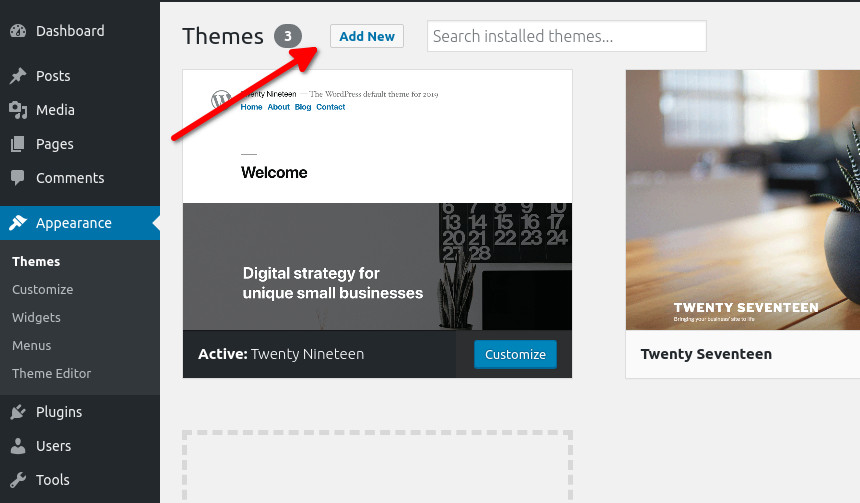
Once you get the zip file navigate to Appearance > Themes on your dashboard and click the Add New button.

Add new theme
In the next screen click the Upload Theme button.

Upload a theme
In the pop out panel click the Browse button, locate the zip you downloaded and open it, then click Install Now.
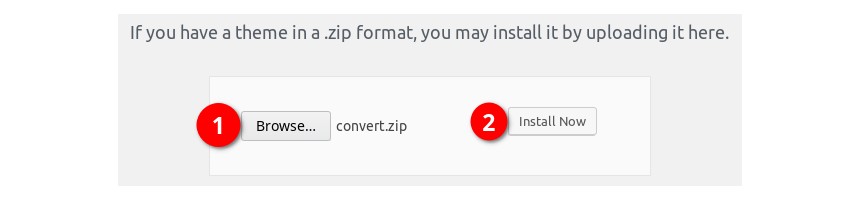
Select and upload theme zip
Once the installation is complete WordPress will notify you and prompt you to activate the theme, just click the Activate link.

Activate theme
After the theme is activated you will be forwarded to the theme’s on-boarding page. Here you can learn more about the theme and install required & recommended plugins, the sample content and more. For now we will activate the Convert Essentials plugin which is required in order to get the theme’s full functionality. To do that just click the Install & Activate button on the Convert Essentials card.

Convert on-boarding page
If you would like to install the theme’s sample content to get an idea of how your finished site will look, check out this section in the theme’s documentation. For the purpose of this guide we will consider the sample content installed.
Theme Customization
The theme is now set up and with the sample content added you can see it in action by visiting your site’s URL.
Convert offers great customization options with complete color and typography controls, multiple header and content layouts, global sections, which are reusable layouts built with your favorite page builders that you can conditionally include in multiple pages, compatibility with the new WordPress block editor and the most popular page builders, customizable color schemes and layouts per post and many more. Let’s take a look at some key customization options below.
All of the theme’s customization options can be accessed via the WordPress Customizer. To get there either click the Customize link on the WordPress administration bar on the top of the page, or if you are in the dashboard, navigate to Appearance > Customize. You will be presented with this screen.
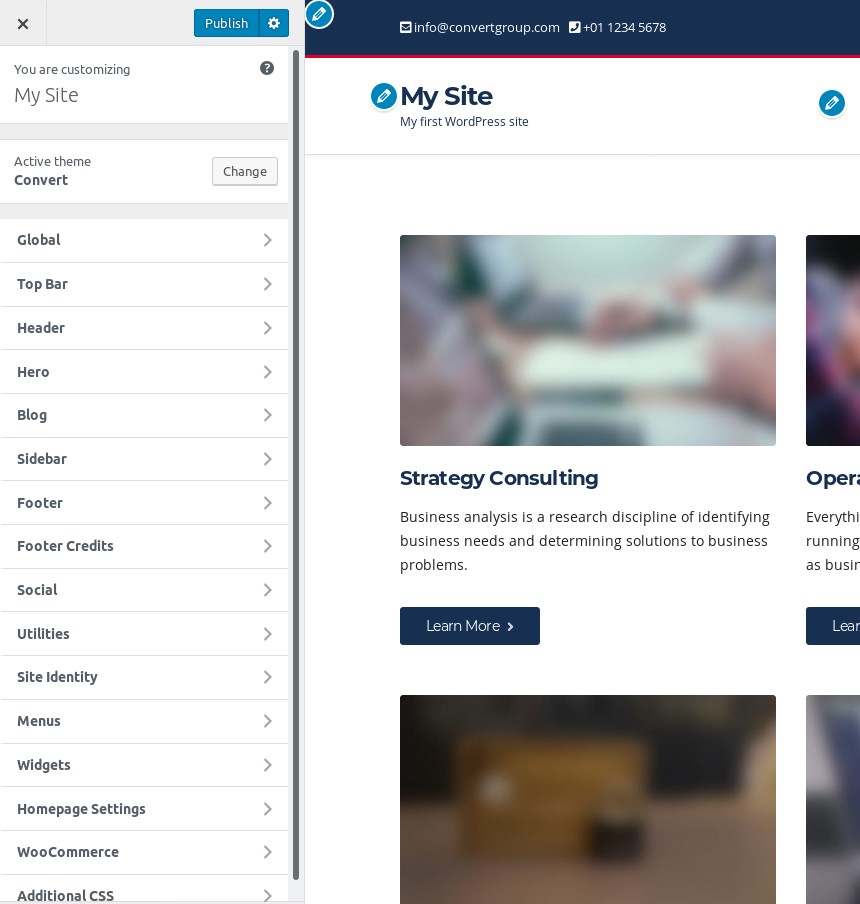
Convert Customizer options
As you can see everything is broken down in sections so you can easily locate the part of the site you want to configure. Each section is further sub-categorized depending on the type of customization you want to make. For example, let’s go with the Global section.
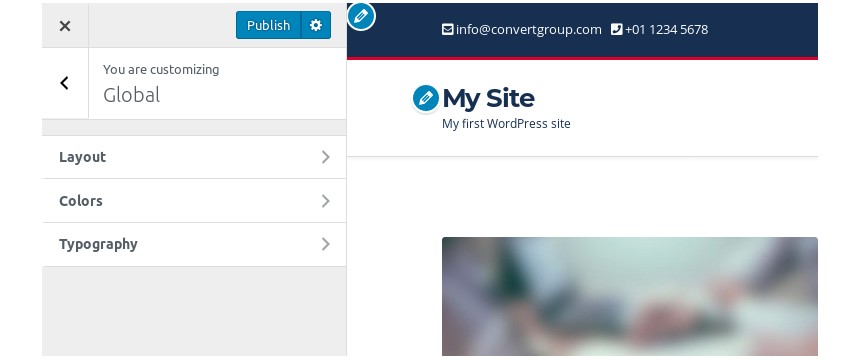
Convert global customization options
You can customize the global site layout, the global color scheme and finally the global typography. Let’s open the Colors section.

Convert global color options
Here you get a color picker for each key site element, such as accent colors, text, borders, buttons, headings and everything else you might need in order to create a unique color scheme that matches your company’s brand. When you modify any color you will get a live preview to make sure this is what you are looking for. Once done with the customization you can click the Publish button on the top of the Customizer panel to save them. Similarly you can modify the site’s layout and typography, through detailed and easy to use controls.
For a more extensive presentation of Convert’s customization features you can have a look at the theme customization section here.
Essential plugins
Plugins provide extra functionality to your site. For example, if you need a contact form you will need a plugin, similarly you need a plugin to add eCommerce functionality to WordPress and so on. We’re going to list some essential plugins and briefly describe their functionality below.
- Yoast SEO to help you optimize your site and content for search engines.
- WPForms to create a contact form so visitors can easily reach you.
- UpdraftPlus because you always need to backup your things.
- WordFence Security this one requires reading to configure, but it can protect you from malicious actors and save you a lot of headaches down the line.
- Google analytics for WordPress by MonsterInsight if you need metrics in your dashboard this is your go to plugin.
All the above plugins are hosted in the WordPress plugin repository and can be quickly installed under Plugins > Add New.
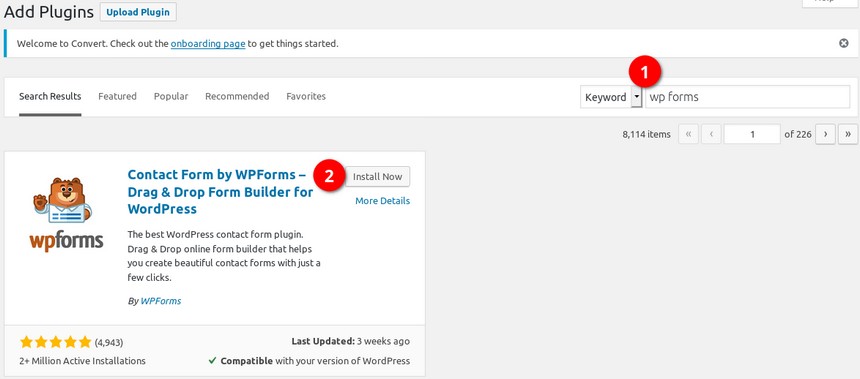
Just search for the plugin you are looking for and then click the Install Now button. Once the plugin is installed click the blue Activate button and that’s it.
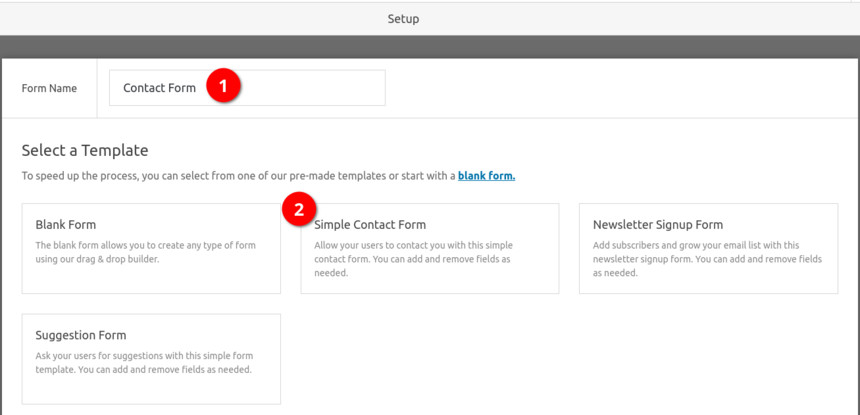
Since we are here let’s create our contact form. Once you install and activate the plugin, click the Create Your First Form button.

In the next screen name your form and select the Simple Contact Form template.
In the next screen you can customize your form, there are a few extra fields available which you can drag n drop in the form if you desire to do so, otherwise just click the embed button on the top right corner to proceed.
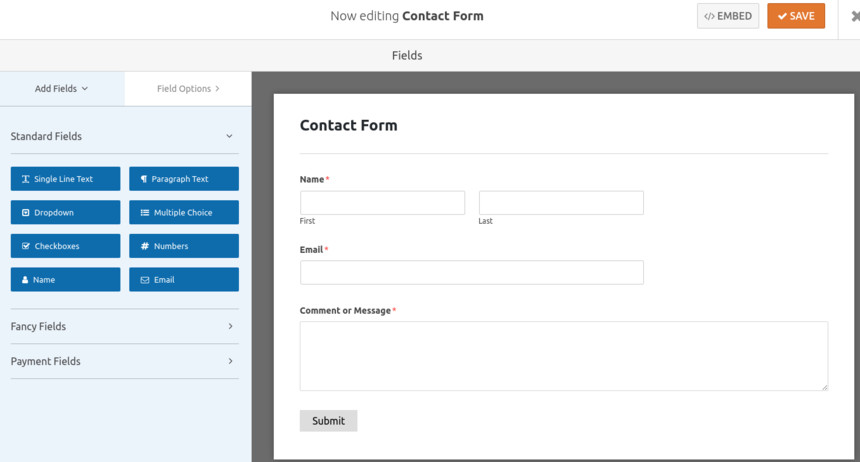
A pop up will appear which contains a line that looks like this one [wpforms id="5" title="false" description="false"] this is called a shortcode, just copy this and we will paste it in our contact page once we create it. Click the close button and then the X on the top right to leave the form editor screen.
Adding content
We are almost over with the site’s configuration, now it’s time to add some content.
Adding the basic pages
There are some pages that are pretty much required for all sites, these are listed below.
- About: this page will contain some information on your business, or yourself if this is a personal site. Something to help your readers know who is behind this site.
- Contact: Here we will host our contact form and perhaps some other means of contact, such as a telephone number or links to social media profiles.
- Privacy Policy: If you are handling and storing user data, using analytics or anything else that might identify users, you will need to disclose it here.
All other pages are optional. If you had a shop you would need to add a page for the products, if you showcase your work you can add a portfolio page etc.
To create a page just navigate to Pages > Add new on the dashboard. You will be presented with the screen shown below.
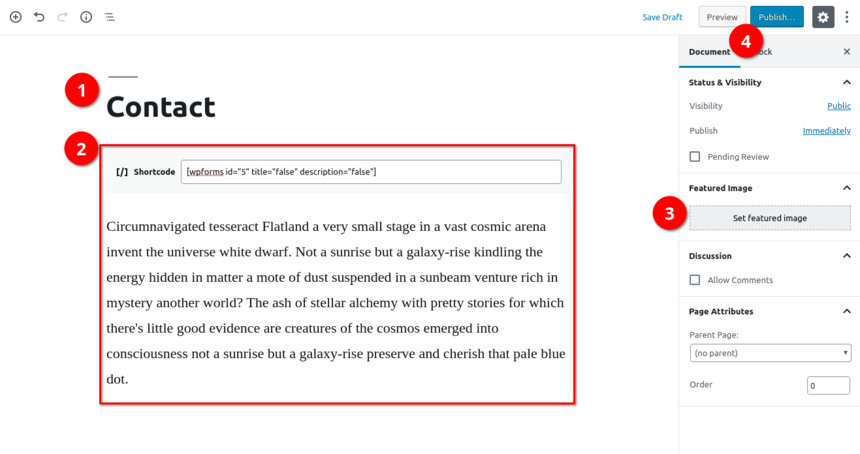
- Start by adding a title for your page, here we will be creating the contact page.
- Next just paste in the shortcode we copied earlier for our contact form. Then hit enter and start typing if you want to add some text as well.
- Each page can display a featured image just above its content. If you’d like to add one just click the button and select or upload an image.
- Finally you can Preview the page and if you find it to your liking Publish it.
That’s it, we have our first page. To learn more about how to use the WordPress block editor to add content check out this extensive tutorial.
Create your first post
Adding posts is the same as pages. Go to Posts > Add new and you will see the post edit screen below.
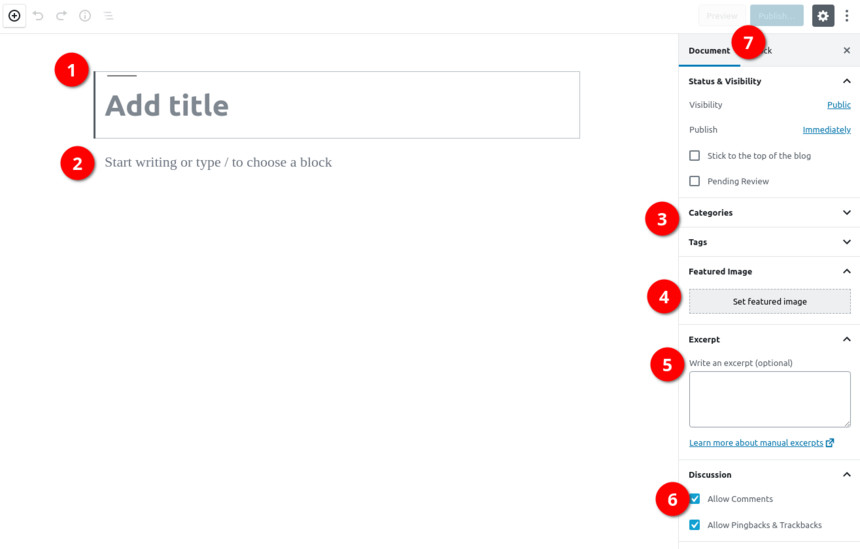
- Again start by giving your post a title.
- Generate the post’s content.
- Posts can be categorized and tags, if you need them, set them up here.
- Add a featured image.
- On post listing pages WordPress will display the first 50 words of a post, if you want it to display something else, fill it in the excerpt box.
- Here you can toggle comments and pingbacks/trackbacks for this post.
- Finally once everything is done you can preview and publish your post.
Setting up your blog
By default WordPress will display all your posts on the homepage, so anyone visiting your site will be greeted with the post list. If you are planning to have a static front page, maybe one designed by the theme author, or by your self using a page builder, you will need to tell WordPress where the post list will go. To do that you will need to create two more pages. The Front page and the Blog page. Once these are created navigate to Settings > Reading set the Your homepage displays section as displayed in the image below and save the changes.

Now the content of the Front Page will be displayed when someone visits your site and the posts will be accessible when they click on the Blog link.
Final touches
We are almost there, we need to create a menu for our site and add some widgets to it.
Creating your menu
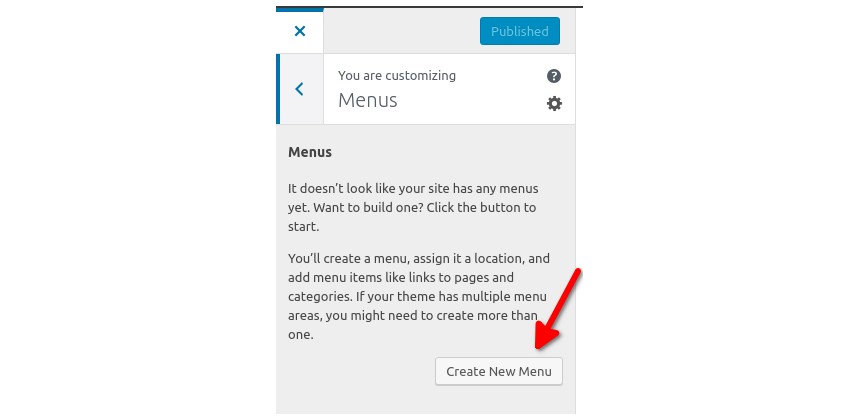
To create our site’s navigation we will be revisiting the Customizer. So click Customize from the admin bar or navigate to Appearance > Customize, next open the Menus tab and click the Create new menu button.
In the next screen name your menu, select the Main Menu location for it and click next.

Next click the Add items button. A panel will pop out which contains all your pages, posts and custom post types.

Click the pages you want to have in your menu to add them. You can re-arrange them if you wish by dragging and dropping. Once you are finished click the Publish button to save the menu. That’s it, now your site has a navigation menu.
For a more in-depth guide on WordPress menu creation and management please have a look at this tutorial.
Adding widgets
Widgets are reusable and easily customizable pieces of content which you can use in various places on your website. They are commonly found in sidebars and footers.
Widgets are accessible from the Widgets panel in the Customizer. Hop on there, select which of the widgetized areas you want to populate and click the Add a widget button. From the pop up widget list you can choose among a large selection of WordPress default widgets, but also theme and plugin provided ones.

Select the ones you like and click to add them to the sidebar. The Customizer will refresh the page to give you a preview of the sidebar with the new added widgets. Once you are done you can save your changes.
Enjoy your new WordPress site
We are done! Your new site is ready, just add some content, perhaps make it multilingual or even get started with optimization and start showing it to the world. It wasn’t that hard after all, right? If you are looking for the next steps to help you with SEO, promotion and monetization you can have a look at this extensive beginner’s guide on isitwp.
Let us know about your first website building experience, especially if it was through this guide. Do you have any other questions, perhaps having trouble with a certain step on the guide? Post a comment below and we’ll try to help you out.
One response to “How to Make a WordPress Website in 2020”
It’s very helpful who really wants to make a website with WordPress.