Search Results

185 results found.

Andros – Legacy

Last Updated On

About

Andros is a responsive Hotel WordPress theme specifically designed to showcase your hotel or resort in style. Enjoy your stay.

WordPress theme installation

The easiest way to install the theme is by accessing your WordPress admin panel, then go to Appearance > Themes. Select the Install Themes tab and click the Upload link located just below the tab’s name. Click on Browse… and select the WordPress theme zip file you just downloaded. Then click the Install Now button, and after a few seconds, your new theme should be installed. Click activate and the theme is ready to use.
In order to install the theme manually, or in case you have trouble installing it through the admin panel, you have to unzip the WordPress theme’s zip file on your computer and upload via FTP the resulting theme folder into your WordPress installation themes folder (wp-content/themes). Then, from the WordPress admin go to Appearance > Themes. The theme should be available in your themes list. Click activate.
TIP: A more visual guide can be found here.

Image Sizes

The recommended image sizes for the Andros theme are:

Post Thumbnail: 750x500px
Tall generic Image:  750px in width and unlimited in height
Item Image : 555x450px
Tall Item Image: 555px in width and unlimited in height
Full Width Image:1140x650px
Hero* Image: 1570x500px
Home Slide Image : 1570x750px

* A hero image is a large banner image, prominently placed on a web page, generally in the front and center.

Useful Plugins

These plugins provide functionality and features used directly (or not) by the Theme. So, it is recommended to install and activate them before importing your sample content.

  • MaxSlider : Use this plugin to help you create custom sliders and use them anywhere you wish shortcodes.
  • Contact Form 7 use this plugin to create a contact form, then copy the shortcode it gives you and paste it in an empty page.
  • WP Instagram Widget: Use the latest version of this plugin to help you display your Instagram feed in any of the theme’s sidebars.
  • WordPress Jetpack: You can use this to create a contact form instead of Contact Form 7, insert sharing buttons, create tiled galleries etc.

Importing Sample Content using One Click Import

To automate the process of importing and for a better experience we have natively included support for OneClick Import Plugin. Let install it fist:

From your WordPress dashboard

  1. Visit ‘Plugins > Add New’,
  2. Search for ‘One Click Demo Import’ and install the plugin,
  3. Activate ‘One Click Demo Import’ from your Plugins page.

From WordPress.org

  1. Download ‘One Click Demo Import’.
  2. Upload the ‘one-click-demo-import’ directory to your ‘/wp-content/plugins/’ directory, using your favorite method (ftp, sftp, scp, etc…)
  3. Activate ‘One Click Demo Import’ from your Plugins page.

Once the plugin is activated you will find the actual import page in: Appearance > Import Demo Data.

 Click on the Import demo data button and you are done!

This plugin requires PHP version of at least 5.3.x, but we recommend version 5.6.x or better yet 7.x. Please contact your hosting company and ask them to update the PHP version for your site.

Theme pages

Let’s start by adding the first few basic pages you are going to need. Go to Pages > Add New and create the following pages:

Frontpage Page

To set up the homepage create a page named Home and set to it the Frontpage Template from the Page Attributes drop down on the right. To add content to your front page go to Customize > Widgets or Appearance > Widgets and use the theme’s widgets to help you display your content. You will notice that in your Homepage template page under the WordPress text Editor you have two sections.

Hero Section

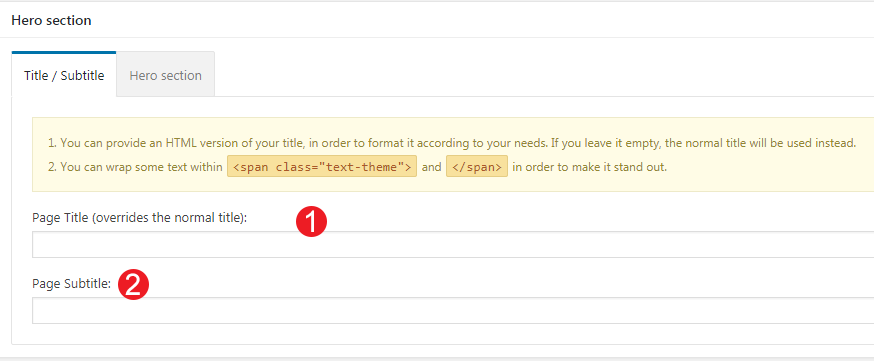
This the basic section before the contents of your page and you can :

  1. Add A Page title.
  2. Add a Page subtitle.

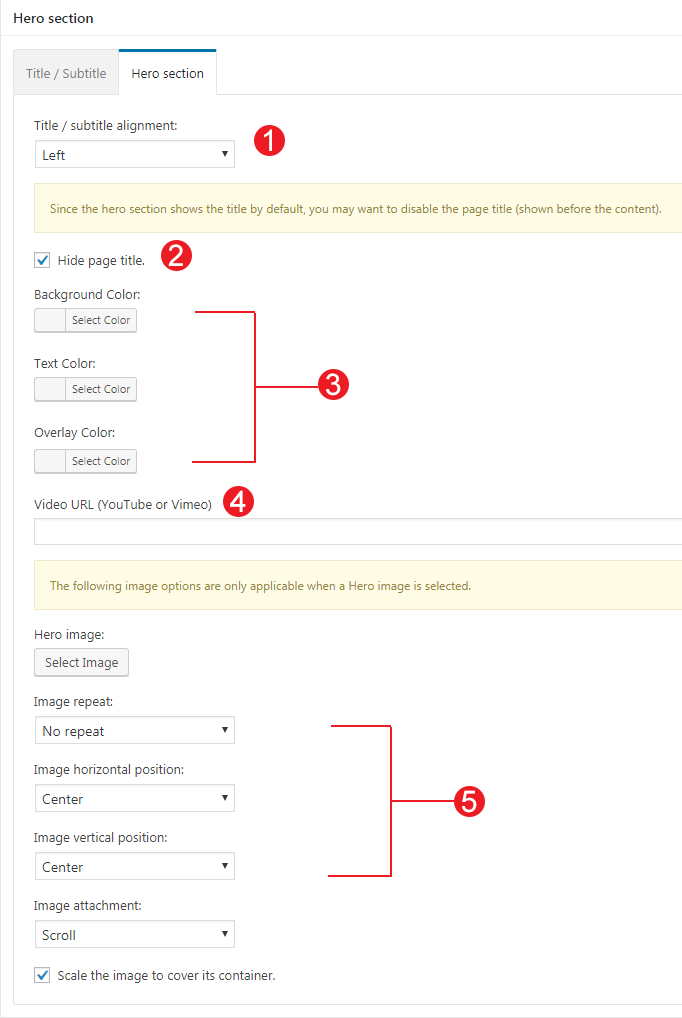
Also you can style your Hero with a background image / video or color :

  1. Align the Title.
  2. Hide the Page title.
  3. Add a Background Color or an Overlay color in case you have a background image with the same color of your Hero title or subtitle.
  4. Add a background Video.
  5. Add a background image and change its position  and screen coverage.

Hero Section is also visible in all  pages with the default page template selected.

Front Page Options

In this section you can also select a MaxSlider Slideshow to appear instead of a hero image or choose not to have a slideshow at all.

Blog

this will be your posts page. Just create and publish a blank default page named “Blog” (or whatever you wish to name it) without adding any content, no further action needed for now. You cannot control the background image from the Layout Section of this page since it is registered by WordPress. You can add a generic background image that will apply here from Appearance > Customize > Colors > Hero.

Room Listing

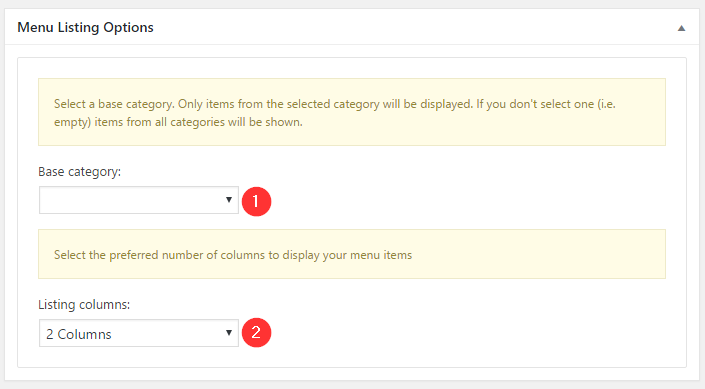
In this page you will list your Room Items by applying the Room Listing template to your page. From the Room Listing Options panel that appears once the template is set, you can select how your Rooms are going to display.

  1. You can choose a loading Effect of your preference.
  2. Select the Base Room category you wish to render. Leave this blank to render them all.
  3. Select the columns you need your rooms to be in.
  4. Use Masonry effect and Add an category filter effect.
  5. Select how many items you wish to display.

Full Width Page

In this page you can add any content you wish without displaying the sidebar.

Setting up your theme

In this section we are going to have a closer look in Andros unique features like Portfolio and Testimonial Items.

Adding Room Items

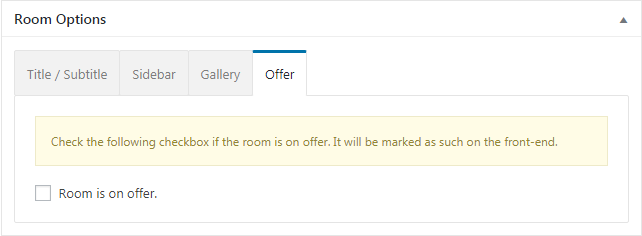
To add new Room item go to Rooms > Add new and set it’s featured image, add the content and  publish the item. Room page offers more options to control the looks, Galleries and Room features.  Under Room Options you can change under the Title / Subtitle tab

  1. Change Page title.
  2. Change Page Subtitle.

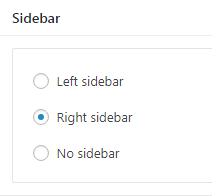
Under the Sidebar tab you can select where your sidebar want to appear or if you need a sidebar.

You can create a Gallery for your current Room from the Gallery tab.

Finally you can select if your Room is an Offer from the Offer Tab

Adding Testimonials

To add a new Testimonial item go to Testimonials > Add New. Fill in a title for the Testimonial, set it’s featured image, add the content and finally publish the item. You can also add a citation of the person that provided this testimonial from the Citation Section :

Customizing Your Theme

All theme customization is done via WordPress’s built in customizer. If you haven’t used it or want to learn more about it, please read this article.

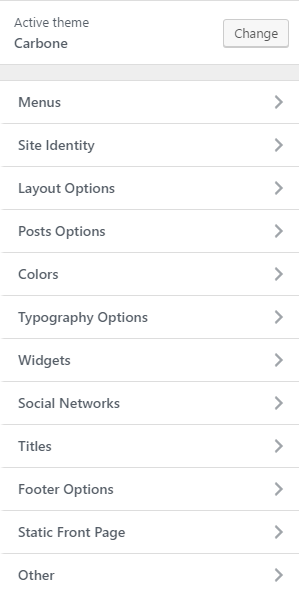
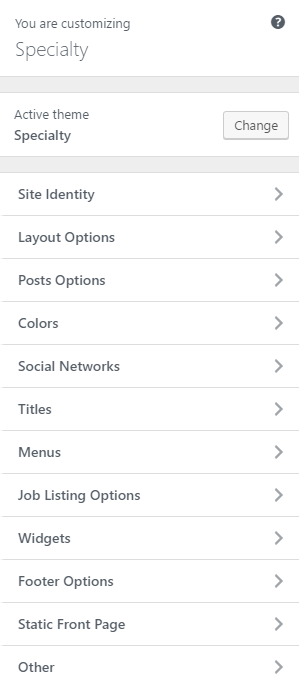
Go to Appearance > Customize and you will see this

TIP: any changes you make in the tabs below will be previewed live on the site which appears in right side of the screen, however to save these changes you need to click the Save & Publish button on the top of the bar, if you have made a change but see the button grayed out (for example changed the font size of a heading), move the cursor outside the input box, for example, to the next input box, then the button should be clickable again.

Let’s take a look at the options each tab gives you.

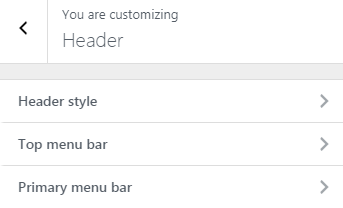
Header Options are split into three sections.

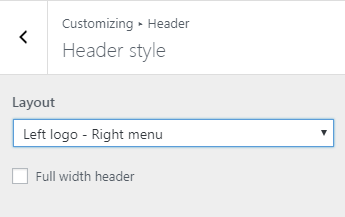
In the Header style section  you can set the layout style your wish your header to have and make it fullwidth. You can select various layouts like

  1. Your logo on the left while the menu displays on the right.
  2. Your logo centered while the menu splits in two sections surrounding the logo. You will need to have menus assigned in both your Main Menu and Main Menu-Right location under Customize > Menus > Menu Locations.
  3. Your logo on top of the menu. After selecting this option you can choose whether you need menu and logo aligned center or  left.

In the Primary menu bar  you can select if you wish to have a sticky menu and change various display settings like the menu vertical padding and text size.

Finally you can control the Top menu bar and add some custom text to it like your email or phone number as well as select whether you need to show or not Search module or your social Icons.

  1. Vertical Padding your your menu bar.
  2. Control your menu text size
  3. Add complimentary text about your business
  4. Show or hide extra modules like Search box and Social Icons.

Site Identity

Here you can  change the logo and favicon as well as the title and description. Use the appropriate fields to add your information, show or hide your site title and subtitle and upload your images.

Blog Settings

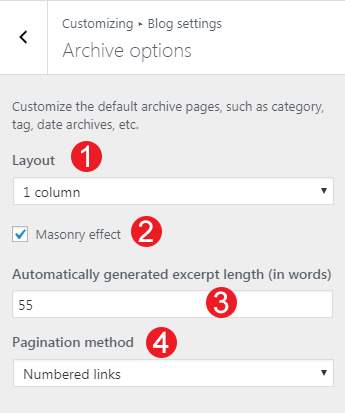
Here you can  change your blog archive looks as well as each element of your single articles. This section is divided in two parts Archive Options and Post Options.

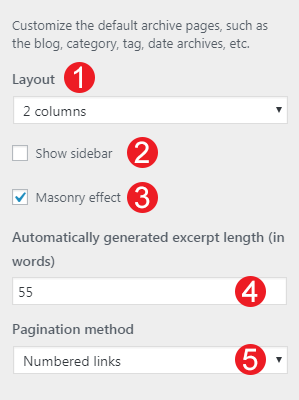
In Archive Options

  1. Change your blog layout
  2. Show or Hide the Sidebar
  3. Use a Masonry effect to render your posts
  4. Change Excerpt Length
  5. Select a pagination method

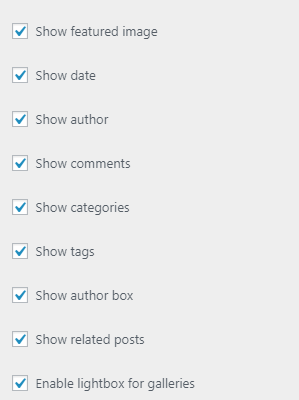
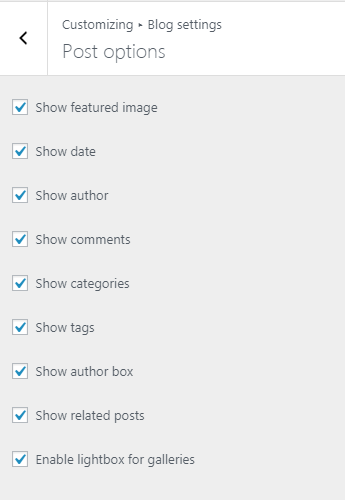
While in Post Options you can select which elements you wish your single blog posts to have. This includes showing or hiding the date, the featured image, the author and author box etc. Or even enabling/disabling the Lightbox option for your galleries.

Colors

This tab allows you to customize the colors and background images for the entire site, the header, hero section, sidebars and the footer.

Typography

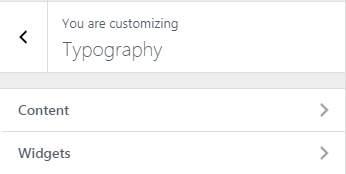
Through this tab you can control the font size of key theme elements, such as headings, body and widgets. If you want to change the default Theme fonts have a look here.

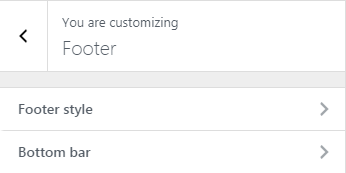
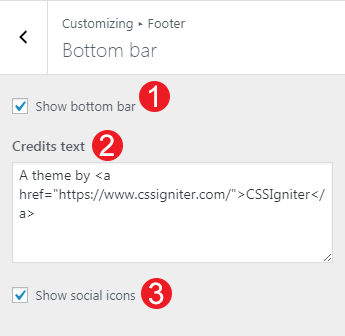
Here you can modify the credits text and your Footer Column Layout.

Under the Bottom Bar Section you can

>

  1. Select to show or not the bottom bar.
  2. Add you credit text. You can use some HTML here if you wish.
  3. Show Your Social Icons in the footer.

In your Footer style section you can

  • Change the columns the footer will have.
  • Set the footer to be fullwidth or not.

Here you can create and assign menus to the theme.Your theme supports 2 main menus. If you wish to have two menus surrounding the logo, select the equivalent option from Customize > Header > Header Style. To learn more about menu creation check out the Codex’s menu user guide here.

Widgets

Through this tab you can add widgets to the theme’s sidebars. The theme features eight Sidebar Areas in order to provide the best option to display your content.

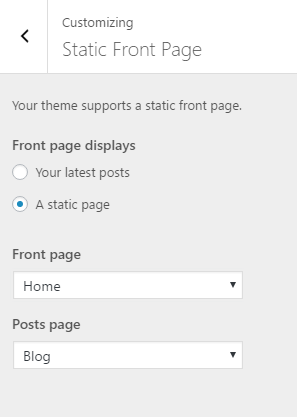
Static Front Page

Use this tab to make the Home page your static front page so you can take advantage of the homepage template we have created for you.

Titles

In this tab you can change the titles for various theme pages, like the blog, search and 404.

Social Networks

In this section You can add your Social Network URLs. These icons will be displayed in the Theme-Social Icons Widget automatically.

Additional CSS

In this tab we host the custom CSS panel which you can use to insert styles for elements not covered in the rest of the tabs.

Other

Here you can download your sample content files.

Widgets

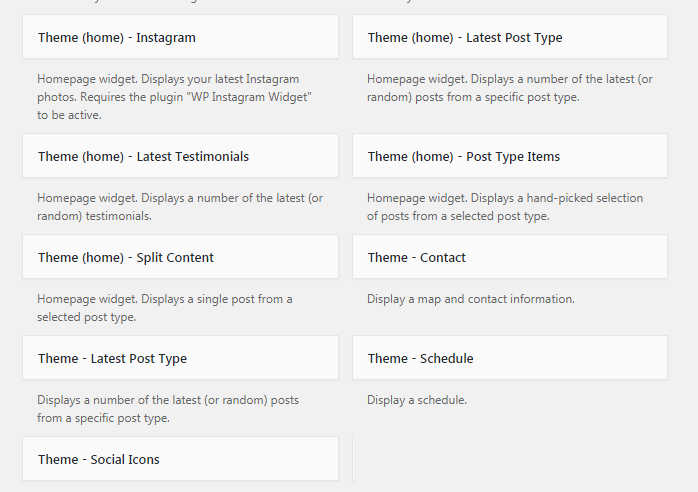
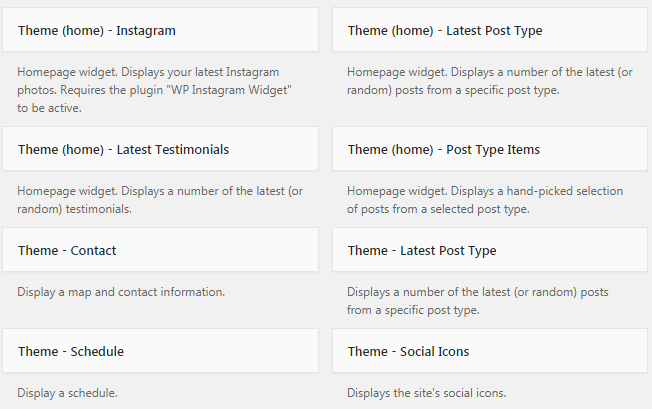
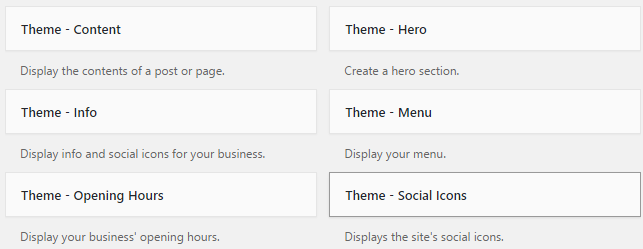
We have handcrafted some custom widgets to help you better display your content. You will find them under Appearance > Customize > Widgets or Appearance > Widgets

Customize Widgets

In all theme’s widgets except Theme – Social Icons, You can use the Customize button to add a background image or color. You can also create a color overlay or stretch your background image to cover the entire width of the widget. You can also enable a parallax effect for your background image or add some padding if you need extra spacing.

Theme-Contact

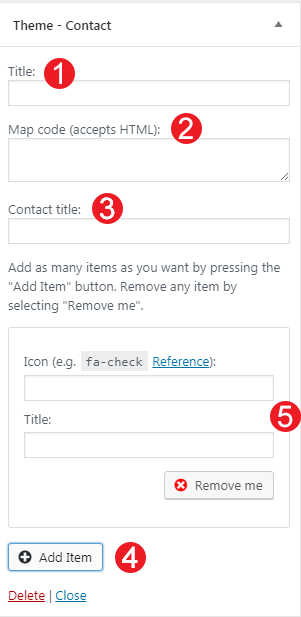
Using this widget you can create a contact box including a title a map and various complementary elements with icons that will help you add more information like telephone etc about your business.

  1. Add a title for your Contact widget.
  2. Add a map code (iframe).
  3. Add a contact title
  4. Create new complementary elements.
  5. Add an icon code  (from fontawesome.io) and some text along.

Theme-Latest Post Type

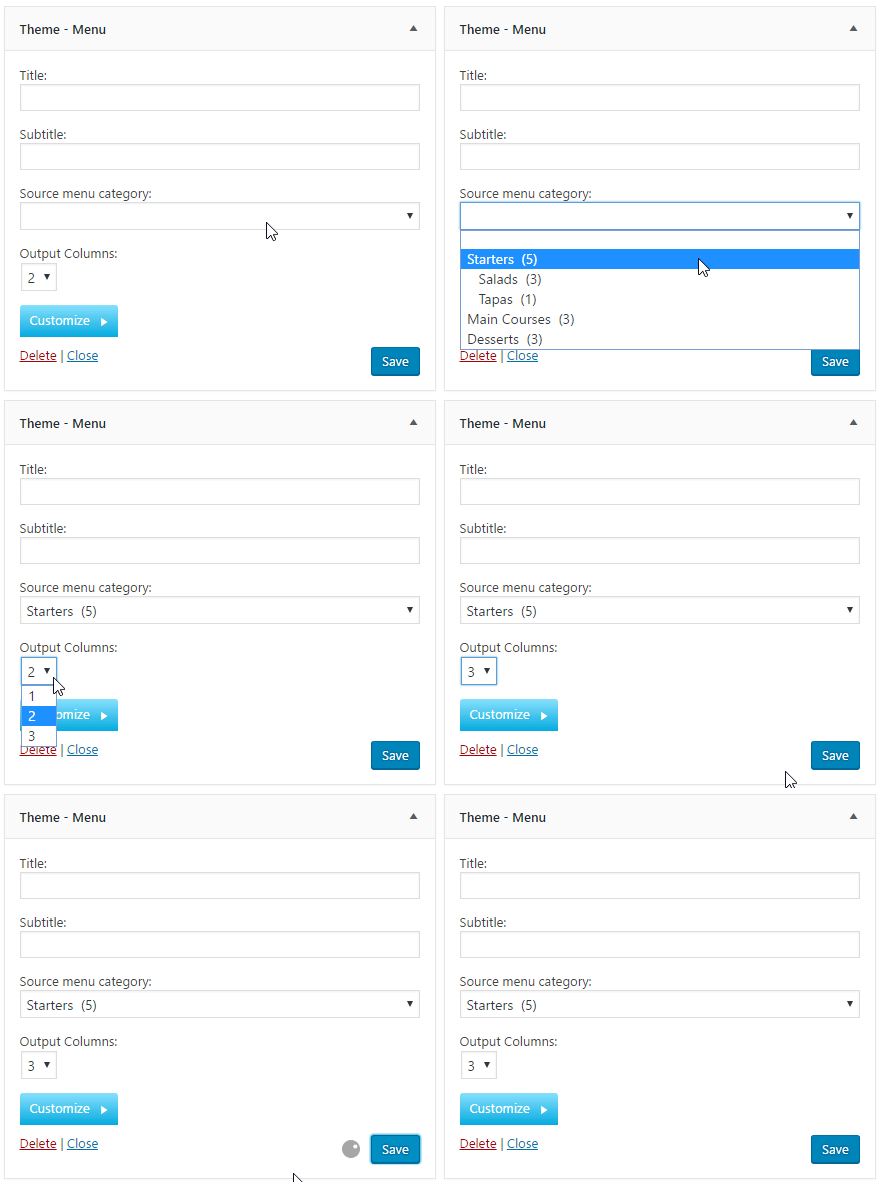
This widget is built to help you display your latest posts  in any widget area you wish.
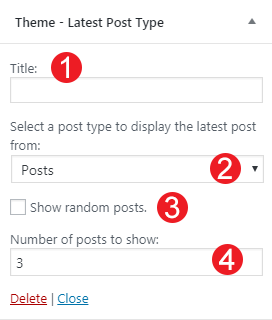
  1. Add a title.
  2. Select the post type you want to get the latest items.
  3. Check if you need random posts instead.
  4. Add the number of posts.

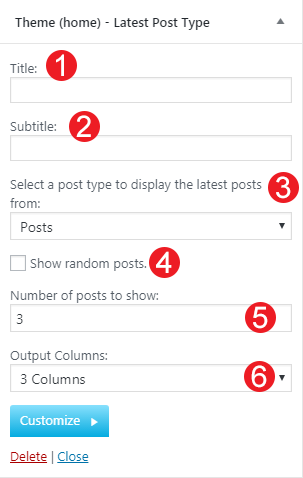
Theme(home)-Latest Post Type

This widget is built to help you display your latest posts  in your Homepage Widget  area.

  1. Add a title.
  2. Add a subtitle.
  3. Select the post type you want to get the latest items.
  4. Check if you need random posts instead.
  5. Add the number of posts.
  6. Select the output columns.

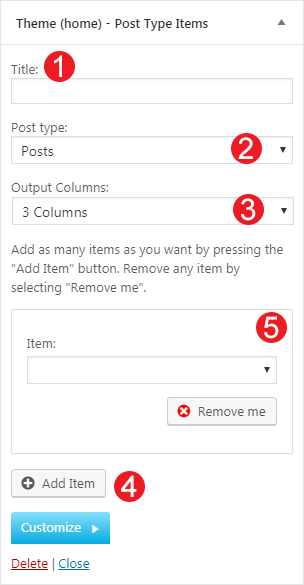
Theme(home)-Post Type Items

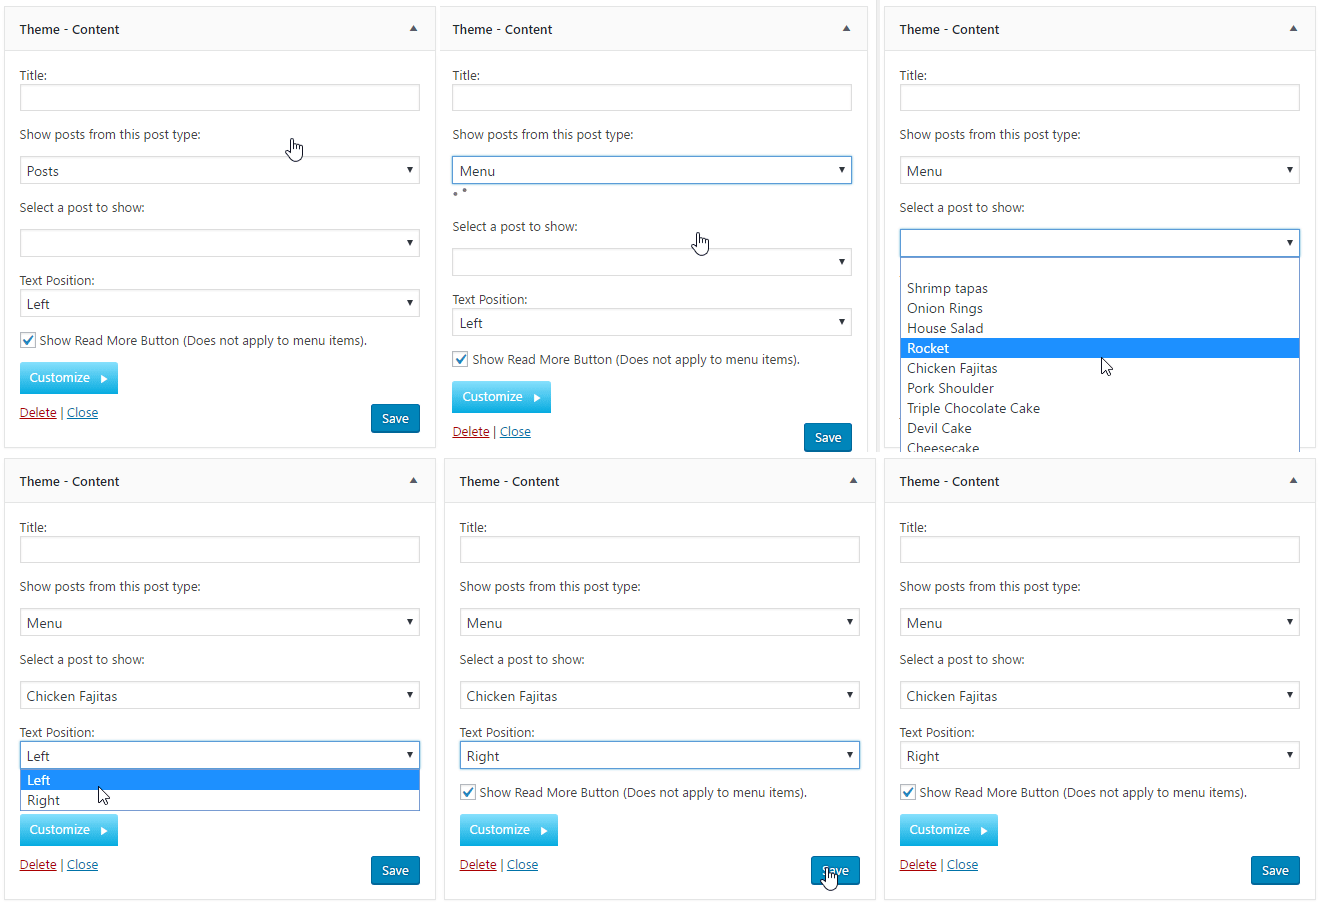
This widget is built to help you display any post you wish  in your Homepage Widget  area.

  1. Add a title.
  2. Select the post type.
  3. Select the output columns.
  4. Add the Item you wish to output.
  5. Select the Item from the dropdown menu.

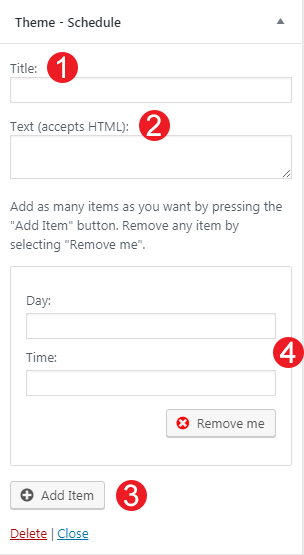
Theme-Schedule

This widget allows you to create a small Schedule table with extra contextual information.

  1. Add a title for your widget
  2. Add some complementary text. You can use HTML tags also if you wish.
  3. Add a new day/time widget.
  4. Add your day and time information for each item.

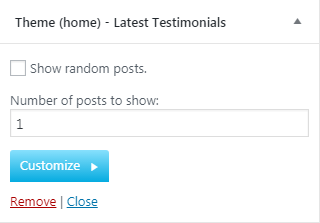
Theme(home)-Latest Testimonials

This widget will render you latest Testimonials. You can select if you wish to show random posts instead as well as the number of testimonial items you want to display.

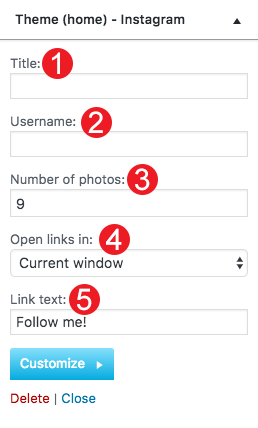
Theme(home)-Instagram

This will allow you to display your Instagram Account in your Front Page or Pre-Footer sidebar. The WP Instagram Widget must be installed and activated in order this Widget to appear

  1. Add a title for your Instagram Widget.
  2. Add your Instagram Account.
  3. Add a number of photos you wish to display.
  4. Select whether you need your images to open in the current window or open in a new tab.
  5. Change the link text.

Shortcodes

Shortcodes in WordPress are small  code like functions that allow you to do various things with little effort.The main reason to use them is to execute code inside WordPress posts, pages, and widgets without writing any code directly. They can be used in Elementor ‘s (or any other page builder) shortcode module.

Andros theme has two shortcodes with various attributes:

[latest-testimonials random="false" count="3"]
  • Random: false by default. Set to “true” to enable.
  • Count: 3 by default. Int values.
[latest-post-type post_type="post" random="false" count="3" columns="3"]
  • Post type: “post” by default. Can be one of: post, pages,andros_room.
  • Random: false by default. Set to “true” to enable.
  • Count: 3 by default. Use only integers larger than 0.
  • Columns: 3 by default. Use only integers  larger than 0.

How to use the page builder template

The theme comes bundled with a page builder template which allows you to use your favorite page builder plugin on it and create unique layouts very easily.

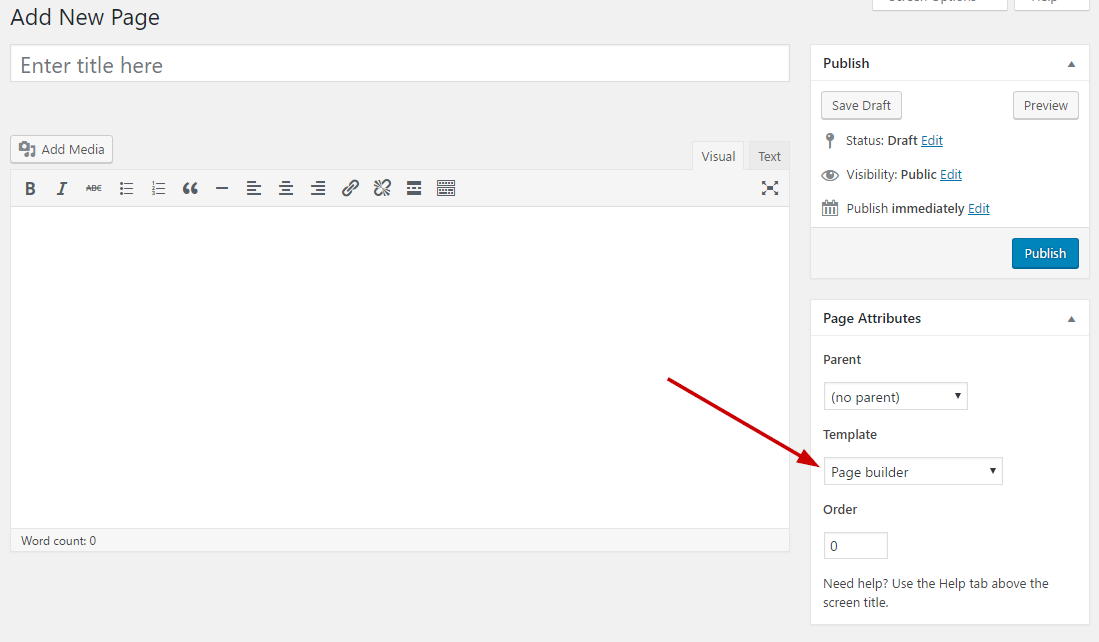
To use that template start by going to Pages > Add New. This will create a new page. Add a title to your page and select the Page builder template from the template drop down in the Page Attributes metabox.

ci_page_builder_template

That’s it. You can now start building your page using the page builder of your choice, once done publish it and check it out.

Next Steps

Still have questions or problems setting up your CSSIgniter Theme? We will be happy to help you out! Please visit our support Hub 

Spencer – Legacy

Last Updated On

About

Spencer is a responsive Business / Blogging WordPress theme.

WordPress theme installation

The easiest way to install the theme is by accessing your WordPress admin panel, then go to Appearance > Themes. Select the Install Themes tab and click the Upload link located just below the tab’s name. Click on Browse… and select the WordPress theme zip file you just downloaded. Then click the Install Now button, and after a few seconds, your new theme should be installed. Click activate and the theme is ready to use.
In order to install the theme manually, or in case you have trouble installing it through the admin panel, you have to unzip the WordPress theme’s zip file on your computer and upload via FTP the resulting theme folder into your WordPress installation themes folder (wp-content/themes). Then, from the WordPress admin go to Appearance > Themes. The theme should be available in your themes list. Click activate.
TIP: A more visual guide can be found here.

Image Sizes

The recommended image sizes for Spencer theme are:

Post Thumbnail: 750x500px
Item Image : 555x755px
Full Width Image:1140x650px
Hero* Image: 1920x250px
Home Slide Image : 1920x750px

* A hero image is a large banner image, prominently placed on a web page, generally in the front and center.

Useful Plugins

These plugins provide functionality and features used directly (or not) by the Theme. So, it is recommended to install and activate them before importing your sample content.

  • MaxSlider : Use this plugin to help you create custom sliders and use them anywhere you wish shortcodes.
  • Contact Form 7 use this plugin to create a contact form, then copy the shortcode it gives you and paste it in an empty page.
  • WordPress Jetpack: You can use this to create a contact form instead of Contact Form 7, insert sharing buttons, create tiled galleries etc.
  • Mashsharer: A free Social Media Plugin, professional and highly customizable ecosystem for social media sharing and optimizing of your valuable content..

Importing Sample Content using One Click Import

To automate the process of importing and for a better experience we have natively included support for OneClick Import Plugin. Let install it fist:

From your WordPress dashboard

  1. Visit ‘Plugins > Add New’,
  2. Search for ‘One Click Demo Import’ and install the plugin,
  3. Activate ‘One Click Demo Import’ from your Plugins page.

From WordPress.org

  1. Download ‘One Click Demo Import’.
  2. Upload the ‘one-click-demo-import’ directory to your ‘/wp-content/plugins/’ directory, using your favorite method (ftp, sftp, scp, etc…)
  3. Activate ‘One Click Demo Import’ from your Plugins page.

Once the plugin is activated you will find the actual import page in: Appearance > Import Demo Data.

 Click on the Import demo data button and you are done!

This plugin requires PHP version of at least 5.3.x, but we recommend version 5.6.x or better yet 7.x. Please contact your hosting company and ask them to update the PHP version for your site.

Theme pages

Let’s start by adding the first few basic pages you are going to need. Go to Pages > Add New and create the following pages:

Frontpage Page

To set up the homepage create a page named Home and set to it the Frontpage Template from the Page Attributes drop down on the right. To add content to your front page go to Customize > Widgets or Appearance > Widgets and use the theme’s widgets to help you display your content. You will notice that in your Homepage template page under the WordPress text Editor you have two sections.

Hero Section

This the basic section before the contents of your page and you can :

  1. Add A Page title.
  2. Add a Page subtitle.

Also you can style your Hero with a background image / video or color :

  1. Align the Title.
  2. Hide the Page title.
  3. Add a Background Color or an Overlay color in case you have a background image with the same color of your Hero title or subtitle.
  4. Add a background Video.
  5. Add a background image and change its position  and screen coverage.

Hero Section is also visible in all  pages with the default page template selected.

Front Page Options

In this section you can also select a MaxSlider Slideshow to appear instead of a hero image or choose not to have a slideshow at all.

Blog

this will be your posts page. Just create and publish a blank default page named “Blog” (or whatever you wish to name it) without adding any content, no further action needed for now. You cannot control the background image from the Layout Section of this page since it is registered by WordPress. You can add a generic background image that will apply here from Appearance > Customize > Colors > Hero.

Full Width Page

In this page you can add any content you wish without displaying the sidebar.

Setting up your theme

In this section we are going to have a closer look in Spencer unique features.

Adding Post Items

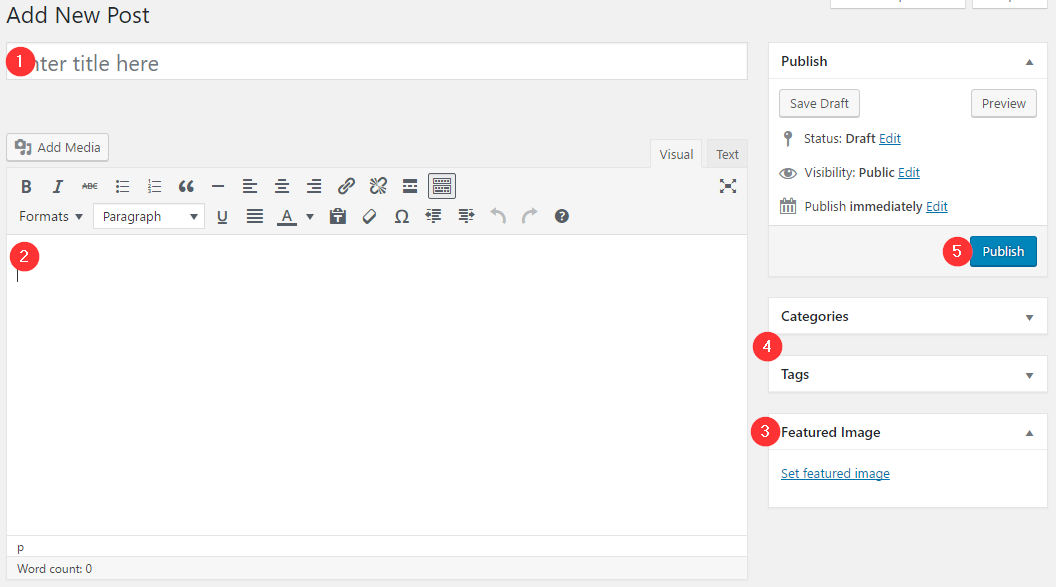
To add new Room item go to Posts > Add new and set it’s featured image, add the content and  publish the item.

Hero Section

This the basic section before the contents of your page and you can :

  1. Add A Page title.
  2. Add a Page subtitle.

Also you can style your Hero with a background image / video or color :

  1. Align the Title.
  2. Hide the Page title.
  3. Add a Background Color or an Overlay color in case you have a background image with the same color of your Hero title or subtitle.
  4. Add a background Video.
  5. Add a background image and change its position  and screen coverage.

You can also select the sidebar location and visibility from the Sidebar section.

Customizing Your Theme

All theme customization is done via WordPress’s built in customizer. If you haven’t used it or want to learn more about it, please read this article.

Go to Appearance > Customize and you will see this

TIP: any changes you make in the tabs below will be previewed live on the site which appears in right side of the screen, however to save these changes you need to click the Save & Publish button on the top of the bar, if you have made a change but see the button grayed out (for example changed the font size of a heading), move the cursor outside the input box, for example, to the next input box, then the button should be clickable again.

Let’s take a look at the options each tab gives you.

Header Options are split into three sections.

In the Header style section  you can set the layout style your wish your header to have and make it fullwidth. You can select various layouts like

  1. Your logo on the left while the menu displays on the right.
  2. Your logo centered while the menu splits in two sections surrounding the logo. You will need to have menus assigned in both your Main Menu and Main Menu-Right location under Customize > Menus > Menu Locations.
  3. Your logo on top of the menu. After selecting this option you can choose whether you need menu and logo aligned center or  left.

In the Primary menu bar  you can select if you wish to have a sticky menu and change various display settings like the menu vertical padding and text size.

Finally you can control the Top menu bar and add some custom text to it like your email or phone number as well as select whether you need to show or not Search module or your social Icons.

  1. Vertical Padding your your menu bar.
  2. Control your menu text size
  3. Add complimentary text about your business
  4. Show or hide extra modules like Search box and Social Icons.

Site Identity

Here you can  change the logo and favicon as well as the title and description. Use the appropriate fields to add your information, show or hide your site title and subtitle and upload your images.

Blog Settings

Here you can  change your blog archive looks as well as each element of your single articles. This section is divided in two parts Archive Options and Post Options.

In Archive Options

  1. Change your blog layout
  2. Show or Hide the Sidebar
  3. Use a Masonry effect to render your posts
  4. Change Excerpt Length
  5. Select a pagination method

While in Post Options you can select which elements you wish your single blog posts to have. This includes showing or hiding the date, the featured image, the author and author box etc. Or even enabling/disabling the Lightbox option for your galleries.

Colors

This tab allows you to customize the colors and background images for the entire site, the header, hero section, sidebars and the footer.

Typography

Through this tab you can control the font size of key theme elements, such as headings, body and widgets. If you want to change the default Theme fonts have a look here.

Here you can modify the credits text and your Footer Column Layout.

Under the Bottom Bar Section you can

  1. Select to show or not the bottom bar.
  2. Add you credit text. You can use some HTML here if you wish.
  3. Show Your Social Icons in the footer.

In your Footer style section you can

  1. Change the columns the footer will have.
  2. Set the footer to be fullwidth or not.

Here you can create and assign menus to the theme.Your theme supports 2 main menus. If you wish to have two menus surrounding the logo, select the equivalent option from Customize > Header > Header Style. To learn more about menu creation check out the Codex’s menu user guide here.

Widgets

Through this tab you can add widgets to the theme’s sidebars. The theme features eight Sidebar Areas in order to provide the best option to display your content.

Static Front Page

Use this tab to make the Home page your static front page so you can take advantage of the homepage template we have created for you.

Titles

In this tab you can change the titles for various theme pages, like the blog, search and 404.

Social Networks

In this section You can add your Social Network URLs. These icons will be displayed in the Theme-Social Icons Widget automatically.

Additional CSS

In this tab we host the custom CSS panel which you can use to insert styles for elements not covered in the rest of the tabs.

Other

Here you can download your sample content files.

Widgets

We have handcrafted some custom widgets to help you better display your content. You will find them under Appearance > Customize > Widgets or Appearance > Widgets

Customizing Widgets

In all theme’s widgets except Theme – Social Icons, You can use the Customize button to add a background image or color. You can also create a color overlay or stretch your background image to cover the entire width of the widget. You can also enable a parallax effect for your background image or add some padding if you need extra spacing.

Theme-Contact

Using this widget you can create a contact box including a title a map and various complementary elements with icons that will help you add more information like telephone etc about your business.

  1. Add a title for your Contact widget.
  2. Add a map code (iframe).
  3. Add a contact title
  4. Create new complementary elements.
  5. Add an icon code  (from fontawesome.io) and some text along.

Theme-Latest Post Type

This widget is built to help you display your latest posts  in any widget area you wish.

  1. Add a title.
  2. Select the post type you want to get the latest items.
  3. Check if you need random posts instead.
  4. Add the number of posts.

Theme(home)-Latest Post Type

This widget is built to help you display your latest posts  in your Homepage Widget  area.

  1. Add a title.
  2. Add a subtitle.
  3. Select the post type you want to get the latest items.
  4. Check if you need random posts instead.
  5. Add the number of posts.
  6. Select the output columns.

Theme(home)-Post Type Items

This widget is built to help you display any post you wish  in your Homepage Widget  area.

  1. Add a title.
  2. Select the post type.
  3. Select the output columns.
  4. Add the Item you wish to output.
  5. Select the Item from the dropdown menu.

Theme-Schedule

This widget allows you to create a small Schedule table with extra contextual information.

  1. Add a title for your widget
  2. Add some complementary text. You can use HTML tags also if you wish.
  3. Add a new day/time widget.
  4. Add your day and time information for each item.

Theme(home)-Instagram

This will allow you to display your Instagram Account in your Front Page or Pre-Footer sidebar. The WP Instagram Widget must be installed and activated in order this Widget to appear

  1. Add a title for your Instagram Widget.
  2. Add your Instagram Account.
  3. Add a number of photos you wish to display.
  4. Select whether you need your images to open in the current window or open in a new tab.
  5. Change the link text.

Shortcodes

Shortcodes in WordPress are small  code like functions that allow you to do various things with little effort.The main reason to use them is to execute code inside WordPress posts, pages, and widgets without writing any code directly. They can be used in Elementor ‘s (or any other page builder) shortcode module.

Spencer theme has one shortcode with various attributes:

[latest-from-terms]
Parameters:
  1. post_type=”post” (default “post”). Any post type.
  2. taxonomy=”category” (default “category”). Any taxonomy associated with the post_type.
  3. ids=”1, 2, 7″ (default empty). One or more comma-separated term IDs. Required.
  4. random=”1″ or “true” (default “false”).
  5. count=”12″ (default “3”). Can’t be 0.
  6. columns=”4″ (default “3”). Must be between 2 and 4.

How to use the page builder template

The theme comes bundled with a page builder template which allows you to use your favorite page builder plugin on it and create unique layouts very easily.

To use that template start by going to Pages > Add New. This will create a new page. Add a title to your page and select the Page builder template from the template drop down in the Page Attributes metabox.

ci_page_builder_template

That’s it. You can now start building your page using the page builder of your choice, once done publish it and check it out.

Next Steps

Still have questions or problems setting up your CSSIgniter Theme? We will be happy to help you out! Please visit our support Hub 
Benson – Legacy

Last Updated On

About

Benson is a WordPress  theme for Photographers, Wedding Photographers and Photography Enthusiasts. It allows you to display your portfolio, testimonials and photo galleries related to your work.

WordPress theme installation

The easiest way to install the theme is by accessing your WordPress admin panel, then go to Appearance > Themes. Select the Install Themes tab and click the Upload link located just below the tab’s name. Click on Browse… and select the WordPress theme zip file you just downloaded. Then click the Install Now button, and after a few seconds, your new theme should be installed. Click activate and the theme is ready to use.
In order to install the theme manually, or in case you have trouble installing it through the admin panel, you have to unzip the WordPress theme’s zip file on your computer and upload via FTP the resulting theme folder into your WordPress installation themes folder (wp-content/themes). Then, from the WordPress admin go to Appearance > Themes. The theme should be available in your themes list. Click activate.
TIP: A more visual guide can be found here.

Image Sizes

The recommended image sizes for the Benson theme are:

Post Thumbnail: 750x600px
Entry Item Image:  570x380px
Tall Entry Item Image 540px in width and unlimited in height
Full Width Image: 1140x600px
Hero* Image:  1700x433px
Home Slide Image : 1700x956px

* A hero image is a large banner image, prominently placed on a web page, generally in the front and center.

Useful Plugins

These plugins provide functionality and features used directly (or not) by the Theme. So, it is recommended to install and activate them before importing your sample content.

  • One Click Import : Use this plugin to help you import your content with just one click.
  • MaxSlider : Use this plugin to help you create custom sliders and use them anywhere you wish shortcodes.
  • WPForms use this plugin to create a contact form, then copy the shortcode it gives you and paste it in an empty page.
  • WP Instagram Widget: Use the latest version of this plugin to help you display your Instagram feed in any of the theme’s sidebars.
  • WordPress Jetpack: You can use this to create a contact form instead of Contact Form 7, insert sharing buttons, create tiled galleries etc.

Importing Sample Content using One Click Import

To automate the process of importing and for a better experience we have natively included support for OneClick Import Plugin. Let install it fist:

From your WordPress dashboard

  1. Visit ‘Plugins > Add New’,
  2. Search for ‘One Click Demo Import’ and install the plugin,
  3. Activate ‘One Click Demo Import’ from your Plugins page.

From WordPress.org

  1. Download ‘One Click Demo Import’.
  2. Upload the ‘one-click-demo-import’ directory to your ‘/wp-content/plugins/’ directory, using your favorite method (ftp, sftp, scp, etc…)
  3. Activate ‘One Click Demo Import’ from your Plugins page.

Once the plugin is activated you will find the actual import page in: Appearance > Import Demo Data.

 Click on the Import demo data button and you are done!

This plugin requires PHP version of at least 5.3.x, but we recommend version 5.6.x or better yet 7.x. Please contact your hosting company and ask them to update the PHP version for your site.

Importing sample content

To get the sample content file you can click the link in the notice that will appear on your dashboard immediately after activating the theme.

download_sample

Extract the zip file you downloaded and upload the xml file in Tools > Import > WordPress (if not already present, you will be prompted to install the WordPress importer plugin), asking the authors to an existing user and make sure you check the “import attachments” box. You can now import the sample content.

You can also download the Sample Content for Benson by clicking here

Importing widgets

You can also import the widgets you see on the theme’s demo. To do that, you need the Widget Importer & Exporter plugin. To install it go to Plugins > Add new search for Widget Importer exporter and install the plugin. Activate it and go to Tools > Widget Importer & Exporter click choose file and upload the benson_widgets.wie file which is located in the sample content zip file, click Import widgets and you are good to go.
WARNING: As this will create posts, pages, custom post types, categories, widgets, etc. and change various system settings, it is strongly advised that you do this on a clean WordPress installation, without any previous and/or precious data. Under no circumstances we can be held responsible for total or partial data loss, so please be careful.

Theme pages

Let’s start by adding the first few basic pages you are going to need. Go to Pages > Add New and create the following pages:

Frontpage Page

To set up the homepage create a page named Home and set to it the Frontpage Template from the Page Attributes drop down on the right. To add content to your front page go to Customize > Widgets or Appearance > Widgets and use the theme’s widgets to help you display your content. You will notice that in your Homepage template page under the WordPress text Editor you have two sections.

Hero Section

This the basic section before the contents of your page and you can :

  1. Add A Page title.
  2. Add a Page subtitle.

Also you can style your Hero with a background image / video or color :

  1. Align the Title.
  2. Hide the Page title.
  3. Add a Background Color or an Overlay color in case you have a background image with the same color of your Hero title or subtitle.
  4. Add a background Video.
  5. Add a background image and change its position  and screen coverage.

Hero Section is visible in all  pages with the default page template selected.

Front Page Options

In this section you can also select a MaxSlider Slideshow to appear instead of a hero image or choose not to have a slideshow at all.

Blog

this will be your posts page. Just create and publish a blank default page named “Blog” (or whatever you wish to name it) without adding any content, no further action needed for now. You cannot control the background image from the Layout Section of this page since it is registered by WordPress. You can add a generic background image that will apply here from Appearance > Customize > Colors > Hero.

Portfolio Listing

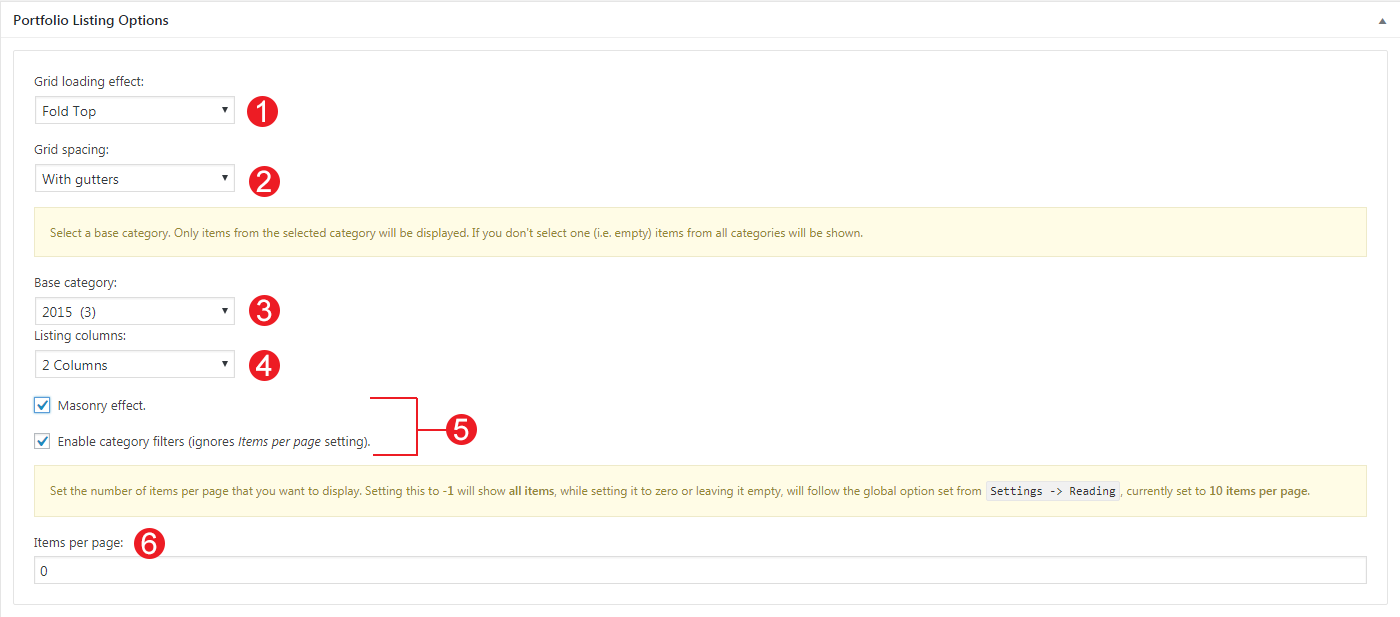
In this page you will list your Portfolio Items by applying the Portfolio Listing template to your page. From the Portfolio Listing Options panel that appears once the template is set, you can select how your portfolio is going to display.

  1. You can choose a loading Effect of your preference.
  2. Select if you need your items to have some spacing or nor
  3. Select the Base portfolio category you wish to render. Leave this blank to render them all.
  4. Select the Columns you need to output.
  5. Use Masonry effect and Add an Isotope effect.
  6. Add how many items you wish to display.

Testimonials Listing

In this page you will list your testimonials, apply to it the Testimonial Listing template.

Full Width Page

In this page you can add any content you wish without displaying the sidebar.

Setting up your theme

In this section we are going to have a closer look in Benson’s unique features like Portfolio and Testimonial Items.

Adding Portfolio Items

To add new Portfolio item go to Portfolio > Add new and set it’s featured image, add the content and finally publish the item.

Adding Testimonials

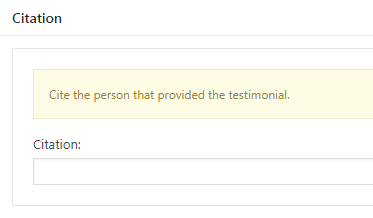
To add a new Testimonial item go to Testimonials > Add New. Fill in a title for the Testimonial, set it’s featured image, add the content and finally publish the item. You can also add a citation of the person that provided this testimonial from the Citation Section :

Customizing Your Theme

All theme customization is done via WordPress’s built in customizer. If you haven’t used it or want to learn more about it, please read this article.

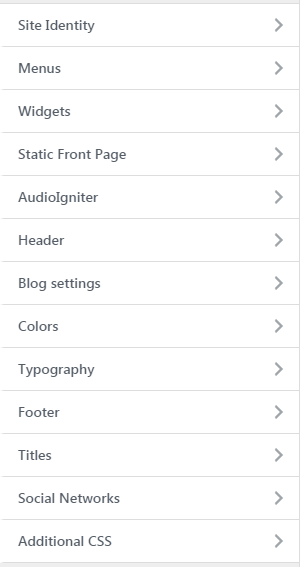
Go to Appearance > Customize and you will see this

TIP: any changes you make in the tabs below will be previewed live on the site which appears in right side of the screen, however to save these changes you need to click the Save & Publish button on the top of the bar, if you have made a change but see the button grayed out (for example changed the font size of a heading), move the cursor outside the input box, for example, to the next input box, then the button should be clickable again.

Let’s take a look at the options each tab gives you.

Site Identity

Here you can  change the logo and favicon as well as the title and description. Use the appropriate fields to add your information, show or hide your site title and subtitle and upload your images.

Here you can create and assign menus to the theme.Your theme supports 2 main menus. If you wish to have two menus surrounding the logo, select the equivalent option from Customize > Header > Header Style. To learn more about menu creation check out the Codex’s menu user guide here.

Widgets

Through this tab you can add widgets to the theme’s sidebars. The theme features eight Sidebar Areas in order to provide the best option to display your content.

Static Front Page

Use this tab to make the Home page your static front page so you can take advantage of the homepage template we have created for you.

Header Options are split into three sections.

In the Header style section, you can set the layout style your wish your header to have and make it fullwidth. You can select various layouts like

  1. Your logo on the left while the menu displays on the right.
  2. Your logo centered while the menu splits in two sections surrounding the logo. You will need to have menus assigned in both your Main Menu and Main Menu-Right location under Customize > Menus > Menu Locations.
  3. Your logo on top of the menu. After selecting this option you can choose whether you need menu and logo aligned center or left.

In the Primary menu bar you can select if you wish to have a sticky menu and change various display settings like the menu vertical padding and text size.

Finally, you can control the Top menu bar and add some custom text to it like your email or phone number as well as select whether you need to show or not Search module or your social Icons.

  1. Vertical Padding your your menu bar.
  2. Control your menu text size
  3. Add complimentary text about your business
  4. Show or hide extra modules like Search box and Social Icons.

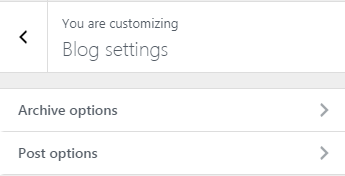
Blog Settings

This tab allows you to customize your blog and post options.

In Post Options you can select which elements you wish your single blog posts to have. This includes showing or hiding the date, the featured image, the author and author box etc. Or even enabling/disabling the Lightbox option for your galleries.

In Archive options you have customize the default archive pages like category, tag and date archive pages.

  1. Change the Layout by selecting in how many columns you need your content to appear.
  2. Enable Masonry effect in case you have articles with different content and featured image height.
  3. Select the article excerpt length.
  4. Select a pagination method.

Colors

This tab allows you to customize the colors and background images for the entire site, the header, hero section, sidebars and the footer.

Typography

Through this tab you can control the font size of key theme elements, such as headings, body and widgets. If you want to change the default Theme fonts have a look here.

Here you can modify the credits text and your Footer Column Layout.

Under the Bottom Bar Section you can

  1. Select to show or not the bottom bar.
  2. Add you credit text. You can use some HTML here if you wish.
  3. Show Your Social Icons in the footer.

In your Footer style section you can

  1. Change the columns the footer will have.
  2. Set the footer to be fullwidth or not.

Titles

In this tab you can change the titles for various theme pages, like the blog, search and 404.

Social Networks

In this section You can add your Social Network URLs. These icons will be displayed in the Theme-Social Icons Widget automatically.

Additional CSS

In this tab we host the custom CSS panel which you can use to insert styles for elements not covered in the rest of the tabs.

Other

Here you can download your sample content files.

Widgets

We have handcrafted some custom widgets to help you better display your content. You will find them under Appearance > Customize > Widgets or Appearance > Widgets

Customize Widgets

In all theme’s widgets except Theme – Social Icons, You can use the Customize button to add a background image or color. You can also create a color overlay or stretch your background image to cover the entire width of the widget. You can also enable a parallax effect for your background image or add some padding if you need extra spacing.

Theme-Contact

Using this widget you can create a contact box including a title a map and various complementary elements with icons that will help you add more information like telephone etc about your business.

  1. Add a title for your Contact widget.
  2. Add a map code (iframe).
  3. Add a contact title
  4. Create new complementary elements.
  5. Add an icon code  (from fontawesome.io) and some text along.

Theme-Latest Post Type

This widget is built to help you display your latest posts  in any widget area you wish.

  1. Add a title.
  2. Select the post type you want to get the latest items.
  3. Check if you need random posts instead.
  4. Add the number of posts.

Theme(home)-Latest Post Type

This widget is built to help you display your latest posts  in your Homepage Widget  area.

  1. Add a title.
  2. Add a subtitle.
  3. Select the post type you want to get the latest items.
  4. Check if you need random posts instead.
  5. Add the number of posts.
  6. Select the output columns.

Theme(home)-Post Type Items

This widget is built to help you display any post you wish  in your Homepage Widget  area.

  1. Add a title.
  2. Select the post type.
  3. Select the output columns.
  4. Add the Item you wish to output.
  5. Select the Item from the dropdown menu.

Theme-Schedule

This widget allows you to create a small Schedule table with extra contextual information.

  1. Add a title for your widget
  2. Add some complementary text. You can use HTML tags also if you wish.
  3. Add a new day/time widget.
  4. Add your day and time information for each item.

Theme(home)-Latest Testimonials

This widget will render you latest Testimonials. You can select if you wish to show random posts instead as well as the number of testimonial items you want to display.

Theme(home)-Instagram

This will allow you to display your Instagram Account in your Front Page or Pre-Footer sidebar. The WP Instagram Widget must be installed and activated in order this Widget to appear

  1. Add a title for your Instagram Widget.
  2. Add your Instagram Account.
  3. Add a number of photos you wish to display.
  4. Select whether you need your images to open in the current window or open in a new tab.
  5. Change the link text.

Shortcodes

Shortcodes in WordPress are small  code like functions that allow you to do various things with little effort.The main reason to use them is to execute code inside WordPress posts, pages, and widgets without writing any code directly. They can be used in Elementor ‘s (or any other page builder) shortcode module.

Benson theme has two shortcodes with various attributes:

[latest-testimonials random="false" count="3"]
  • Random: false by default. Set to “true” to enable.
  • Count: 3 by default. Int values.
[latest-post-type post_type="post" random="false" count="3" columns="3"]
  • Post type: “post” by default. Can be one of: post, page, benson_portfolio.
  • Random: false by default. Set to “true” to enable.
  • Count: 3 by default. Use only integers larger than 0.
  • Columns: 3 by default. Use only integers  larger than 0.

How to use the page builder template

The theme comes bundled with a page builder template which allows you to use your favorite page builder plugin on it and create unique layouts very easily.

To use that template start by going to Pages > Add New. This will create a new page. Add a title to your page and select the Page builder template from the template drop down in the Page Attributes metabox.

ci_page_builder_template

That’s it. You can now start building your page using the page builder of your choice, once done publish it and check it out.

Next Steps

Still have questions or problems setting up your CSSIgniter Theme? We will be happy to help you out! Please visit our support Hub 
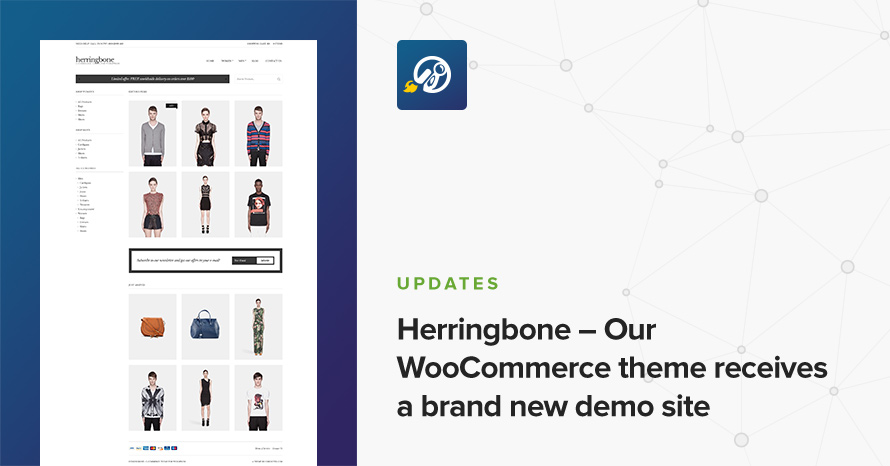
Herringbone – Our WooCommerce theme receives a brand new demo site

Last Updated On
Herringbone – Our WooCommerce theme receives a brand new demo site WordPress template

Looking for a WooCommerce compatible WordPress theme for your retail business? Make sure you check out Herringbone’s all new demo page, it has been updated to meet modern design trends.

Changes are not all cosmetic though. We have updated the theme to be compatible with WooCommerce’s latest version (3.0.x), updated FontAwesome to its latest version, added styling for the WP Instagram widget and the native WP galleries, modernized the theme’s color schemes and fixed various minor bugs.

Read More

Milos – Legacy

Last Updated On

Milos is a WordPress theme designed for hotel, resorts and restaurants.

Theme installation

To install the theme, access your WordPress admin panel, then go to Appearance → Themes. Select the Install Themes tab and click the Upload link located just below the tab’s name. Click on Browse… and select the WordPress theme zip file you just downloaded. Then click the Install Now button, and after a few seconds, your new theme should be installed. Click activate and the theme is ready to use.

TIP: Visual instructions can be found here

In order to install the theme manually, or in case you have trouble installing it through the admin panel, you have to unzip the WordPress theme’s zip file on your computer, and upload via FTP the resulting theme folder into your WordPress installation themes folder (wp-content/themes). Then, from the WordPress admin go to Appearance → Themes. The theme should be available in your themes list. Click activate.

Image Sizes

The recommended image sizes for the Milos theme are:

  • Post Thumbnail: 1140x694px
  • Slider: 1920x920px
  • Hero: 1920x600px
  • Listing Item: 750x850px
  • Menu Item: 68x86px

Useful Plugins

These plugins provide functionality and features used directly (or not) by the Theme. So, it is recommended to install and activate them before importing your sample content.

  • Socials Ignited use this plugin to create a widget that links to all your social profiles. You can also customize it with your icons and add new social networks, a guide can be found here.
  • Contact Form 7 use this plugin to create a contact form, then copy the shortcode it gives you and paste it in an empty page.
  • WP Instagram Widget: Use the latest version of this plugin to help you display your Instagram feed in any of the theme’s sidebars.
  • WordPress Jetpack: You can use this to add Testimonials, tiled Galleries, better LightBox, insert sharing buttons etc.

Jetpack

Milos uses Jetpack extensive to display menu items, testimonials and create unique galleries for a better user experience. With Jetpack you can Add a rich, beautifully-presented media — no graphic design expertise necessary:

  • [free] A high-speed CDN for your images
  • [free] Carousels, slideshows, and tiled galleries
  • [free] Simple embeds from YouTube, Google Documents, Spotify and more
  • [free] Sidebar customization including Facebook, Twitter, and RSS feeds
  • [free] Extra sidebar widgets including blog stats, calendar, and author widgets

For more information on Jetpack’s enchantments have a look here.

Importing Sample Content using One Click Import

To automate the process of importing and for a better experience we have natively included support for OneClick Import Plugin. Let install it fist:

From your WordPress dashboard

  1. Visit ‘Plugins > Add New’,
  2. Search for ‘One Click Demo Import’ and install the plugin,
  3. Activate ‘One Click Demo Import’ from your Plugins page.

From WordPress.org

  1. Download ‘One Click Demo Import’.
  2. Upload the ‘one-click-demo-import’ directory to your ‘/wp-content/plugins/’ directory, using your favorite method (ftp, sftp, scp, etc…)
  3. Activate ‘One Click Demo Import’ from your Plugins page.

Once the plugin is activated you will find the actual import page in: Appearance > Import Demo Data.

Theme pages

Let’s start by adding the first few basic pages you are going to need. Go to Pages → Add New and create the following pages:

Creating Parent and Child pages

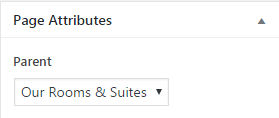
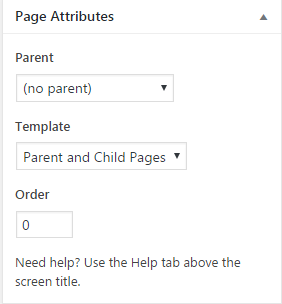
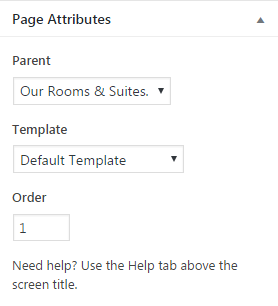
To set up the Parent and Child page select it under the Page Attributes drop down on the right. This page will list all child pages as items when displayed. This means you can use pages as Rooms and organize them as children pages under a Parent and Child Page. You can select a parent page from the Page Attributes dropdown on the right.

Creating Menu pages

This page will list all your Food Menu Items. You can select this template from  the Page Attributes drop down on the right

Creating a Booking Page

This is the a Default WordPress page but with a Contact Form 7 form inside.

Blog

this will be your posts page. Just create and publish a blank default page named “Blog” (or whatever you wish to name it) without adding any content, no further action needed for now.

Setting up your theme

These are the basic elements that Milos uses to render your custom content.

Adding  Food Menus

Milos uses  Jetpack to display Food Menus, so Installing and Activating Jetpack is mandatory if you want to use Food Menus.

If you wish to have an overall view of your menu you can navigate to Food Menus→Menu Items. There you will have a screen like this

  1. You can Quickly Add a menu item.
  2. Change the Menu section
  3. Order your menu Sections the way you want them to display in your Menu Page template.
  4. Save the order if changed.
  5. Search your menu items.

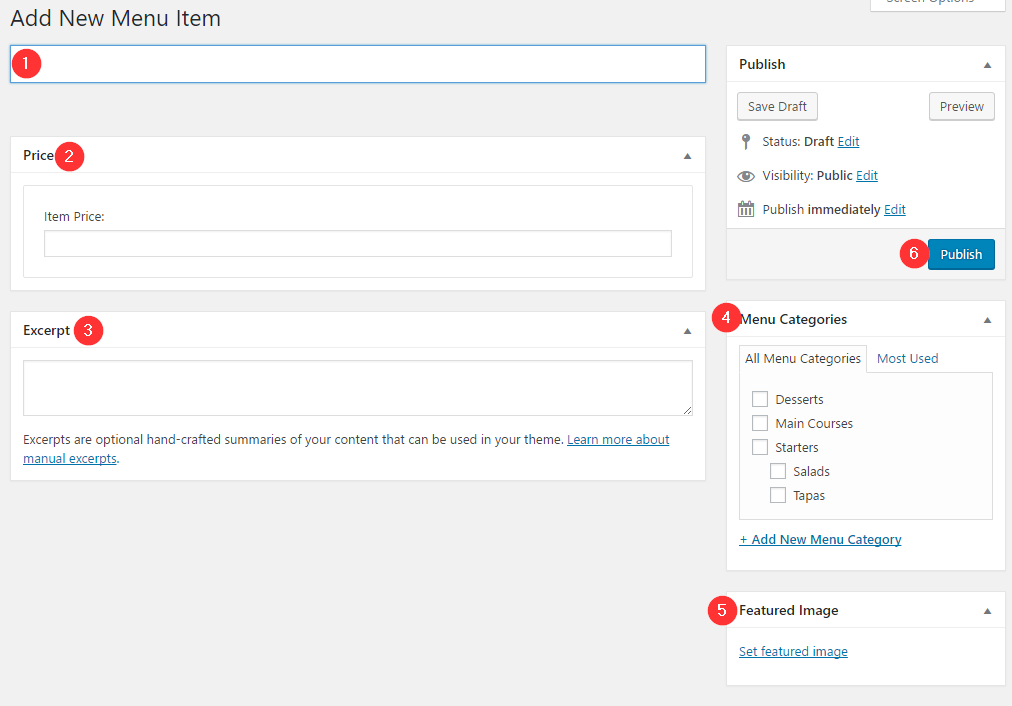
When Adding a new Menu item from the above screen or from  Food Menus→Add One Item you get this screen bellow

  1. Add the Menu Item Name.
  2. Add the Menu Item Description.
  3. Add the Price.
  4. Select a Menu Section (Main Menu, Desserts etc).
  5. Add a custom label (Chef’s Special, Spicy,  etc).
  6. Add a featured image.
  7. Publish your Item.

You can also Add multiple Menu Items from Food Menus→Add Many Items.

  1. Select the Section you wish your Items to belong.
  2. Add Some Name, Price, Label and Description
  3. Add a New Row.
  4. Save your Items.

Adding Testimonials

Milos uses the Testimonial post type from Jetpack. So you will need to Install and Activate Jetpack if you want to use Testimonials.

The Testimonial custom post type allows you to add, organize, and display your testimonials. If your theme doesn’t support it yet, you can enable the Testimonial custom post type by activating the Custom Content Types module in your Jetpack settings.

You can then choose to display testimonials using the testimonial shortcode ( [testimonials] ) or you can view a full archive of your testimonials at yourgroovydomain.com/testimonial.

Setting Up the Frontpage

Creating a Front Page

To set up the homepage create a page named Home and set to it the Homepage Template from the Page Attributes drop down on the right. To add content to your front page go to Customize → Theme Options→Frontpage and use the theme’s sections to help you display your content.

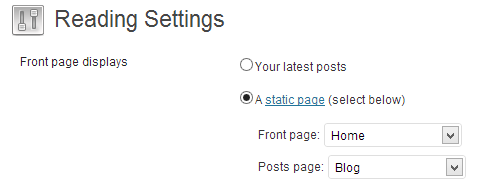
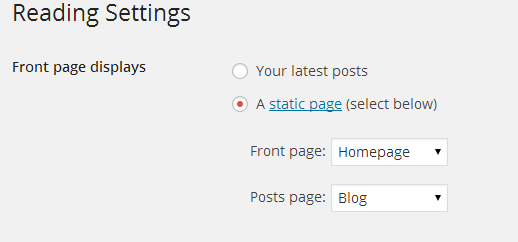
Once the pages are created, navigate to Settings → Reading and set the “Home” page to be your static frontpage and the “Blog” page as your posts page, as demonstrated in the image below.

ReadingSettings

Adding content to the Front Page

We will need to create the pages that we need to display in our Frontpage. We are going to recreate our demo site, but you are free to implement your own case scenario.

Adding a Slider or a Video background

Have a look in the Featured Slider Content section under Customizing your theme on adding a frontpage slider.  You can easily add a video background instead of a slider by navigating to Appearance→Customize→Theme Options→Front page  and pasting a Video URL (Youtube, Vimeo) under the Video URL field.

Recreating Frontpage Sections

First we will create a “Best Experience Ever” page with a simple testimonial inside. So go ahead and create a new page from Pages→Add New named “Best Experience Ever.” then add this shortcode inside to display our latest testimonial which we have already setup from Testimonials→Add New.

[testimonials showposts="1"]

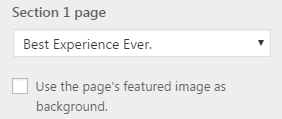
Now let’s render it in our frontpage! Navigate to Appearance→Customize→Theme Options→Front page and Select the “Best Experience Ever” page we have just Created in the Section 1 page dropdown.

If you want to add a  background  image for this section you will need to add a Featured image in your page  and select the Use the page’s featured image as background  option.

Next we are going to set up our “Our Rooms & Suites” page. First create a new page named Our Rooms & Suites from Pages→Add New. Then set the template from Page Attributes section to Parent and Child Pages.

That’s it! Save it we are done. This will serve as a main listing page, and all pages that have this page as parent will be its listing items. Go ahead and create some new pages with some content and a featured image and add this page as their parent from Page Attributes.

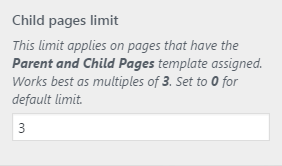
Lets navigate again to  Appearance→Customize→Theme Options→Front page and under Section 2 page let’s select our parent “Our Rooms & Suites” page. You will notice all our Child pages content appeared. You can control how many of these child pages you want to appear globally in the same Customizer section. Use multiples of 3 for better results.

Let’s continue by creating a new page named “Our Beautiful Island”. In this page we are going to add a simple WordPress gallery enchanted by Jetpack’s tiled galleries. For more information on adding a gallery have a look here. Again in our Customizer we are going to select this page for our third section under the Section 3 page.

Next, we are going to create a new page named “Our Restaurant” in which we are going to select the Menu Page template under Page Attributes. This will work great as our fourth section, but since we dont want to bloat our Frontpage with unwanted menu items, we will truncate our content to show only what we wish. This can be easily done with the use of the native WordPress Read more tag button.

Finally, we are going to setup our contact / booking  form and place it in our last fifth section. Go ahead and create a new page named “Plan your visit.” with your Contact Form 7 shortcode inside.

Select the page as a Section 5 page under your Customizer section as mentioned above.

Save your Customizer Changes by clicking on Save & Publish Button and you are ready!

Customizing your theme

All theme customization is done via WordPress’s built in customizer. If you haven’t used it or want to learn more about it, please read this article.

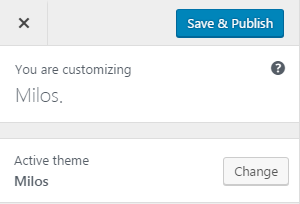
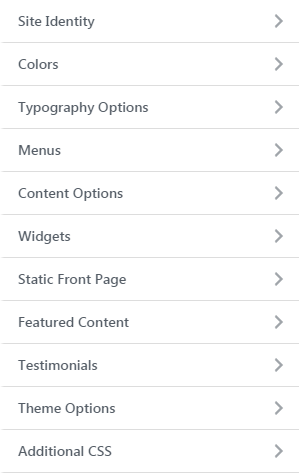
Go to Appearance → Customize and you will see this

TIP: any changes you make in the tabs below will be previewed live on the site which appears in right side of the screen, however to save these changes you need to click the Save & Publish button on the top of the bar, if you have made a change but see the button grayed out (for example changed the font size of a heading), move the cursor outside the input box, for example, to the next input box, then the button should be clickable again.

Let’s take a look at the options each tab gives you.

Menus

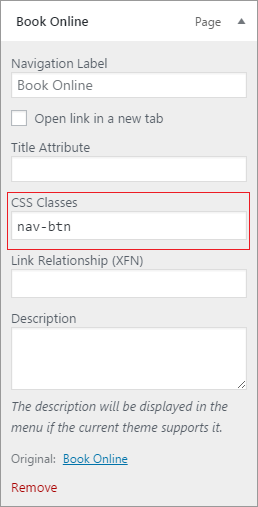
Here you can create and assign menus to the theme. The theme features one menu location, the main menu one. To learn more about menu creation check out the Codex’s menu user guide here. You will notice that one menu item comes with a different styling. This is the book menu item but you can add this styling to any menu item by applying the nav-btn class in the CSS Classes menu Item field.

Site Identity

In this tab you can modify the site’s title, tagline, logo and site icon.

Content Options

Here you choose between a full post or an excerpt for the blog and archive pages,  change the Post details,  show  or its date, author, category, tags. Also, you can hide or show your featured images in posts  or archives or pages.

Colors

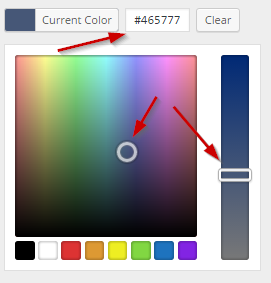
Are you looking to create your own unique color scheme? This tab will help you do it by allowing you to modify the colors of many elements of the content. To do that click the Select Color button and either use a hex color value in the box or use the palette to select a color.

color_change

Typography Options

Through this tab you can control the font size of key theme elements, such as headings, body and widgets. If you want to change the default Theme fonts have a look here

Widgets

Through this tab you can add widgets to the theme’s sidebars. This theme features two main sidebars, the blog and pages

Static Front Page

Use this tab to make the Home page your static front page so you can take advantage of the homepage template we have created for you.

Featured Slider Content

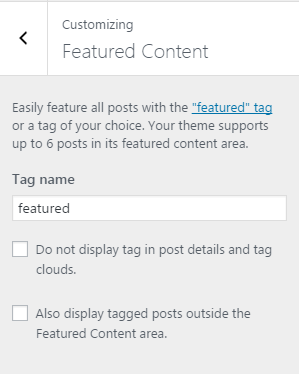
Milos allows you to set up to six posts as “featured,” which means they’ll be displayed in a slider in your Frontpage.

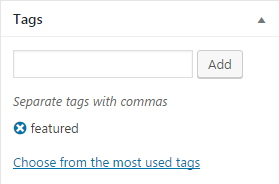
To add a post to the Featured Content Slider, the first step is to pick a special tag and set that in the Customizers Featured Content panel. For example, if you set the tag to be featured, all posts tagged with “featured” will be displayed in the Frontpage Content Slider.

To set your special tag, go to Appearance → Customize →Featured Content and type in the tag in the Tag name field.

To add a page or a post to the Featured Content slider, start a new page at Pages→ Add New or post at Posts→Add New , give it a title, and add content that you want to be shown on the slider.

Add a Featured Image to the page , and add the special tag that you set in the previous step. Publish the post and it will show up on the Frontpage Content slider.

You can also add a manual excerpt that you wish to appear after your Title in your Featured Content Slider, by filling it in the Manual Excerpt Section in your post or page.

Testimonials

Here you can add a Title, Some description and an image for your Testimonials Archive.

Theme Options

Theme options is split in two sections.

In the Header tab you can control if you want to have a sticky menu. In the Theme Options tab you can select the pages  you need to render after your Slider in your Homepage.

Here you can add a Video replacing your Featured Content Slider and select the pages you wish to show in your Frontpage. Currently you can have up to five Section pages. If you want to show less Child pages under the parent ones you might have selected in a section, change the Child pages limit accordingly.

Additional CSS

In this tab we host the custom CSS panel which you can use to insert styles for elements not covered in the rest of the tabs.

How to use the page builder template

The theme comes bundled with a page builder template which allows you to use your favorite page builder plugin on it and create unique layouts very easily.

You can use any page builder your wish but we recommend these three for a better experience.

To use that template start by going to Pages > Add New. This will create a new page. Add a title to your page and select the Page builder template from the template drop down in the Page Attributes metabox.

ci_page_builder_template

That’s it. You can now start building your page using the page builder of your choice, once done publish it and check it out.

Next Steps

Still have questions or problems setting up your CSSIgniter Theme? We will be happy to help you out! Please visit our support Hub 

The Styler – Legacy

Last Updated On

About

The Styler is a beauty, hair & spa WordPress theme. It allows you to display services available by your business, team, price lists and client testimonials as well as photo galleries related to your work.

WordPress theme installation

The easiest way to install the theme is by accessing your WordPress admin panel, then go to Appearance > Themes. Select the Install Themes tab and click the Upload link located just below the tab’s name. Click on Browse… and select the WordPress theme zip file you just downloaded. Then click the Install Now button, and after a few seconds, your new theme should be installed. Click activate and the theme is ready to use.
In order to install the theme manually, or in case you have trouble installing it through the admin panel, you have to unzip the WordPress theme’s zip file on your computer and upload via FTP the resulting theme folder into your WordPress installation themes folder (wp-content/themes). Then, from the WordPress admin go to Appearance > Themes. The theme should be available in your themes list. Click activate.
TIP: A more visual guide can be found here.

Image Sizes

The recommended image sizes for the The Styler theme are:

Post Thumbnail: 750x400px
Entry Item Image: 500x333px
Full Width Image 1140x540px
Square Item Image:230x230px
Hero* Image: 1920x250px
Home Hero* Image :1920x960px
FullWidth Narrow Thumbnail :750x450px
Widget Hero: 168x37px

* A hero image is a large banner image, prominently placed on a web page, generally in the front and center.

Useful Plugins

These plugins provide functionality and features used directly (or not) by the Theme. So, it is recommended to install and activate them before importing your sample content.

  • MaxSlider : Use this plugin to help you create custom sliders and use them anywhere you wish shortcodes.
  • Contact Form 7 use this plugin to create a contact form, then copy the shortcode it gives you and paste it in an empty page.
  • WP Instagram Widget: Use the latest version of this plugin to help you display your Instagram feed in any of the theme’s sidebars.
  • WordPress Jetpack: You can use this to create a contact form instead of Contact Form 7, insert sharing buttons, create tiled galleries etc.
  • One Click Import : Use this plugin to help you import your content with just one click.
  • WPForms use this plugin to create a contact form, then copy the shortcode it gives you and paste it in an empty page.

Importing Sample Content using One Click Import

To automate the process of importing and for a better experience we have natively included support for OneClick Import Plugin. Let install it fist:

From your WordPress dashboard

  1. Visit ‘Plugins > Add New’,
  2. Search for ‘One Click Demo Import’ and install the plugin,
  3. Activate ‘One Click Demo Import’ from your Plugins page.

From WordPress.org

  1. Download ‘One Click Demo Import’.
  2. Upload the ‘one-click-demo-import’ directory to your ‘/wp-content/plugins/’ directory, using your favorite method (ftp, sftp, scp, etc…)
  3. Activate ‘One Click Demo Import’ from your Plugins page.

Once the plugin is activated you will find the actual import page in: Appearance > Import Demo Data.

 Click on the Import demo data button and you are done!

This plugin requires PHP version of at least 5.3.x, but we recommend version 5.6.x or better yet 7.x. Please contact your hosting company and ask them to update the PHP version for your site.

Importing sample content

To get the sample content file you can click the link in the notice that will appear on your dashboard immediately after activating the theme.

download_sample

Extract the zip file you downloaded and upload the xml file in Tools > Import > WordPress (if not already present, you will be prompted to install the WordPress importer plugin), asking the authors to an existing user and make sure you check the “import attachments” box. You can now import the sample content.

You can also download the Sample Content for The Styler by clicking here

Importing widgets

You can also import the widgets you see on the theme’s demo. To do that, you need the Widget Importer & Exporter plugin. To install it go to Plugins > Add new search for Widget Importer exporter and install the plugin. Activate it and go to Tools > Widget Importer & Exporter click choose file and upload the the_styler_widgets.wie file which is located in the sample content zip file, click Import widgets and you are good to go.
WARNING: As this will create posts, pages, custom post types, categories, widgets, etc. and change various system settings, it is strongly advised that you do this on a clean WordPress installation, without any previous and/or precious data. Under no circumstances we can be held responsible for total or partial data loss, so please be careful.

Theme pages

Let’s start by adding the first few basic pages you are going to need. Go to Pages > Add New and create the following pages:

Home Page

To set up the homepage create a page named Home and set to it the Homepage Template from the Page Attributes drop down on the right. To add content to your front page go to Customize > Widgets or Appearance > Widgets and use the theme’s widgets to help you display your content. You will notice that in your Homepage template page under the WordPress text Editor you have two sections.

The Layout section appears in all pages.

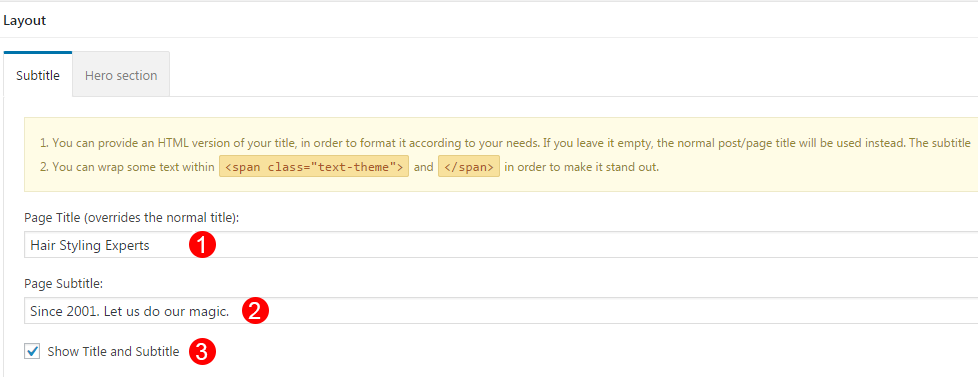
In the Subtitle tab you can

  1. Add A Page title or
  2. Subtitle and
  3. Show or hide  them depending in the use case.

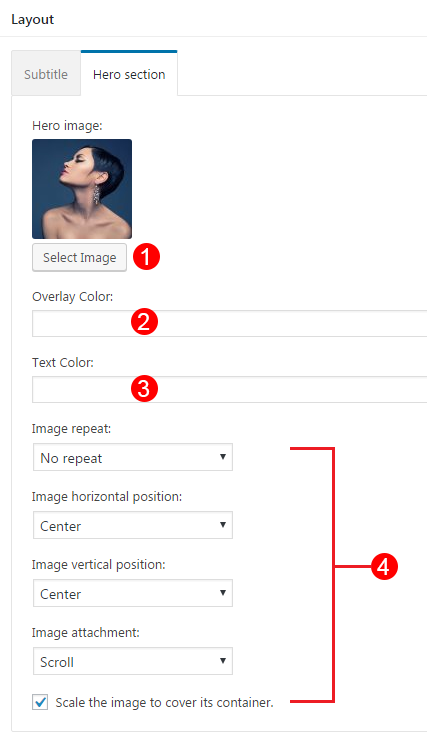
In the Hero Section you can

  1. Add a background image.
  2. Add an overlay color to that background image.
  3. Control the text  color
  4. Change background image position and screen coverage.

Especially in your Homepage Template there is an extra section called Home page Hero Options

In this section you can select

  1. A Maxslider Slider for your frontpage.
  2. Add a Video (Youtube, Vimeo) as your homepage background.

Blog

this will be your posts page. Just create and publish a blank default page named “Blog” (or whatever you wish to name it) without adding any content, no further action needed for now. You cannot control the background image from the Layout Section of this page since it is registered by WordPress. You can add a generic background image that will apply here from Appearance > Customize > Colors > Hero.

In this page you will list your Gallery Items by applying the Galleries Listing template to your page. From the Galleries Listing Options panel that appears once the template is set, select the number of columns you want the template to have and the gallery Category you want to render.

Services Listing

In this page you will list your services, apply to it the Service Listing template. From the Service Listing Options panel that appears once the template is set, select the number of columns you want the template to have and the Services Category you want to render.

Team Listing

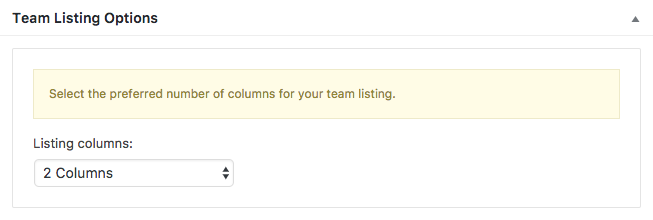
Here you can  list your services, apply to it the Team Listing template. From the Team Listing Options panel that appears once the template is set, select the number of columns you want the template to have.

Pricelist

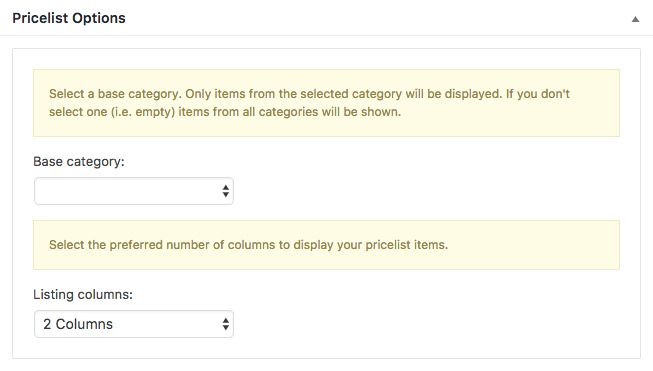
Here you can list your pricelist by applying the Pricelist template. From the PriceList Listing Options panel that appears once the template is set, select the number of columns you want the template to have and the Pricelist Category you want to render.

Testimonial Listing

In this page you can list all your Testimonials. 

Setting up your theme

Adding Services

To add new Service item go to Service > Add new and fill in the title, content and featured image. Next, in the Service Settings metabox set an icon for the service by following the on screen instructions. Finally publish the item.

Adding a New Pricelist Item

To add a new Pricelist Item navigate to PriceList > Add New and add a title and a price.

Adding Team Members

To add a new Team member go to Team > Add New. Set a Role from the Team Settings panel on the bottom.

Adding Testimonials

To add a new Testimonial item go to Testimonials > Add New. Fill in a title for the Testimonial, set it’s featured image, add the content and finally publish the item.

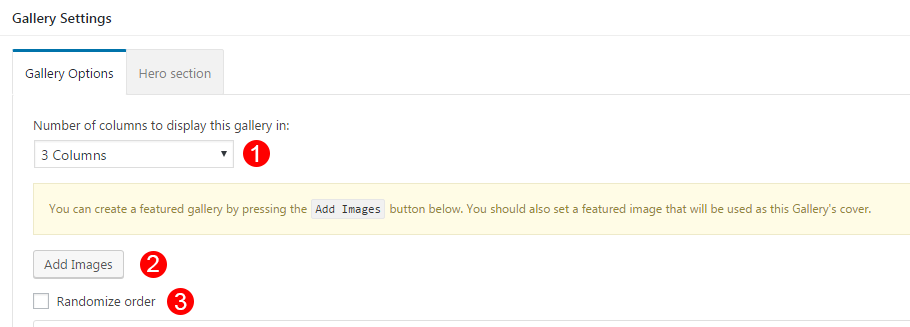
Adding Galleries

To add new Service item go to Gallery > Add new and fill

  1. The number of columns you want to render your images.
  2. Select your images.
  3. Randomize the images order.

Customizing Your Theme

All theme customization is done via WordPress’s built in customizer. If you haven’t used it or want to learn more about it, please read this article.

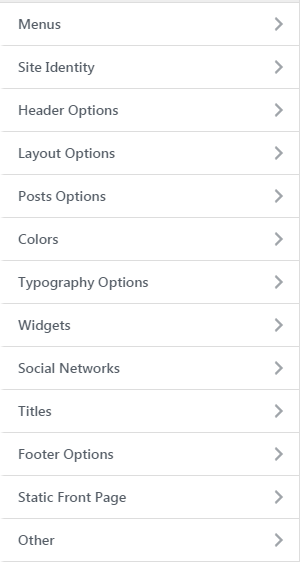
Go to Appearance > Customize and you will see this

TIP: any changes you make in the tabs below will be previewed live on the site which appears in right side of the screen, however to save these changes you need to click the Save & Publish button on the top of the bar, if you have made a change but see the button grayed out (for example changed the font size of a heading), move the cursor outside the input box, for example, to the next input box, then the button should be clickable again.

Let’s take a look at the options each tab gives you.

Header Options

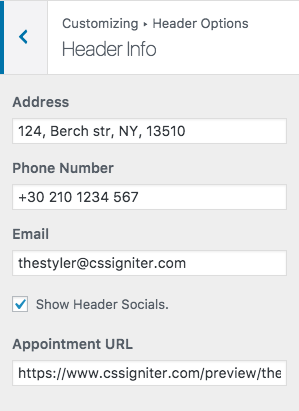
Header Options are split into two sections. In the first one, Header Info,  you can set the business’ address & phone number that will appear on the header and also toggle the appearance of social icons

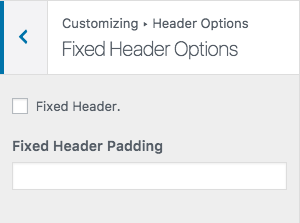
In the second section, Fixed Header Options you can fix your header on top and change its padding.

Menus

Here you can create and assign menus to the theme. The theme features one menu location, the main menu one. To learn more about menu creation check out the Codex’s menu user guide here.

Site Identity

To change the logo and favicon as well as the title and description and you need to go to Appearance > Customize > Site Identity and use the appropriate fields to add your information and upload your images.

Widgets

Through this tab you can add widgets to the theme’s sidebars. The theme features twelve sidebars, the blog, pages, one homepage sidebar, a service sidebar, a team sidebar, an after content sidebar, a footer Instagram one and four footer sidebars.

Layout Options

Here you can modify the length of the automatic excerpt and select between numbered and older/newer pagination. Also you can choose if your blog listing has any sidebar and control its position.

Typography Options

Through this tab you can control the font size of key theme elements, such as headings, body and widgets. If you want to change the default Theme fonts have a look here

Colors

This tab allows you to customize the colors and background images for the entire site, the header, hero section, sidebars and the footer.

Social Networks

In this section You can add your Social Network URLs. These icons will be displayed in the Theme-Social Icons Widget automatically.

Titles

In this tab you can change the titles for various theme pages, like the blog, search and 404.

Footer Options

Here you can modify the credits text and your Footer Column Layout

Static Front Page

Use this tab to make the Home page your static front page so you can take advantage of the homepage template we have created for you.

Other

In this tab we host the custom CSS panel which you can use to insert styles for elements not covered in the rest of the tabs. Here you can also download your sample content again.

Widgets

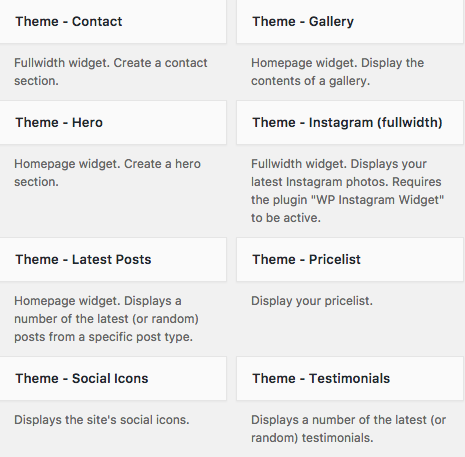
We have handcrafted some custom widgets to help you better display your content. You will find them under Customize > Widgets or Appearance > Widgets

Below each widget you will find a small description regarding its functionality, additionally each widget provides you with some info on each usage, please read the small text found on the widget once it’s added on the sidebar.

Theme-Contact

Using this widget you can create a contact box including a title and a subtitle and your Contact Form 7 shortcode as well.

Theme-Gallery

This widget is built to help you display a gallery item in any widget area you wish.

  1. Add a title.
  2. Add a subtitle.
  3. Select the gallery item  you want to display.
  4. Select the output columns.
  5. Customize the looks of the widget.

Theme-Hero

This widget is built to help you add content to your front page, whether it is an introductory text, a bio or any other text you might want to include. Its functionality is pretty straight forward, you add the widget to the homepage sidebar, fill in all the info you need, click the Select Image button to upload an image (optional)   or add  an custom Icon and save the widget.

Theme-Instagram(fullwidth)

This widget will show your Instagram Feed along with some helpful options like choosing the number of your Instagram Images and the option to open them in a new window or not. This widget is specially reserved for the Footer Instagram sidebar under Appearance > Customize > Widgets or Appearance→Widgets.

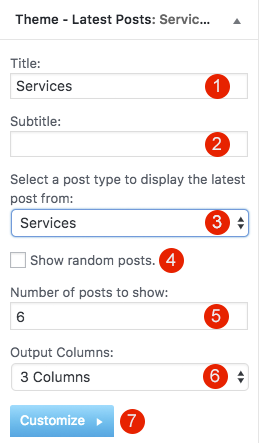
Theme-Latest Posts

This widget is built to help you display your latest posts  in any widget area you wish.

  1. Add a title.
  2. Add a subtitle.
  3. Select the post type you want to get the latest items.
  4. Check if you need random posts instead.
  5. Add the number of posts.
  6. Select the output columns.
  7. Customize the looks of the widget.

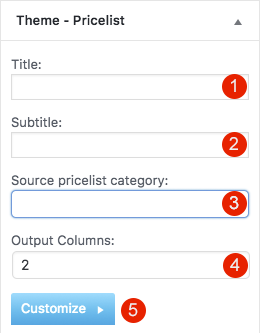
Theme-Pricelist

This widget is built to help you display your Pricelists in any widget area you wish.

  1. Add a title
  2. Add a subtitle
  3. Select the pricelist category you want to display
  4. Select the output columns
  5. Customize the looks of the widget.

Theme-Social Icons

This widget displays your site’s social icons. In order to set them up, you need to visit Appearance > Customize > Social Networks and provide the appropriate URLs where desired.

Theme-Testimonials

This widget is built to help you display your latest Testimonials in any widget area you wish. You can select how many testimonials you want to show or display them in random order.

Customize Widgets

In all theme’s widgets except Theme -Social Icons, You can use the Customize button to add a background image or color. You can also create a color overlay or stretch your background image to cover the entire width of the widget. You can also enable a parallax effect for your background image or add some padding if you need extra spacing.

How to use the page builder template

The theme comes bundled with a page builder template which allows you to use your favorite page builder plugin on it and create unique layouts very easily.

To use that template start by going to Pages > Add New. This will create a new page. Add a title to your page and select the Page builder template from the template drop down in the Page Attributes metabox.

ci_page_builder_template

That’s it. You can now start building your page using the page builder of your choice, once done publish it and check it out.

Next Steps

Still have questions or problems setting up your CSSIgniter Theme? We will be happy to help you out! Please visit our support Hub 
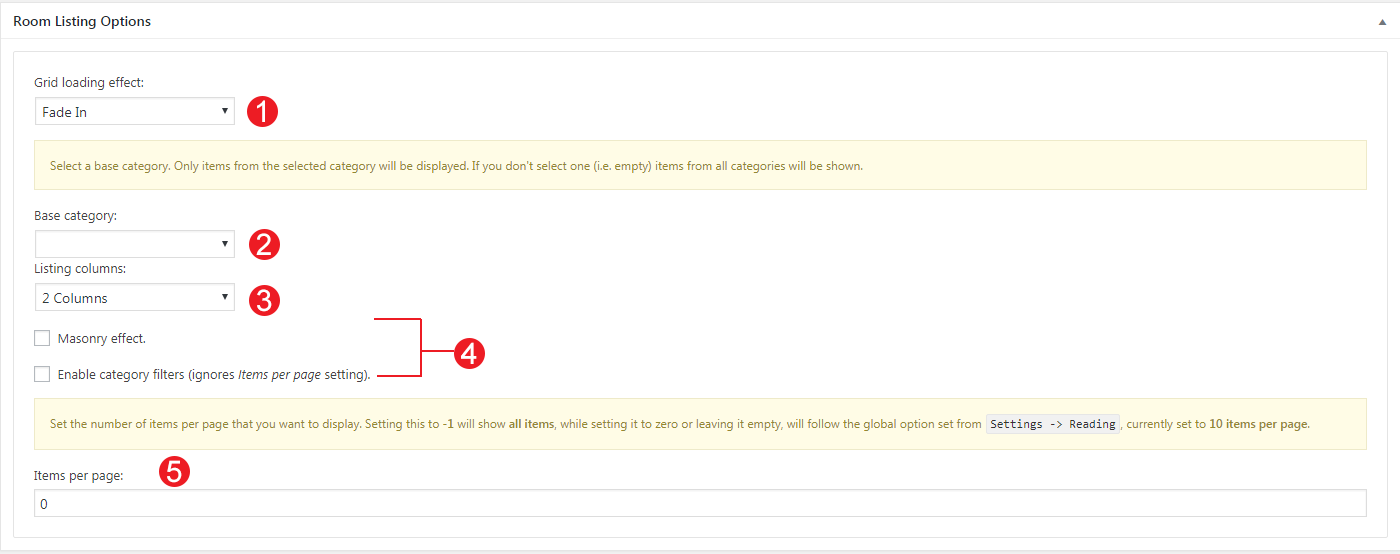
Exclude words while searching in WordPress

Last Updated On
Exclude words while searching in WordPress WordPress template

Did you know that when you’re using the search boxes on your WordPress site, you can narrow down the results by providing words that you don’t want included? That’s right! This method works both on the front end (theme-provided search bar, search widget, etc), as well as on the back end (post listing screens, etc), and is available since WordPress v4.4

Read More

Carbone – Legacy

Last Updated On

Theme installation

The easiest way to install the theme, is by accessing your WordPress admin panel, then go to Appearance > Themes. Select the Install Themes tab and click the Upload link located just below the tab’s name. Click on Browse… and select the WordPress theme zip file you just downloaded. Then click the Install Now button, and after a few seconds, your new theme should be installed. Click activate and the theme is ready to use.

In order to install the theme manually, or in case you have trouble installing it through the admin panel, you have to unzip the WordPress theme’s zip file on your computer, and upload via FTP the resulting theme folder into your WordPress installation themes folder (wp-content/themes). Then, from the WordPress admin go to Appearance > Themes. The theme should be available in your themes list. Click activate.

TIP: More info on how to download and install a theme here.

Image Sizes

The minimum recommended image sizes for Carbone are:

  • Post thumbnail: 720x400px
  • Entry items: 660x500px
  • Fullwidth featured image: 1140x550px
  • Fullwidth narrow: 950x450px
  • Menu items: 67x67px
  • Hero image: 1600x500px
  • Homepage hero image: 1600x1067px

Useful Plugins

These plugins provide functionality and features used directly (or not) by the Theme. So, it is recommended to install and activate them before importing your sample content.

  • Contact Form 7 use this plugin to create a contact form, then copy the shortcode it gives you and paste it in a page which will serve as your contact page.
  • WP Instagram Widget: Use the latest version of this plugin to help you display your Instagram feed in any of the theme’s sidebars.
  • MaxSlider: You can use our slider plugin to generate sliders for your content.

Importing Sample Content using One Click Import

To automate the process of importing and for a better experience we have natively included support for OneClick Import Plugin. Let install it fist:

From your WordPress dashboard

  1. Visit ‘Plugins > Add New’,
  2. Search for ‘One Click Demo Import’ and install the plugin,
  3. Activate ‘One Click Demo Import’ from your Plugins page.

From WordPress.org

  1. Download ‘One Click Demo Import’.
  2. Upload the ‘one-click-demo-import’ directory to your ‘/wp-content/plugins/’ directory, using your favorite method (ftp, sftp, scp, etc…)
  3. Activate ‘One Click Demo Import’ from your Plugins page.

Once the plugin is activated you will find the actual import page in: Appearance > Import Demo Data.

 Click on the Import demo data button and you are done!

This plugin requires PHP version of at least 5.3.x, but we recommend version 5.6.x or better yet 7.x. Please contact your hosting company and ask them to update the PHP version for your site.

Adding a new post

To add new posts to your blog, go to Posts > add new and proceed to:

  1. add a title to your post,
  2. enter the content in the editor,
  3. upload a featured image by clicking “Set featured image” on the Featured Image panel,
  4. add a category and/or tag to the post,
  5. once finished click the Publish button to publish the post.

new_post

Creating a page for your posts

To setup your blog page you can go to Pages > Add New and create a page named Blog. Then navigate to Settings > Reading and set that page as your posts page.

settings_reading

Now you can add that page to your menu to give your visitors easy access to all your posts.

 Adding a menu item

To create a new menu item navigate to Menu > New Menu Item and proceed to:

  1. Add the title for your menu item.
  2. Set the item’s price (you need to include the currency symbol as well).
  3. Add a short description about the menu item.
  4. Select the menu categories.
  5. Add a featured image.
  6. And finally publish the menu item.

Create a menu listing template

To create a listing page for your menu items go to Pages > Add New and select the Menu Listing template from the Page Attributes metabox on the right.

In the Menu Listing Options metabox that appears after you select the template you can:

  1. Select the Base Category for your menu template, this is useful if you want to just display one menu category instead of the entire meny (which appears by default).
  2. Change the number of columns of the menu listing, available options are one, two and three columns.

Customizing the theme

All the theme’s options can be accessed via WordPress’ customizer. Navigate to Appearance > Customize and you will be presented with this panel.

If you have used any theme from the WordPress.org theme directory you should be familiar with the usage of the customizer, if not you can read more about it here. Below we will take a look at the options each section offers.

Using this tab you can create new or modify existing menus. For more info on menu creation please check our small article here. Carbone features two main menus, one left of the logo and one on the right. You will have to split your main menu in two pieces and assign each one to its respective position to recreate the theme’s default layout.

Site Identity

Here you can set your site’s logo, title, tagline, logo padding and site title.

Layout Options

Here you can modify the blog’s default layout and choose between a ‘no-sidebar’ blog and a blog with a sidebar on the right. Additionally this tab allows you to customize the excerpt’s length and choose your preferred pagination method.

Posts Options

As you might imagine, this tab helps you configure the layout of single posts. You can toggle the featured image, the categories, date, and comments.

Colors

This tab allows you to customize the colors and background images for the entire site, the header, hero section, sidebars and the footer.

Typography options

Here you can modify the size of content headings, content and sidebar text.

Widgets

Through this tab you can access all the available theme sidebars and add widgets to them.

Social Networks

Here you can fill in all links to your social profiles and display them via a custom widget on any sidebar.

Titles

In this tab you can set titles for the blog section, search and 404 pages.

Here you can modify the left and right footer texts.

Static Front Page

static_front_page

Using this tab we can choose what gets displayed on the front page of our site. For example if we want to create a homepage using a the homepage template we provide create a new page and apply to it the Home Page template, name it home and set it as your Front Page as shown above. The Posts Page is the page that will display our post listing, as discussed earlier in the post creation section.

Other

This tab contains the custom CSS box which allows you to add custom styling if you need it.

How to use the page builder template

The theme comes bundled with a page builder template which allows you to use your favorite page builder plugin on it and create unique layouts very easily.

To use that template start by going to Pages > Add New. This will create a new page. Add a title to your page and select the Page builder template from the template drop down in the Page Attributes metabox.

ci_page_builder_template

That’s it. You can now start building your page using a page builder of your choice. On the theme’s demo we have used extensively the Elementor page builder plugin.

Widgets

The theme comes with six custom widgets.

The Theme – Content widget allows you to display the featured image (if it exists) and the content of any post/page/menu item on your site.

The Theme – Hero helps you create custom hero sections on your homepage, just fill in the required info and save.

The Theme – Info widget is built to be used in the Pre Content & After Content widget areas. It can display a short piece of text and links to your social profiles.

The Theme – Menu widget allows you to display either your entire menu or a particular menu category on the homepage sidebar.

The Theme – Opening Hours can be used in any normal sidebar (not the fullwidth ones) to display your business hours.

Next Steps

Still have questions or problems setting up your CSSIgniter Theme? We will be happy to help you out! Please visit our support Hub 
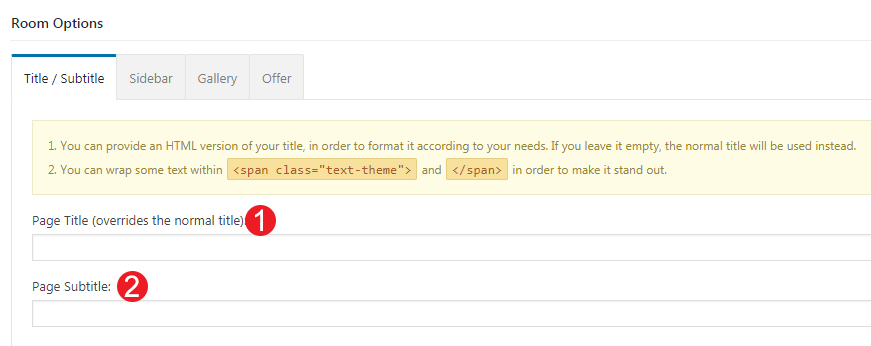
Specialty – Legacy

Last Updated On

Theme installation

The easiest way to install the theme, is by accessing your WordPress admin panel, then go to Appearance > Themes. Select the Install Themes tab and click the Upload link located just below the tab’s name. Click on Browse… and select the WordPress theme zip file you just downloaded. Then click the Install Now button, and after a few seconds, your new theme should be installed. Click activate and the theme is ready to use.

In order to install the theme manually, or in case you have trouble installing it through the admin panel, you have to unzip the WordPress theme’s zip file on your computer, and upload via FTP the resulting theme folder into your WordPress installation themes folder (wp-content/themes). Then, from the WordPress admin go to Appearance > Themes. The theme should be available in your themes list. Click activate.

TIP: More info on how to download and install a theme here.

WP Job Manager installation

To install the job manager plugin, navigate to Plugins > Add New and search for WP Job ManagerClick the button to install and activate the plugin.

Once the plugin is installed it will create three pages, the Jobs page which is the plugin’s default job listing page, the Job Dashboard page which allows a user to see all job listings they have posted at once and the Post a Job page which allows logged in users to post new job listings. You can add the latter two to the menu to allow businesses to post job listings and also access all their postings. The default jobs listing can be skipped in favor of our custom solution.

Initial configuration

The plugin’s configuration page can be found under Job Listings > Settings, here you can configure the plugin to match your needs. We would suggest enabling Job Categories & Job Types which are by default disabled, you can also enable Multi Category & Multi Type selections, these will make your filtering system much more flexible. In the Job Submission tab you can configure the requirements for allowing users to submit job listings.

For more information the plugin’s extensive documentation can be found here.

Image Sizes

The minimum recommended image sizes for Specialty are:

  • Post thumbnail: 850x450px
  • Entry items: 264x140px
  • Fullwidth featured image: 1140x550px
  • Fullwidth narrow: 950x450px
  • Company logos: 200px wide
  • Hero image: 1920x500px

Useful Plugins

These plugins provide functionality and features used directly (or not) by the Theme. So, it is recommended to install and activate them before importing your sample content.

  • Contact Form 7 use this plugin to create a contact form, then copy the shortcode it gives you and paste it in a page which will serve as your contact page.
  • WP Instagram Widget: Use the latest version of this plugin to help you display your Instagram feed in any of the theme’s sidebars.
  • MaxSlider: You can use our slider plugin to generate sliders for your homepage or any other page you want.
  • Wp Job Manager: This is the basic plugin Specialty depends on
  • Elementor: Elementor is a free Page Builder tool.

Importing Sample Content using One Click Import

To automate the process of importing and for a better experience we have natively included support for OneClick Import Plugin. Let install it fist:

From your WordPress dashboard

  1. Visit ‘Plugins > Add New’,
  2. Search for ‘One Click Demo Import’ and install the plugin,
  3. Activate ‘One Click Demo Import’ from your Plugins page.

From WordPress.org

  1. Download ‘One Click Demo Import’.
  2. Upload the ‘one-click-demo-import’ directory to your ‘/wp-content/plugins/’ directory, using your favorite method (ftp, sftp, scp, etc…)
  3. Activate ‘One Click Demo Import’ from your Plugins page.

Once the plugin is activated you will find the actual import page in: Appearance > Import Demo Data.

 Click on the Import demo data button and you are done!

This plugin requires PHP version of at least 5.3.x, but we recommend version 5.6.x or better yet 7.x. Please contact your hosting company and ask them to update the PHP version for your site.

Adding a new post

To add new posts to your blog, go to Posts > add new and proceed to:

  1. add a title to your post,
  2. enter the content in the editor,
  3. upload a featured image by clicking “Set featured image” on the Featured Image panel,
  4. add a category and/or tag to the post,
  5. once finished click the Publish button to publish the post.

new_post

Creating a page for your posts

To setup your blog page you can go to Pages > Add New and create a page named Blog. Then navigate to Settings > Reading and set that page as your posts page.

settings_reading

Now you can add that page to your menu to give your visitors easy access to all your posts.

Adding a new Job

To create a new Job listing go to Job Listings > Add New.

Start by adding the title, description, category, type and company logo, once done move on to the Job Data section below.

Most of the fields above are pretty self explanatory, let’s have a look at a couple that might need some explanation. The Position Filled box allows you to mark a position as filled which will disable applications for this particular job listing, filled listings can also be hidden from archives. The Featured Listing box allows to to mark the listing as such, this will make it sticky during searches and it also gives you the ability to style it differently to stand out. Finally the Listing Expiry Date allows you to set an expiration date for the job listing, after that date the listing won’t accept applications, also the content in expired listings can be set to automatically be hidden after the expiration date.

Once everything is filled in you can go ahead and publish the job listing.

Creating a Job Listing page

To do that create a new page and apply to it the Job Listing template from the Page Attributes panel. Then you can select the sidebar’s placement (or choose to not have a sidebar) from the Job Listing Options metabox.

As mentioned earlier the plugin creates a job listing page when installed, however our own listing offers a more refined filtering system as you can see on the theme’s demo, so you might want to use the custom one instead of the default.

Customizing the theme

All the theme’s options can be accessed via WordPress’ customizer. Navigate to Appearance > Customize and you will be presented with this panel.

If you have used any theme from the WordPress.org theme directory you should be familiar with the usage of the customizer, if not you can read more about it here. Below we will take a look at the options each section offers.

Site Identity

Here you can set your site’s logo, title, tagline, logo padding and site title.

Layout Options

This tab allows you to customize the excerpt’s length and choose your preferred pagination method.

Posts Options

As you might imagine, this tab helps you configure the layout of single posts. You can toggle the featured image, the categories, date, comments, social sharing icons and related posts. You can also modify the title of the related posts section.

Colors

This tab allows you to customize the appearance of the hero section, text color, background color/image and position.

Social Networks

Here you can fill in all links to your social profiles and display them via a custom widget on any sidebar.

Titles

In this tab you can set titles for the blog section, search and 404 pages.

Using this tab you can create new or modify existing menus. For more info on menu creation please check our small article here.

Job Listing Options

Here you can toggle the alert creation box and fine tune job reporting functionality.

Widgets

Through this tab you can access all the available theme sidebars and add widgets to them.

Here you can modify the left and right footer texts.

Static Front Page

static_front_page

Using this tab we can choose what gets displayed on the front page of our site. For example if we want to create a homepage using a page builder we will need to create a new page using the Page Builder template, name it home and set it as our Front Page above. The Posts Page is the page that will display our post listing, as discussed earlier in the post creation section.

Other

This tab contains the custom CSS box which allows you to add custom styling if you need it. You can also download the theme’s sample content. Here you can also set the Login Page, this is a page that will make logging in a bit easier for your users. Just create a new page, assign to it the Login template and set it as your login page here. All login links will then be redirected to this page.

How to use the page builder template

The theme comes bundled with a page builder template which allows you to use your favorite page builder plugin on it and create unique layouts very easily.

To use that template start by going to Pages > Add New. This will create a new page. Add a title to your page and select the Page builder template from the template drop down in the Page Attributes metabox.

ci_page_builder_template

That’s it. You can now start building your page using a page builder of your choice. On the theme’s demo we have used extensively the Elementor page builder plugin.

Widgets

The theme comes with three custom widgets. The Theme – Callout  which allows you to create banners easily, the Theme – Related Jobs which displays jobs similar to the one the visitor is currently viewing and the Theme – Social Icons which allows you to display links to your social profiles.

Additional Information

If you would like to create buttons on the menu you can use the menu-item-btn class. For info on how to apply it, please read this small guide. (No styling needed on your part, just add the class and save the menu).

Job Alerts Add-on

If you want to use the Job Alerts feature to allow your users to be notified on jobs they are interested in you will have to purchase the plugin’s alert add-on. More info, pricing and purchase options can be found here.

Next Steps

Still have questions or problems setting up your CSSIgniter Theme? We will be happy to help you out! Please visit our support Hub 
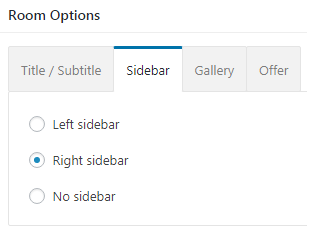
Translating content with WPML

Last Updated On
Translating content with WPML WordPress template

Multilingual sites allow you to reach a wider audience, especially for non native English speakers. Translating your site in English will make it accessible to a very large, worldwide audience. The benefits do not apply only to the English language though, you might want to make your site accessible to a market or country that does not have many English speakers, translating it to their language removes that barrier.

Read More

Get access to all WordPress themes & plugins

24/7 Support Included. Join 115,000+ satisfied customers.

Pricing & Sign Up

30-day money-back guarantee. Not satisfied? Your money back, no questions asked.

Back to top