How to add a custom tab on single WooCommerce products

In today’s guide we will be creating a custom tab for single products which will display after the additional information tab. The new tab will pull and display the content from a user selected page, this will allow complex layouts created with the block editor or your favorite page builder to be displayed right inside the product tab.
Install and activate a child theme
As always the first step on our process here is to create and install a child theme. If you are using one of our themes you can easily grab its child theme from our downloads section. If not, you can read our beginner’s guide on child themes to create your own. This step is essential in order to preserve our changes throughout theme updates.
Add a tab to the product data metabox
First we need to create a couple of custom fields required to store our data. The first one will store the custom tab’s title and the second one will hold the ID of the page we’ll use to pull content from. We have gone through the process of creating and displaying custom fields for WooCommerce in a previous article so some of the following might look familiar.
In this scenario we will be creating a custom tab in the product data metabox since our options don’t really fit in one of the existing tabs. To achieve this we filter the existing tabs using woocommerce_product_data_tabs and add our new one with this code:
We have set the priority to 100 in order for our new tab to appear after the default Advanced tab.
Next up we need to add content to the tab, the tab’s content will be the two custom fields mentioned earlier, one for the custom tab’s title and one for the selected page’s ID. To do that we will use the woocommerce_product_data_panels hook.
As mentioned we create a text input for the custom tab’s title, leaving this custom field empty will stop your custom tab from appearing in the front end. We also added a drop down of all published pages for the user to select which one they want to pull content from in the tab. Now let’s add some code to save our data.
We are done with the back end configuration, now when editing a product we’ll be able to see our new tab and custom fields under the product data metabox.
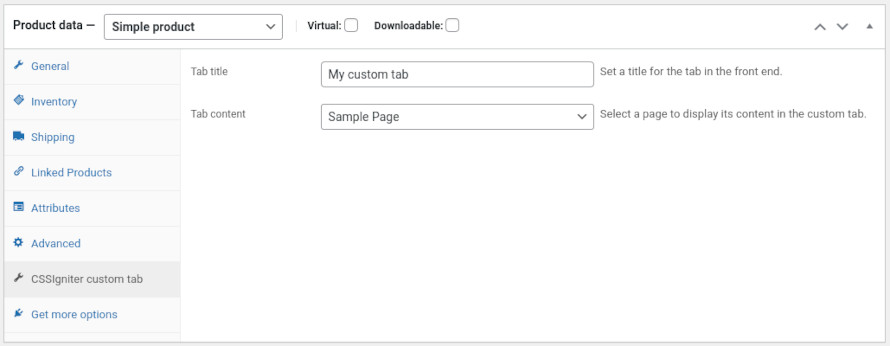
In our example we will be pulling content from the default WordPress sample page and we’ll name our tab My custom tab.
Add the custom tab to the front end
It’s time to display our custom tab. We need to use the woocommerce_product_tabs hook to filter the existing tabs and add our own.
As you can see in lines 8-10, if the tab title metabox is left empty, the custom tab will not be displayed. In line 15 we add our callback function which will pull and display the content of our selected page. The callback function looks like this:
It is designed to pull the metadata with the selected page ID from the current product and using that ID get and display the page’s content in the custom tab. This is what the final result looks like.

Wrapping up
We have successfully added a custom tab to single WooCommerce products which can pull and display the content of any user selected page. This means that complex layouts built with the block editor or any page builder can be displayed in a product’s single view. Let us know in the comments below if you have found this guide useful and leave your suggestions for future guides.
6 responses to “How to add a custom tab on single WooCommerce products”
How can I add a text box instead of pulling a page? Can you give me the code, please? I am not a coder.
Hello.
If you just need to display some text you can easily achieve this in the way described in the guide, just add your test to the page pulled and you are done.
Actually, I want to add a specification of my e-commerce product. So I want a text editor block there just like the Product Description Tab.
The fastest way to achieve this would be to use the ACF plugin to create WYSIWYG field and pull it using the cssigniter_new_wc_product_tab_content function.
Hello,
Thanks for the code. I would like to add multiple tabs so I am wondering what is the best way to do this. Best here means optimum.
Thank you very much
Konstantinos
Hello Konstantinos.
Best really depends on your requirements. If these are simple tabs you could expand on the tutorial, however this would require you to deal with adding fields, making sure they are sanitized and stored properly, which is an additional overhead, especially if you are looking to make many tabs with variable content. The fastest and easiest way to go would be a bespoke plugin like for example this one https://wordpress.org/plugins/yikes-inc-easy-custom-woocommerce-product-tabs/