WordPress Customizer Custom Controls: Categories dropdown
Are you building a WordPress theme? Perhaps you are extending a theme by working on a child theme? Or maybe, you are building a WordPress plugin that has something to do with the site’s presentation. Chances are, you need to add options into the WordPress Customizer. Options in the customizer are added as controls.
A “control” in the case of the WordPress customizer, can be loosely defined as “a reusable UI component” that can either be simple (e.g. a title and an input box) or more complex (e.g. a title, a group of checkboxes and a dropdown). Fortunately, WordPress itself provides some customizer controls that can be used without much effort. Unfortunately, the selection of controls it provides is quite limited, leaving a lot to be desired.
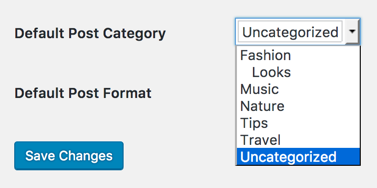
One big omission (in my opinion) is the lack of a categories dropdown selection control. You know, the one where all categories are listed hierarchically (perhaps even with post counts) and you can select just one. Most probably you’ve seen this in Settings → Writing, where you can select the default category your posts will be assigned to.
Now, WordPress already provides a ‘select‘ control which displays a dropdown, and all you need to use it is an associative array of key-value pairs. Generating such an array for (hierarchical) categories is very involved however, as is evident from inspecting the source of the wp_dropdown_categories() WordPress function. Examining the code further, you’ll notice a call to function walk_category_dropdown_tree() which in turn handles logic to the Walker_CategoryDropdown walker class.
For the purposes of this tutorial, the imaginary scenario is that we are adding a front page slider for a theme, and we need a way to select a category of posts that the slider will pull posts from. I also assume that you know what sections, settings and controls are, and how to use them. We’ll only involve ourselves with building a new control.
Creating a custom control
So, in order to avoid replicating the code of wp_dropdown_categories() in order to feed the select control that WordPress provides, we’re going to build a custom control that calls wp_dropdown_categories() itself. That way we will have a reusable control to use as often as we like. Let’s begin!
First of all, I will be working on a child theme based on our popular free theme, Olsen Light. Although you don’t have to work on child theme yourself, you might want to go on and create one anyway. Inside my child theme, I’ve created a customizer-controls folder where the custom control’s file will live, and in there, the control’s file itself, dropdown-category.php with the following contents:
A custom control must be a subclass of WP_Customizer_Control, so that it inherits all necessary methods and properties to work with the customizer. $type is a string representation of the control that is used as part of an HTML class name, so ideally restrict the name to latin characters with dashes or underscores. The function render_content() is called by the customizer to output the markup, so that’s where most of our code will live. Finally, I’ve added the $dropdown_args property which will hold parameters regarding the wp_dropdown_categories() call. More on that later.
Adding stuff in
Right now, our custom control can work but will display nothing. In fact, due to the fact the we extended the WP_Customize_Control class, our control already accepts a label and a description (like all controls) but doesn’t output them, since we’ve overridden the base render_content() with an empty one. Our output will closely match the select control’s one, so let’s go ahead and add handling for the label/title and description:
The elements and classes given will reproduce the standard look that the labels (bold) and descriptions (italic) have in the customizer. Finally, the opening/closing label element will associate the texts with the dropdown that will be generated by wp_dropdown_categories().
Now, just before the closing label element’s tag, add the following code:
Line 1 merges together arguments passed via the $this->dropdown_args property that we declared above, along with a set of known defaults we want passed at wp_dropdown_categories(). Line 20 makes sure the ‘echo’ argument is always false (no matter what we pass), as we need to further manipulate the resulting HTML. $this->value() is how we get the value of the control’s default setting (each control may have more than one setting), so we assign it to the ‘selected’ argument on line 4, in order to have our dropdown display the appropriate value that was last saved.
We then call wp_dropdown_categories() and (hackily) add the value of $this->get_link() as the first attribute of the returned select element, by replacing the <select string. This adds a data-customize-setting-link=”setting-name” attribute in the element, that allows the customizer work its magic on our element, such as updating the site preview when we select a value, or showing/hiding the control depending on the active_callback value.
That’s it. Let’s see our code up to this point:
Using the control
Don’t just take my word that the control works. Let’s see it working. In your child theme’s functions.php file, add the following:
Line 3 includes our custom control file. Make sure to amend the path and filename to match yours. Lines 5-12 add a customizer section and a setting that our control will use. Of course you may use an existing section or use a different setting name.
Line 14 is what interests us the most. Instead of passing a setting name and an array as two arguments to $wp_customize->add_control(), we pass instead an instance of our control class, My_Dropdown_Category_Control. The object itself needs to be instantiated with a reference to the WP_Customize_Manager object (i.e. the $wp_customize variable), a setting name and an arguments array. In other words: what used to be 1st and 2nd parameters on add_control(), becomes 2nd and 3rd parameters on the control’s constructor.
That’s it.
Go to Customize → Homepage Options, and you should see the dropdown, in all it’s glory!
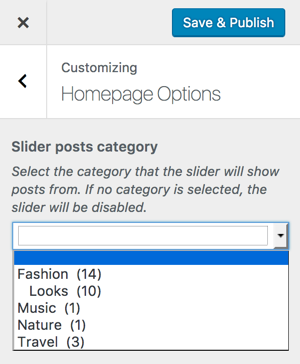
Select a category from the list. Save & Publish. Refresh the page. Check that the selected category is still selected. Bliss!
Passing arguments
We pretty much left unexplained how to use the $dropdown_args property we declared, although we incorporated it in our code. I’ll not keep you waiting. Change the constructor’s 3rd argument array like so:
Refresh customizer. Observe that the dropdown now lists tags. Shed a happy tear.
We use the property’s name ($dropdown_args) as a key to the arguments array, and the respective value can be anything we want. We of course want it to be an array of options, so that we wp_parse_args() it with the defaults. But how did our property became an array key? To answer this, we need to take a look at the WP_Customize_Control‘s constructor source code:
The constructor checks if each $args‘s key corresponds to an object’s property, and if it does, it assigns it its value. With this knowledge, we can now clearly see that the usual arguments that we pass to add_control() for all controls, such as ‘label‘, ‘description‘, ‘priority‘, ‘section‘, ‘choices‘, etc, all correspond to a property. This also means that we can simply pass values for all our custom properties, via the array.
It’s now up to you to do whatever you want with this customizer setting. Get the value with a standard get_theme_mod( 'home_slider_category' ) and code away!
Conclusion
It’s very easy to start building your own WordPress customizer control, as the boilerplate is minimal. From there, you can be as creative as you want, building something as simple or as complex as your imagination and skill allows. If you are looking for inspiration and further up your skills, you can always turn your eyes on the WordPress core controls.
It’s true, core should include more controls out of the box, but that’s the beauty of open source; if it’s missing, build it and submit it. Who knows, we might see your name on the contributors list!
You can find the full source of this tutorial in this gist, but the beauty of coding is typing out stuff. It’s your choice though!
So, what do your think? Are custom controls easy? Was the tutorial helpful? Let me know in the comments section!
10 responses to “WordPress Customizer Custom Controls: Categories dropdown”
That helped me. Thanks
Helped me too.
I modified the code a little bit to meet my requirements by adding this to the render section
$postType = array();
$postType = get_post_types(array(
‘public’ => true,
));
$postTaxonomies = get_object_taxonomies($postType);
and then I changed ‘taxonomy’ => ‘ category’ to ‘taxonomy’ => $postTaxonomies, …
This wil show all categories including the ones from custom post types
Hi,
I would like to know how to have a drop-down for Custom Taxonomies, similar to an accordion in the backend of WordPress when creating a listing. I have custom Post Type slug (vehicle_listings) and Custom Taxonomy slug (models).
where having the children HIDDEN until select the Parent & then can select the Child.
Parent (FORD) & Children (Falcon, Laser): http://prntscr.com/pksxwx
Also if there is some function code needed, what part of that code would I need to alter ?
Hi Jaso,
this post is about a dropdown control, whereas you seem to need a checklist control. Perhaps this post will help you more: https://www.gavick.com/blog/custom-category-selection-controls
Hi, this is very helpful however when i echo the settings in my front page my page goes to a not existing page, i am using product_cat’s taxonomy.
Instead of getting a normal permalink i get /24-revision-v1/…..
Seeing how terms don’t have revisions, I guess you are doing get_permalink( get_theme_mod( ‘your_setting’ ) ) which is wrong. get_permalink() is for post types, not terms.
You should be doing this instead: get_term_link( get_theme_mod( ‘your_setting’ ) )
Hello, Thanks it is very Hopfull
Is there any Methode you can tell to how display the Post lists and Post type also as you have done here with My_dropdown_category
Best regards
For posts, you could duplicate the functionality of
wp_dropdown_pages()but have it pull posts instead of pages. You’ll need to replaceget_pages()with the results of aWP_Query().For post types, you’ll need to create a function from scratch. You can get the registered post types with
get_post_types().Hello, thank you; it’s quite promising.
Could you share a method for displaying both the post lists and post types, similar to what you’ve accomplished here with My_dropdown_category?
Best regards.
Please see my reply on this similar comment: https://www.cssigniter.com/wordpress-customizer-custom-controls-categories-dropdown/#comment-251767