How to secure your WordPress blog with SSL

Google Search has been very clear about the benefits for websites that are accessible through a secure HTTPS/SSL connection, the announcement back in 2014 saw a huge increase in the number of sites that switched over to HTTPS, but in comparison to today’s standards, there’s still many website owners who haven’t made the switch.
Apart from being a ranking signal for your content, secure connections make your blog much more secure, and can prevent your website from being taken over by hackers, or prevent you from having hackers monitor your traffic, and ultimately steal your customer data. There’s a good reason why eCommerce websites use SSL protection, because it protects the user data, and it allows for secure checkout processing.
There are two factors to understand when it comes to adding SSL/HTTPS to your WordPress blog:
- You need to choose a secure SSL provider that can provide you with the necessary certificate, be it free or premium.
- After you have purchased and installed the certificate, you need to make sure that all your content is pointing to the new HTTPS URLs.
to achieve the desired result is actually far less difficult than it may sound. Numerous startups and open-source platforms have embraced the “secure Web” term, and now provide anyone with the ability to acquire a free and verified SSL certificates to secure their websites. Including you, and me. Google has gone as far as letting webmasters know that HTTPS will be prioritized over HTTP in the content indexing process. It’s also a known fact that SSL is one of the major aspects of securing a WordPress blog.
So, how do you secure your WordPress blog with HTTPS?
Step 1: Find a reliable SSL certificate provider
I’m using NameCheap to store all of my active domains, which is also where I purchase my RapidSSL certificate from. You can purchase the RapidSSL certificate from the official website, but NameCheap makes the process much easier if you are managing your domains in the same place. NameCheap lets you purchase the certificate, verify it, and then issue it so that you can add it to your server.
You have to decide on your own where you wish to purchase your premium SSL certificate from, there are many SSL providers out there, and because I’m not affiliated with any, you have to do your own research. To comment on my experience with RapidSSL — they have been very reliable, and I haven’t experienced any issues while using their impeccable service.
How to add an SSL certificate for your website?
Once you decide on the SSL service that you want to use, you will need to generate what’s called CSR (Certificate Signing Request) and also a private key. The following commands are recommended to be used for those bloggers who have a dedicated or a VPS server running NGINX or Apache web server.
Start with using openssl to generate your CSR and private key. Remember to store this certification information in a secure folder on your own web server.
openssl req -newkey rsa:2048 -nodes -keyout yourdomain.com.key -out yourdomain.com.csr
This will create a private key file, and also a CSR file. You will have both accessible in the folder that you are running the command in, but before the files are created, you need to fill out some essential information that the SSL provider is going to use to verify your certificate.
Country Name (2 letter code) [AU]: US

 State or Province Name (full name) [Some-State]: California

 Locality Name (eg, city) []: Los Angeles

 Organization Name (eg, company) [Internet Widgits Pty Ltd]: Your Company Ltd

 Organizational Unit Name (eg, section) []:

 Common Name (e.g. server FQDN or YOUR name) []: yourdomain.com

 Email Address []: [email protected]
The emphasized parts are the certificate information that you need to enter. Pay close attention to what you enter at the Common Name input, if you are running your website as www.yourdomain.com then that’s what you need to enter there, otherwise use yourdomain.com, or you can use a wildcard for a global certificate if necessary, for example *.yourdomain.com.
This will generate a fully valid private key and a certificate that you can use to verify the certificate that’s being issued by your SSL provider. You won’t need to use the .key file, but you will need to copy the .csr document to give back to the SSL provider.
nano yourdomain.com.csr
Go to your SSL provider and verify your newly acquired SSL certification by pasting the .csr value of your certificate within the certification input from, which is going to be unique for each SSL provider.
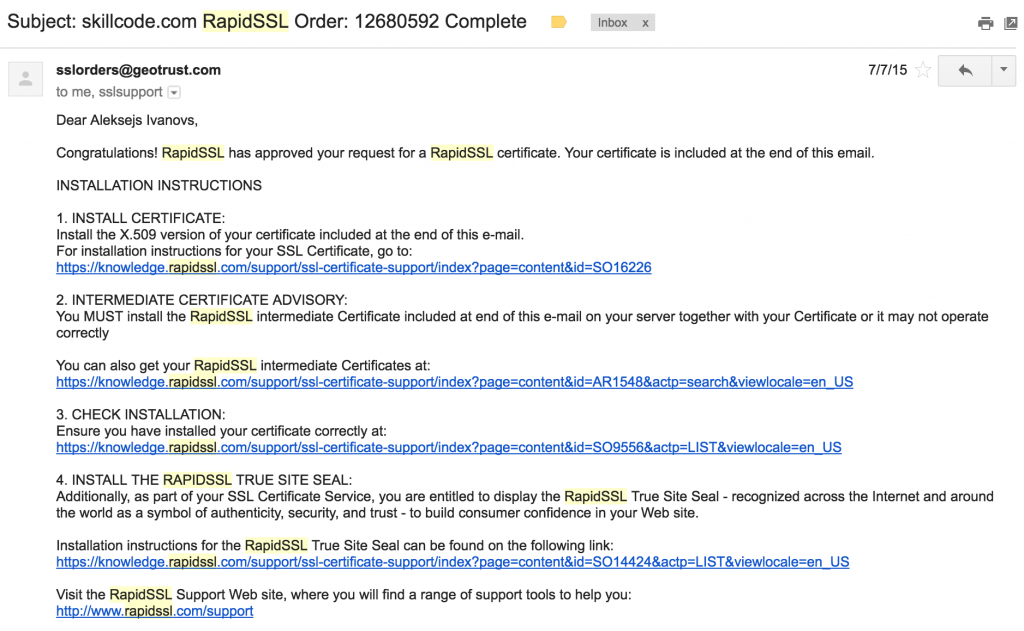
Then, upon completion, the SSL provider is going to issue the actual certificate and email it to the address that you used for the signup process. You will need to add this certificate to your server to enable SSL.
Installing the issued SSL certificate
When I completed the SSL verification process through my NameCheap dashboard, I received an email with confirmation details, including the “Web Server Certificate” and “Intermediate CA” details that I have to keep private for obvious reasons. You will receive the same email no matter which SSL provider you are using.
Configuring the SSL certificate for Apache Web Server
I’m a DigitalOcean customer, hosting one of my WordPress blogs on the Apache 2 droplet. So in this example, I will show you how to install your verified certificate, and ensure that your web server is listening all new requests through HTTPS.
First and foremost, you need to make a backup for your existing Apache 2 configuration file for your website. Copy and paste it somewhere else on the server so you can access in case there are errors presenting themselves.
Apache stores all the virtual server configuration files in the following directory: /etc/apache2/sites-available and if you want to make a backup, do the following:
cd /etc/apache2/sites-available

 cp yourdomain.conf yourdomain.conf.backup
Once that has been done, you’re ready to install your certificate. This will be done by editing your virtual host configuration file.
nano yourdomain.conf
Look for the item and adjust it so that your server is going to listen on the port 443 instead. It should look like once you’ve changed it. Next step, is to configure ServerName.
ServerName yourdomain.com
Moving forward, it’s time to add the SSL specifications:
SSLEngine on

 SSLCertificateFile /var/www/ssl/yourdomain.com.crt

 SSLCertificateKeyFile /var/www/ssl/example.com.key
You will also need to specify where your Intermediate Certificate is located:
SSLCACertificateFile /var/www/intermediate.crt (for Apache 2.4.8+)

 SSLCertificateChainFile /var/www/intermediate.crt (for older Apache versions)
You can check your Apache version with this command: apachectl -V
At this point, all requests to the port 80 will cease to exist, and instead your Apache web server is going to listen to port 443 (HTTPS) only. So you will need to redirect all your HTTP traffic to HTTPS, you can do this by adding an additional VirtualHost configuration to your yourdomain.conf virtual server configuration file:
ServerName yourdomain.com
Redirect permanent / https://yourdomain.com/
Save the file, and finally enable Apache SSL.
sudo a2enmod ssl
Once enabled, reload Apache to launch the changes.
sudo service apache2 restart
Your website should now be fully HTTPS verified, delivering secure SSL connections to your visitors, and yourself.
Where to get a free SSL certificate?
Content deliver networks like Cloudflare provide free SSL protection to all of its users, including those who are on the free plan. Unfortunately, not everyone is keen on using a CDN just for the sake of an SSL certificate.
There is however a great alternative, and it’s called Let’s Encrypt. The platform recently exited its BETA phase, and is now fully accessible for anyone who wants to obtain a free and web standard verified SSL certificate for their website.
You will need to refer to the comprehensive and the easy to follow documentation of Let’s Encrypt to learn how to add a free and secure SSL certificate to your blogs, websites, and apps. It’s actually much easier than you would think, and could save you time from having to purchase a SSL certificate from a premium provider.
Step 2: Ensure all your WordPress pages are HTTPS
The problem with enabling HTTPS on your web server is that WordPress won’t necessarily be compatible with your new SSL connections right out of the bat. Many links and pages on your blog are still pointing towards the HTTP version, and so are all the plugin and theme files. The best fix for this, at least for now, is to use a WordPress plugin that can redirect all of your existing HTTP traffic and URLs to the secure HTTPS connection.
I recommend Easy HTTPS Redirection because it’s simple to use, it has more than ten thousand active users, and it does the job of forcing your blog to use HTTPS in all scenarios.
Understanding SSL/HTTPS connections can be a little tough if you are inexperienced, so if there are any questions at all that you would like to see answered, don’t hesitate to leave a comment and I’ll help you out to my best ability. Don’t let frustration win over your confidence.
About the author
Alex Ivanovs has been working with WordPress related development since 2008 when he built his first WordPress resources platform. Since then, he has worked with industry leading WordPress startups, and currently operates as one of the community managers at Colorlib.


One response to “How to secure your WordPress blog with SSL”
Aside from the WordPress module, you could also do a HTTPS redirect on your .htaccess file as below..
RewriteEngine On
RewriteCond %{SERVER_PORT} 80
RewriteRule ^(.*)$ https://www.yourdomain.com/$1 [R,L]