How to add custom image sizes to your theme
I can’t stop praising WordPress when it comes to the conveniences it provides. While the approach it takes on things might not suit everyone, every time, for the most part its solutions to common issues are good enough. Once such example is images, and the creation of custom sizes from the originally uploaded one.
WordPress’s approach sacrifices disk space and does any work needed at the time an image is uploaded. Intermediate image sizes are then ready to be served by WordPress or the web server, with no additional overhead.
Another approach would be to generate any intermediate sizes on the fly, only when and if needed. This minimizes disk space usage, but carries the overhead of checking whether the requested size exists on every request, and actually generating it if it doesn’t. This might sound like a good idea, especially if disk space is limited, but it’s only good under very specific circumstances, e.g. low traffic websites with limited disk space.
Anyhow, WordPress made its choice a long time ago and went with the former approach. So, let’s see how we can add and use our own image size in our child theme.
For the purposes of this tutorial, I’ll be working on a child theme of our popular Olsen Light theme. If you don’t know what a child theme is, perhaps you should read about child themes first, but it’s not required as the information of this tutorial can also be applied on parent themes and/or plugins.
What we’ll be building is a simple feature where when viewing a single post, any images uploaded specifically to the post (i.e. attached) will be displayed right after the rest of the content. It can be thought as a very simple approach to creating a custom gallery, but for the purpose of this tutorial the images will be short and wide, 750×150 to be exact.
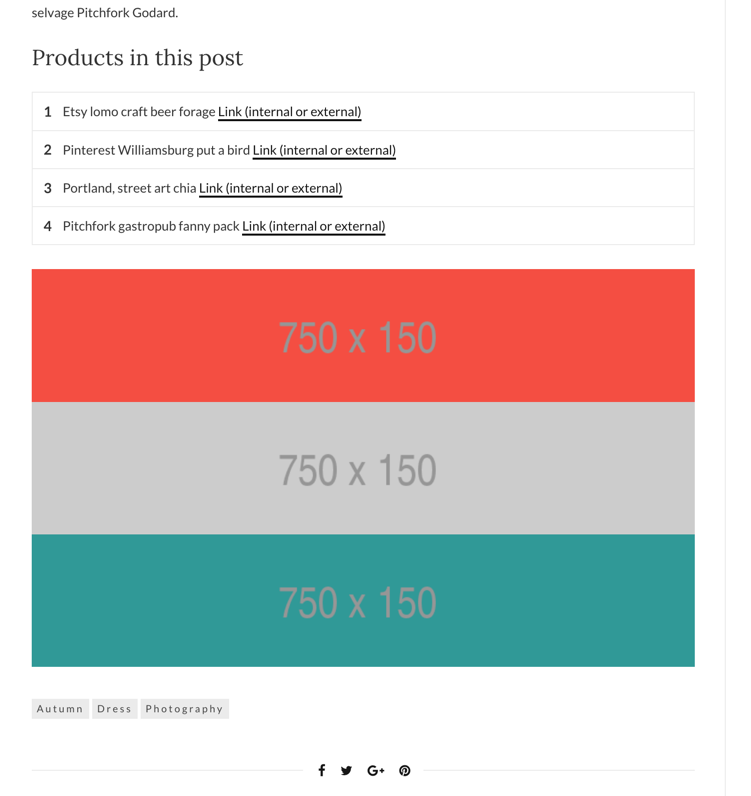
This is what our gallery will kinda look like.
Determining existing sizes
So, you want to display images in some very specific dimensions. First of all, you should know what image sizes are already available, since there might be one that suits your needs, already defined. The easiest way is to install the AJAX Thumbnail Rebuild plugin. While its main function is to regenerate image files (something that we will need a bit later), it also reports about the existing image sizes along with their defined dimensions. Just go to Dashboard → Tools → Rebuild Thumbnails to see them all together.

We can see that there are no image sizes with the dimensions we need, or any that are a bit close to what we need anyway. If there was a predefined size that matched the aspect ratio of the one we need, e.g. 1125×225 we can use that instead of defining a new one. Re-using image sizes saves both disk space and bandwidth, as a single image can be cached by the user’s browser but displayed in multiple places. In case there was a size that was a bit close to our requirement but not quite, e.g. 800×200, I would consult with the designer if that size could work on the design too, as sometimes even a small difference may not be such aesthetically pleasing.
Defining a new image size
Since there is no image size we can re-use, we need to define a new one. We do that with a simple function call to add_image_size(), preferably on the ‘after_setup_theme‘ action.
add_image_size() accepts three parameters; the first is the size’s name. If it’s unique, a new size will be created with that name. If it’s not, the existing size’s dimensions will be overwritten with the rest of the values we pass on the function.
The second and third parameters are the maximum width and height respectively. I say maximum because images in WordPress are always scaled down and never scaled up. If you upload a small image, say 100×100, don’t expect to see a generated size of 750×150. Only down. Never up. Down…
The fourth and last parameter is whether the image should be cropped to the exact dimensions. If true, the image will be cropped, and if false, the image will be scaled down proportionally as to maintain its ratio but still be within those maximum dimensions. Instead of a boolean, this parameter may also be an array to specify how to crop the images. I’m not going to go into that, but if you are interested, David Coleman has a great post explaining crops in detail.
In the example above, we define a new image size called ‘my_wide‘ with dimensions 750×150 and cropping enabled.
Using the new image size
Let’s go ahead and implement the simple gallery. We’ll hook to the content and grab and inject our images right then and there.
Lines 7 and 14 are what interests us more, but I’ll give a quick overview of the rest of the code as well. First, we hook our function to ‘the_content‘ filter so we can change its value, via the add_filter() call. Immediately we check if we’re seeing a single post or not. We do this so that we’re certain the gallery won’t appear on other pages, such as the blog, search results or category listings (it really depends on whether the theme uses the_excerpt() or the_content() on this kind of listing pages). Right there at the start we could also check for the current post type, in case we needed to only show the gallery on posts but not on pages, for example.
We then get all attached images via the get_attached_media() function. This function returns an array of WP_Post objects that are attached to the current post. The objects returned can be filtered to just images, by setting the first parameter to ‘image‘. The first parameter actually accepts a MIME type such as ‘image/jpeg‘, ‘image/png‘ or ‘video/avi‘ but we can also just pass just the first part of the MIME type we want. In this case, ‘image‘ gets converted internally to ‘image/*‘ (the asterisk is a wildcard), so it ends up matching all image types. In case you’re interested, the conversion from ‘image‘ to ‘image/*‘ happens inside wp_post_mime_type_where() which is called by the eventual WP_Query performed internally. A list of default MIME types allowed by WordPress can be found here.
If there are attachments returned from get_attached_media(), we loop through them and construct an <img> tag for each of them. In order to get the URL for the specific image’s size, we use the wp_get_attachment_image_url() function. The first parameter is required, and is the attachment ID (i.e. the post ID of the attachment) of the image we want the URL for. The second parameter is the name of the image size that we want. This is it right here! This is how you use the image size defined earlier!
Note that we don’t echo the <img> tags immediately, but store them in the variable $gallery and finally concatenating them with $content. Since ‘the_content‘ is a filter and not an action, we need to return the value and not echo it. In fact, if we just echoed our <img> tags from within my_wide_images_after_the_content(), they would show up before the content, as $content would actually be echoed later.
That was it. Let’s test it. I had already uploaded some images to the post before starting writing this article, so I should be good to go. Let’s view the post.
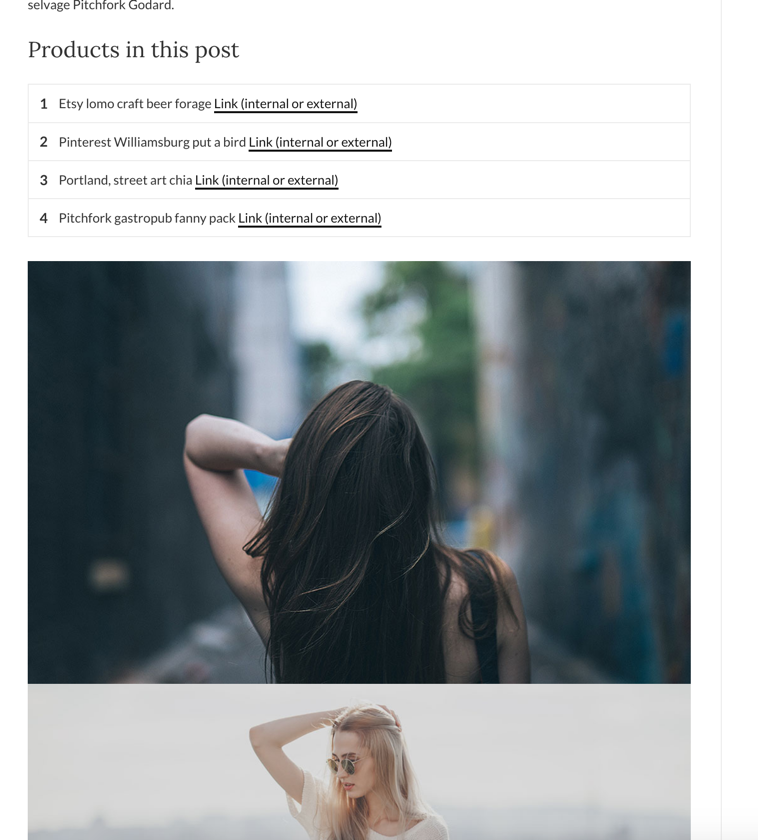
It works… kinda. The images appear but are clearly the wrong size. They were supposed to be short and thin. What happened? Well, newly introduced image sizes only affect newly uploaded images. As we said earlier, WordPress creates the intermediate image sizes at the time of the upload, so newly defined image sizes have no effect on previously uploaded images.
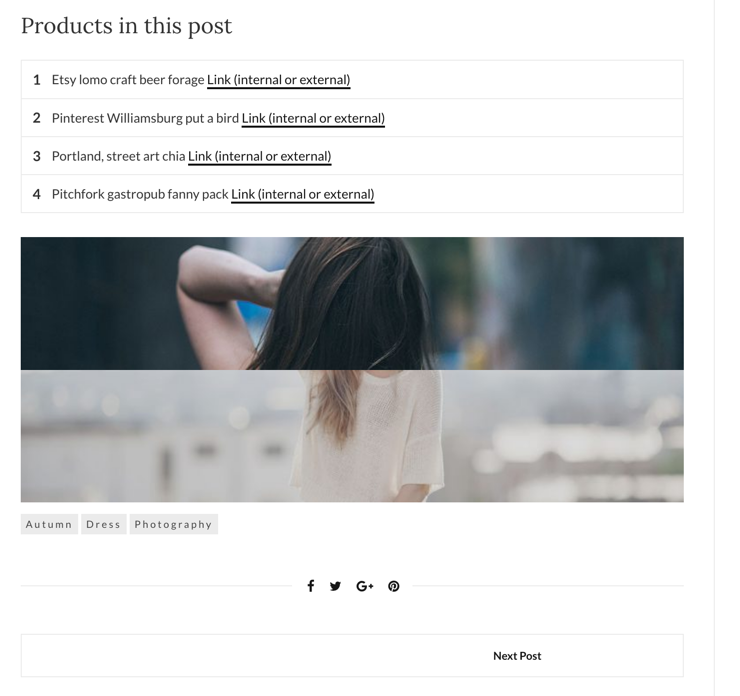
No worries though. We can force WordPress to regenerate the intermediate image sizes for all existing images. How? The AJAX Thumbnail Rebuild plugin of course! We already installed it, didn’t we? Just go to Dashboard → Tools → Rebuild Thumbnails again, make sure ‘my_wide‘ is selected, and press the “Rebuild All Thumbnails” button.

Wait for it to finish, and the refresh the test post page. Voila!
Since you reached this far, especially if you also read the article about the crop array parameters, you must be getting tired. You’re probably looking at the screenshot above, those two short and thin images showing nothing interesting, and thinking “Well, this is ugly. How can I make them show something interesting?”. The answer is the aptly named My eyes are up here plugin. Thank me later.
That was it. One function to define a size, another one to use it. Could it get any simple? Let me know in the comments below.
13 responses to “How to add custom image sizes to your theme”
This road seems simple and easy. But will not it be necessary to make an adjustment in terms of mobile view?
It depends on your requirements and the image sizes in question.
You can use wp_get_attachment_image() which generates an img tag along with its responsive “srcset” and “sizes” attributes.
I think you forgot to put the quotes around my_wide.
Where about would that be? I’ve just checked and every occurrence seems correct.
The last example has:
$gallery .= sprintf( ”,
esc_url(wp_get_attachment_image_url($image->ID,my_wide) )
);
Thanks for this helpful article Anastis. I wıll try these on my blog – http://www.bloghocaniz.com – I hope it will work
Hi,
Thanks for the post. I’ve already used the add_image_size before, but not in a function. I added them to a function like you said to try to solve a problem since WordPress 5.0 and Gutenberg. The new editor dont create my custom image thumbnails, it only upload the full size image.
Have you an idea to fix this ?
Thanks
Hi Dominic,
is your function hooked to the ‘after_setup_theme’ action?
Did you regenerate your thumbnails after you added the function?
Thanks for your reply. The only code I added yesterday in my functions.php file is this :
add_action( ‘after_setup_theme’, ‘child_theme_setup’ );
function child_theme_setup() {
// Création des miniatures dans l’infolettre
add_image_size( ‘thumbnails-newsletter’, 600, 286, false );
// Création des miniatures pour les listes
add_image_size( ‘thumbnails-list’, 280, 130, false );
// Création des miniatures pour les articles 2 colonnes
add_image_size( ‘thumbnails-2cols’, 355, 167, false );
// Création des miniatures pour les articles 2 colonnes
add_image_size( ‘thumbnails-featured’, 725, 345, false );
}
I’ve not regenered all old thumbnails cause they are OK. The problem occur with the new posts with Gutenberg editor.
I’ve used a function to disable Gutenberg :
add_filter(‘use_block_editor_for_post’, ‘__return_false’);
It come back the WordPress admin to classic editor. I tried after that to upload an image and it still upload only the original image, no thumbnails are generated. So, I think it’s not really linked to Gutenberg Editor but to a change in WordPress 5.0 core.
I found another issue with Gutenberg Editor : when you upload an image using the block image tool, it upload the image in the current month folder and not the month where the original post was published. If you use instead the media library, it upload the image in the month folder of the original post published date.
I think it’s some issues that I should post on Github project of Gutenberg and WordPress 5.0.
Thanks for your help.
Oh man, I found the problem !!! This is the plugin Regenerate Thumbnails that give me the clue…
In the settings of the plugin, a message said to me that my server dont support image modification, then the plugin could not create the thumbnails. It said too to ask to my hosting provider to enable « GD » or « Imagick » in PHP.
I goes to my PHP admin page in cPanel and seen that these two extensions was not checked (I’ve changed PHP version two weeks ago from 7.0 to 7.2). I tried again the image upload in Gutenberg and all thumbnails was created whitout any problem.
I will write a post about that. Thanks !!
thanks for article. i like it
Actually i want to set the post thumbnail size for the banner image.Which i was uploading through featured image in the background please suggest me.
Hi Andy,
this can be done with the set_post_thumbnail_size() function.