How to make your own WordPress dashboard widget
Do you build a plugin and want to easily display some general information? Or perhaps you are building a theme and want your customers to keep up with your blog? If you don’t want to build a dedicated settings page, then a simple (or complex, your call) widget on the WordPress dashboard should be enough. It’s very easy and very fast, too!
We’ll be creating a plugin that holds our code for this tutorial. While there is no specific goal, we’ll show how to handle some common use-cases.
Creating a dashboard widget
The code needed to register a dashboard widget is pretty much boilerplate:
Ignoring lines 1-11 that define a plugin, the first thing we notice is that we hook on the ‘wp_dashboard_setup‘ action. This action fires after WordPress has added its own widgets, so we expect our future widget to be displayed last by default. Users, however, can rearrange the dashboard widget, and their position is remembered automatically.
Within the hooked dw_dashboard_add_widgets() function, we make a call to wp_add_dashboard_widget() passing it three arguments. The first argument is the widget id, which is used both as an HTML id and internally as a PHP array key. The second argument is the widget’s title, and the third argument is a display callback, that is, the name of a function that will actually display the contents of the widget, in this case ‘dw_dashboard_widget_news_handler‘.
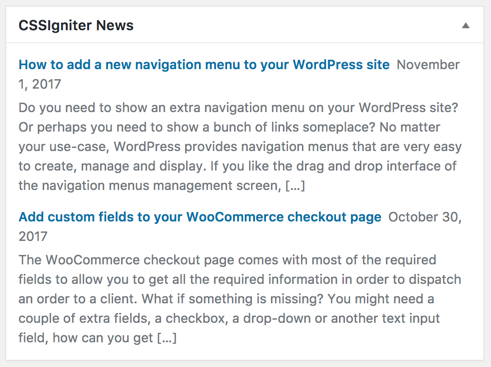
Finally, the dw_dashboard_widget_news_handler() function itself, displays a message so we can see if it actually works.
Now is a good time to activate the plugin and visit the Dashboard page of your WordPress site. You should see a new widget appearing, similar to the screenshot below.

That was it! That’s all it takes to create a new dashboard widget! It isn’t hard at all, is it? Mind you, it’s a full fledged widget indeed! Try dragging it around to change its position, and the refresh the page a observe how it remember the spot you last moved it to.

Displaying a feed
While the main title of this tutorial is covered, there are always a few other things we can learn how to do. For instance, WordPress displays a few RSS feeds on the “WordPress Events and News” widget. You can easily display your own news as well. We just have to use the not-very-helpfully-named (and undocumented) wp_dashboard_primary_output() function.
All we need to do, is create an array of arrays. Each array holds the parameters of a feed, which means yes, we can have multiple feeds displayed at the same time! Each feed the only required parameter is ‘url‘ which should point to the RSS feed’s URL. The rest of the parameters can be left out, but you should include them to fine-tune the output. The RSS feed is cached for 12 hours by default, and if you need to change that, you’ll have to hook on the ‘wp_feed_cache_transient_lifetime‘ filter.
Please note that since the wp_dashboard_primary_output() function is undocumented, it might change or even be removed without any prior warnings. As of WordPress v4.8.3 however, the above information is correct.
Enqueuing scripts and styles
If you’re building something non-trivial, most likely you will need to also use custom CSS and/or JavaScript. Of course, you’ll properly enqueue your scripts and styles, but for efficiency you should also make sure that they are loaded only where needed and not on every admin page. Enqueuing on the admin side is done, as you probably already know, by hooking on the admin_enqueue_scripts action. This action passes as its sole argument a string, identifying the page that it was called from (the caller). This string may look like a filename, e.g. ‘edit.php‘, or like an identifier, e.g. ‘audioigniter_settings’. In the case of the dashboard, it’s simply ‘index.php’.
Another way conditionally enqueue only on the dashboard screen, is by checking the current WP_Screen id.
We can get the current WP_Screen object by calling get_current_screen() and checking against the $id attribute. For the dashboard screen, it should be equal to ‘dashboard‘.
Widget Options
All is good, but a configurable widget is always better. Good thing that dashboard widgets have their own built-in options interface. All you have to do, is provide the widget-specific functionality!
Let’s revisit the dw_dashboard_add_widgets() function:
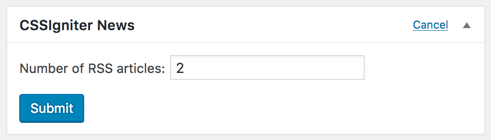
I’ve added another argument on the wp_add_dashboard_widget() call, named ‘dw_dashboard_widget_news_config_handler‘. This is the name of the function that will handle the configuration options of the widget. For now, we leave the actual function empty, just to observe what happens.
Save your file and refresh the dashboard. Now hover your mouse over the widget’s title.

You should see a “Configure” link appear. Press it.

The widget’s content changes and a “Submit” button appears. If you press the submit button now, nothing will happen of course, but it’s ready for our custom code!
Saving options
The widget’s config interface is a standard HTML form. We just need to provide the form’s elements that we need. The submit button has an name attribute ‘submit‘, so we can check if it’s set to determine whether the user has pressed the submit button and if so, to save the newly submitted options.
First, we create a new function dw_dashboard_widget_news_config_defaults() to easily retrieve the default options, in case the user hasn’t provided any, as is the case right now. This will help us avoid any PHP warnings of undefined array indexes.
Then we modify the dw_dashboard_widget_news_config_handler() function to handle the form. On line 8, we get the options of the widget by calling get_option( ‘dw_dashboard_widget_news’ ) and we wp_parse_args() it against the dw_dashboard_widget_news_config_defaults() defaults array, so that if there are missing options (like right now), the $options variable will get populated with the default values.
Lines 19-23 simply show an input box named ‘rss_items‘ with the number of RSS items that we wish to display. We use $options[‘items’] to pre-populate the value, but since the user hasn’t provided any yet, the default (2) will be displayed. This is exactly where wp_parse_args() comes into play, as without we would get a PHP warning.
Finally, on lines 10-13 we check if the submit button was pressed, and if so, we check the validity of the posted ‘rss_item‘ value. We sanitize it as the integer that it’s expected to be and assign it on the $options array, overwriting the previous value. Finally, on line 15 we save our changes by calling update_option(). Please note that the options array is persisted within the isset( $_POST[‘submit’] ) block.
That’s it. Save your changes, update your dashboard, and press “Configure“. Your widget’s option should be waiting for your input.
Joy! Change the value to 3 and press the submit button. The widget returns to its original view, showing the RSS feed, but it still shows only two feed items.
Using options
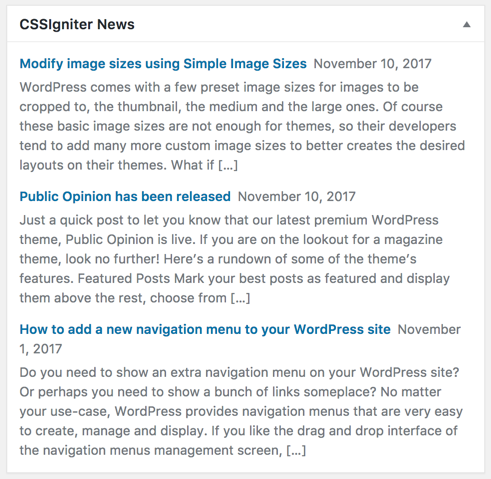
Using the widget’s options couldn’t be simpler. All we need to do is fetch them, and incorporate them into our code. Revisit dw_dashboard_widget_news_handler():
On line 2, we again populate an $options variable by parsing the stored options against the defaults. Once again, this is done as a safety net for non-persisted options. Your users may never go to the configuration interface of the widget, so you need to be prepared for that. Finally, on line 7 we use the ‘item’ option’s value in place of the previously hard-coded “2” value that the feed’s configuration had.
Refresh your dashboard one last time.
Conclusion
That was it! Pretty easy, right? WordPress takes away the pain from most commonly-used patterns, including dashboard widgets, with its well-thought API and hooks. Just take a look at the complete code below, and drop a comment if you think it could have been easier… It’s going to be a very silent comments’ section!
8 responses to “How to make your own WordPress dashboard widget”
A screenshot of the finished product would have been welcomed
There are screenshots throughout the article.
A screenshot of the finished product can be seen right before the “Conclusion” section.
How do create widget default is right column of admin dashboard. All widget deault is left column
The 6th parameter of the wp_add_dashboard_widget() function is a $context that accepts the values ‘normal’, ‘side’, ‘column3’, or ‘column4’. The default is ‘normal’. Try experimenting with this parameter. You can pass null as the 4th and 5th parameters if you don’t need to pass something else.
This is really useful, thanks! Your code features neither the submit button, nor a form – is that intentional or an oversight (not sure how the post you’re checking would ever fire)?
The dashboard widget API automatically generates the form and the button. You only need to provide the fields.
Could this widget be used to embed a YouTube or Vimeo video?
Hello.
Yes, this is possible.
You could replace the dw_dashboard_widget_news_handler function’s output with the YouTube video’s embed code and load some CSS to make it responsive if needed.