How to make a crypto WordPress widget using the CoinMarketCap API
Have you ever wanted to know how to build your own WordPress widget? Have you ever wanted to know how you can use (consume) a third-party API from within your WordPress theme/plugin? Did you answer “yes” to at least one of the questions? If you did, the keep reading because you’re actually learn how to do both.
Start by creating an empty plugin inside its own folder, to house our code and files. Let’s call our project “ci-crypto-widget“, so create a folder with that name and a .php file with the same name inside it.
Creating a Widget
Assuming you (as a user) know what widgets are, then next big thing that you need to know about them (as a programmer) is that widgets are just specializations (subclasses) of the WP_Widget class. Widgets typically override 4 methods:
- __construct() – It’s required to call the parent’s constructor passing some arguments, such as the widget’s id and name.
- widget() – Used to display information in the front-end. If widgets have an ultimate purpose, this is it!
- form() – Used to display information and a configuration form in the back-end.
- update() – Used to save/update the configuration options collected from displaying the form() above.
Widgets need to be registered with WordPress so that they’ll be available for use. This is done by calling register_widget() passing the subclass name as string, and it needs to happen during the ‘widgets_init‘ action.
Registering a widget
So, in the context of our plugin and armed with the information above, a really simple widget that does nothing, requires the following code:
The parameters passed to the parent constructor in line 8, are the widget’s ID which must be unique, and a human-readable name of the widget. WordPress uses that name on the Appearance → Widgets screen, and right below the name, it displays the optional description that we passed in an array. If a description is missing, the name is repeated. Ugly.
Widgets without a description don’t look good.
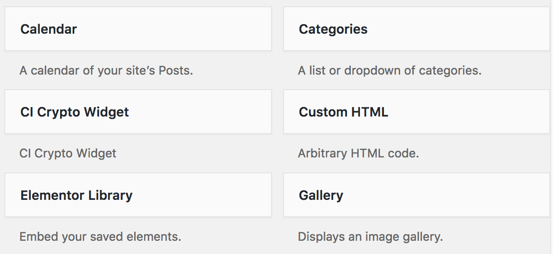
Go ahead and drag the widget into a widget area. Expand it so see its options. It’ll kindly let us know that there are no options for this widget.
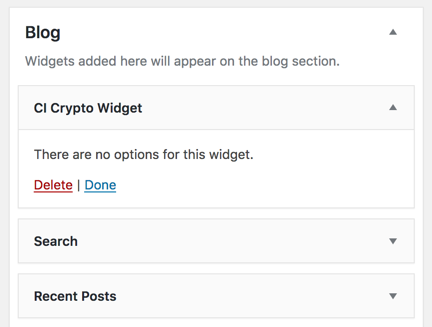
Thanks for pointing the obvious.
Let’s check our front-end. The beautiful Vidiho Pro video theme will be responsible for displaying this tutorial’s widget. You should see the message “Hello, world!” appear on the position that you dragged the widget at.

Hi!
So far so good. But a widget without options, is a nearly useless widget. Indeed, so let’s add one!
Adding widget options
First of all, let’s add an array of defaults. This will prevent us from having any uninitialized options, by providing default values for them. We’ll be needing this throughout the widget, so we’ll define it as class property:
Let’s go ahead and create our first option. We need to override the form() method for this.
WordPress automatically passes to the form() method, an array with the specific instance’s saved options. Since we have no saved options yet, line 4 would produce a warning as there would be no element in the array with the key ‘title’. We can avoid this warning by merging the $instance array with the $defaults array by calling wp_parse_args() (or array_merge(), makes no difference in this case, but wp_parse_args() is more common in WordPress), which will make sure all keys preset in $defaults, exist in $instance too.
Since we now have a variable ($title) that holds the title’s contents (or the default empty string), we can now add a standard HTML form input that handles it. WordPress automatically adds the necessary <form> and other necessary UI elements, such as the submit button. As each widget can have multiple instances appearing in the same screen, we need a way to have unique HTML id and name fields for each input and each widget separately. The base WP_Widget class provides us with the get_field_id() and get_field_name() methods to do just that. Not everything is handled for us though. We still need to apply good practices and provide valid HTML code, as for example we do in lines 7 and 10 where we associate the label with the input field, by referencing the appropriate id inside the for=”” attribute.
Go ahead and refresh the Widgets page and, if you haven’t done so already, assign the CI Crypto Widget to a sidebar. Instead of the “no options” text, you will now see an input field, waiting for a title:
 Enter a title a press the Save button. You’ll see the title appearing right next to the widget’s name. Refresh the page and notice how the title you entered is persisted.
Persisting widget options
We didn’t override the update() method, but WordPress still saved our setting into the database. This behavior is just for convenience though, and we should always provide our own update() function that sanitizes each and every one of our options.
The update() method gets passed two arrays. The first, $new_instance, contains the option values that were just submitted; that is, the values to be saved. The second array, $old_instance, contains the existing data that are to be replaced. Finally, we need to return an array of value. Whatever the method returns, get persisted into the database. So, not only can we sanitize new option values, but we can also compare against the old values and behave accordingly, even opting not to save any changes at all!
In the code above, I follow a common pattern for going through the option values. I first make a copy of $old_instance at line 2, and then set each new option independently (well, just ‘title‘ in this case), after sanitizing it of course. Using this pattern makes sure that keys in $old_instance that don’t have a corresponding key in $new_instance, will remain in the newly saved array. This is useful during the development of the widget where options are added/removed/renamed, but is especially useful (and usually required) on complex widgets where fields are enabled/disabled or are added/removed dynamically.
Finally, just return the resulting $instance array, and persistence will be handled for you.
Displaying widget options
Let’s go back at the widget() method. There are two arrays passed by WordPress; the first, $args, contains information about the widget area (a.k.a. sidebar) that the widget appears into, such as its id and any other configuration options passed to the respective register_sidebar() call, most probably made by the currently active theme. The second array, $instance, contains the current widget’s options. Yes, it’s the same one that gets passed to form() and is returned from update(). Just like we did in form(), the first thing we do in widget() is to make sure there are no undefined array keys in $instance, by passing it through wp_parse_args() along with $this->defaults.
Other than the widget’s own output, each widget typically should display some markup before and after its output, as well as some some markup before and after its title. This isn’t a rule, however. Depending on what you do, you might need to have specific markup for the title, or for the widget’s wrappers altogether. We don’t need anything special in our case, so we can just print out the ‘before_widget‘ and ‘after_widget‘ array keys, as we do in lines 6 and 14. Similarly, in lines 8-10 we print ‘before_title‘ and ‘after_title‘ around the title, but only if there is a title to print. We wouldn’t want any empty <h2> tags now, would we?

Looking at the front-end, we can see that the title is now displayed, and its style matches that of the rest of the widget titles, thanks to printing out the sidebar’s $args!
The CoinMarketCap.com API
CoinMarketCap.com provides an API that can be used to retrieve information about cryptocurrencies. In order to use the API, we need to issue ourselves an API key. There are various paid access levels, each with its own set of limitations, but there is also a free plan, which we’ll use for the purposes of this tutorial. So, go ahead and register over at CoinMarketCap. Once you’re logged, you’ll see a widget named “API Key” where you’ll be able to copy it.

Keep your key handy, as you’re going to need it shortly.
Documentation of the API can be accessed publicly, and contains all the information we need to use it and integrate it with our widget. I suggest you now give a quick read of the first three sections of the API documentation, namely: Introduction, Quick Start Guide, and Authentication.
Making an API request
In order to make an external request to an API from WordPress, we need to use one of the wp_safe_remote_*() or wp_remote_*() family of functions, part of WordPress’s HTTP API. Although we won’t be dealing with arbitrary URLs in this tutorial, I generally opt to use the “safe” versions of those functions, because it’s good practice. If the need arises to use the non-safe ones, well, I’ll use them, but usually there’s no reason to. Since the CoinMarketCap API expects parameters to be part of the requested URL (i.e. using the GET method), we will use the wp_safe_remote_get() function.
First of all, let’s store our API key and the base API URL into variables so that we can easily reuse them and deal with smaller chunks:
We will be requesting the cryptocurrency/map endpoint, which returns a list of all cryptocurrencies known to the API, along with some generic info, such as the currency’s name and symbol, and its CoinMarketCap ID, which we need to later get more specific info about a currency.
So, let’s put what we know into variables, and see what happens when we make a request:
I’ve put the above code temporarily into my widget() method and did a print_r() on the $response, but uh oh, something is wrong:
I’ve truncated most of the output for readability, but we can clearly see that the request returned an Unauthorized (401) error instead of the usual OK (200) status. Furthermore, the ‘body’ element of the $response array, contains a JSON-encoded object that holds more information. Apparently, we haven’t provided our API key. Let’s fix that.
The documentation mentions that the API key either as a query string parameter (which is not recommended), or via a custom header, ‘X-CMC_PRO_API_KEY‘.
In order to provide our custom header, we need to pass an array ($request_params) of extra arguments to wp_safe_remote_get(), with its ‘headers‘ element itself being a key => value pairs array of ‘header name‘ => ‘header value‘. I’m also passing a timeout of 60 seconds, just to avoid probable timeouts that may make you think this tutorial’s code doesn’t work!
Save. Refresh. Success! The request is now successful, and the request’s body is a JSON-encoded object that hold information about the cryptocurrencies, all ~3200 of them at the time of writing. The JSON response looks like this:
See that “id”: 1 ? We are going to use this to make a dropdown.
Making a dropdown of cryptocurrencies
We are going to allow the user to select a cryptocurrency on the back-end, and display some information about it on the front-end. Dropdowns in widgets are standard HTML <select> elements, with any number of <option> sub-elements. We’ve already gone through how we can add a new widget option, so, assuming a new option ‘crypto_id‘, this is what our widget should look like:
We need to save the currency’s ID (which is numeric) so that the API will know which currency we are referring to, so we’ll be sanitizing it as an integer (line 33). Of course, we need to set a default (line 4) so that any references to the option won’t trigger any undefined index warnings (lines 15 & 42).
Line 56-60 are what really interests us right now. In order to generate our <option> elements, we loop through a key => value array of currency IDs and currency titles. This array should be returned by the get_cryptocurrency_choices() method, which we haven’t defined yet. Let’s get to it:
Once we get our $response back from the server, we check that it was successful (200) and if so, we decode the JSON-encoded body into a PHP-usable data structure. The $json object contains the property ‘data‘ (which is an array), which holds one object per currency. We go through all of them, building an array of $choices with the currency’s ID as the key, and the name and symbol as the value. That’s all we really need for the dropdown.
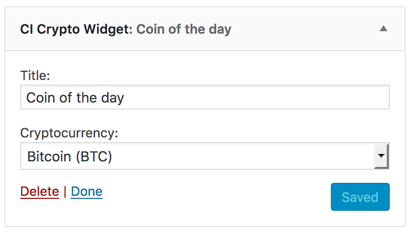
If you now refresh the Widgets page and check our widget’s option, you should see a new dropdown with Bitcoin pre-selected (we set crypto_id to 1 in the defaults, remember?).

Go on, makes sure everything works. Select a different currency, press Save and refresh the page. Your option should persist.
Caching the call
You might have noticed that the Widgets page has become a little slower to load, or you just checked your CoinMarketCap dashboard and saw the daily calls limit (“credits” in their own words) rise with every page refresh you did. For both of these reasons, we should cache the calls we make. The best way to do it, is by storing the API reply into a transient. Not only we get caching, but also timed invalidation of the cached values. If you need a refresher on transients, have a look on Using the WordPress transients API.
We apply the usual transients pattern. Get the transient’s value; if false (meaning it doesn’t exist or has expired), do the API call and cache the result. One thing to notice however, is the name of the transient itself (line 16). If we set it to something static, e.g. ‘cicw_get_currencies_map‘, everything will work normally until the moment you realize you want to call another endpoint, or want to change the API key, but you have to wait 30 minutes until the transient invalidates (line 27). For this reason, we construct a dynamic name based on the whole request URL and any other request parameters, generating a unique fingerprint for it (md5), and of course prefixing the resulting hash to avoid collisions and to keep things logically organized (which is helpful if we ever need to, say, manually find and delete all transients set by the widget). Note the the md5() function requires a string, so we need to string-ify $request_params, which we do by converting it to JSON.
Now, refresh your Widgets page. And now refresh it again. The first time will probably be considerably slower (depending on your Internet connection speed) than the second. This means your second refresh used the stored transient value instead of fetching it from the remove server once again. There are a few ways to check that the transient code actually works; the easiest one in this case, is to keep refreshing the Widgets page and also the CoinMarketCap’s dashboard, and notice whether the daily credits used increase or stay the same. It should be the latter, of course.
Displaying cryptocurrency information
With the cryptocurrency ID stored into our widget’s instance, and a way to contact the API, it’s time we display some more information about the chosen coin. Looking through the API documentation, we find the ‘cryptocurrency/listings/latest‘ endpoint, which provides the freshest information (such as price, circulating supply, rank, etc) for all cryptocurrencies. While this is useful in some cases, it’s overkill in our specific use-case. Sure, we could fetch the whole thing and selectively pick the information we want from within our code, but downloading, say, 1MB instead of 1KB of information is a waste of resources for both ends, and frankly, it takes a lot more time to both download and process it. If only we could pass a parameter to request information on a single cryptocurrency…
Keep reading the documentation and sure enough, another endpoint comes up that will do the trick. The endpoint ‘cryptocurrency/quotes/latest‘ returns the same (or almost the same) information, but only for the currency (or currencies) that we request explicitly. This is exactly what we need, as we have a specific currency ID that we need information for. The endpoint returns information in this format:
Let’s go back into our widget() method, and make another call to the API. This time of course, we need to set our endpoint to ‘cryptocurrency/quotes/latest‘:
Don’t get too excited and refresh the page just yet. We first need to pass the cryptocurrency ID through the URL, as a query string. We could do this by a simple string concatenation, joining the $url with the ‘?id=‘ string and the $crypto_id next to it. But you probably already guessed that we won’t do it that way. Not only it’s not extensible, it’s also very specific, directly relating to the endpoint in question. Not to mention that we need to urlencode() (or perhaps rawurlencode() ?) the parameters’ values.
Instead, we will use the awesome add_query_arg() function that does all these things for us, automatically. All we need to do is pass it an associative array of query parameters, and a URL, and it will return for us a properly formatted URL with the parameters included as they should, even if the URL already had existing parameters by itself.
That was it! Refreshing the page now will query the API and bring us back information about our selected coin. Do a var_dump() on $json if you want to see the fruits of your labor.
But wait. The JSON returned is this:
The object returned contains an object named ‘data‘ as before, and in turn, ‘data‘ contains an object named ‘74‘. How can we reference that object? Identifiers (function names, class names, variables, constants, etc) in PHP can start with or comprised only of numbers. $json->data->74 will definitely not work. One solution is $json->data->{’74’} which may or may not always work, but since we don’t know the ID beforehand, it’ll have to be something like $json->data->{$crypto_id}, if it works. Another solution is to have json_decode() convert everything to associative arrays, by setting its second parameter to true. This means that we would now have to do $json[‘data’] instead of $json->data, which is different from what we did in get_cryptocurrency_choices(), so either we’d be inconsistent, or we’d have to rewrite get_cryptocurrency_choices() to keep the same format.
The solution I prefer in this instance, is to use the reset() array function. Its purpose is to reset the internal pointer of an array back to its first element and return its value. By passing it the $json->data object, it is implicitly converting the ‘data‘ object into an array, and returns its first element, that is the object that contains the cryptocurrency info. The ‘74‘ in this case is the array element’s key, which we really don’t care about, at least in this case. So, in one step we get to keep both using object notation and avoiding the numeric name referencing problem. What’s not to like?
Finally, we can use the object to display any information we want (lines 50-54). Note that we should use the %s sprintf() specifier to display the currency’s price, i.e. $data->quote->USD->price, as cryptocurrencies tend to have values with quite a lot of decimal places, and are all significant since a coin may only be worth $0.0000219 or similar. Displaying it as a floating point number would probably lose some precision, in some cases. This isn’t acceptable.
The actual specifier I’m using, “$%2$s”, might look a bit complicated but it actually this is all it means:
- $ – Print the $ sign, verbatim.
- % – Start of placeholder string.
- 2$ – Display the second parameter passed to sprintf(). This is called “argument swapping”.
- s – Print the value as a string.
That should be it. Go ahead, refresh your page and see your widget’s output.

Yeap! This is it! You may now go ahead and add any other info you might want to display. And styles. Make it beautiful. Always make beautiful things!
Just to recap, the whole plugin so far:
Avoiding repetition
If you take a close look at the API-related lines 35-66 and compare them with 126-153, you’ll see that they are quite similar. In fact, they are identical in every way, except the $api_params and add_query_arg() lines (39-41 & 44). In order to avoid having this duplicate code, we should refactor it. All we need to do is add a new function, let’s call it do_api_call(), where we’ll accept as parameters the endpoint and the arguments’ array. The contents of our new function? Lines 35-66, almost verbatim; No $endpoint and $api_params lines. Return $json at the end. That’s it.
Then, just replace all those repeating lines in widget() and get_cryptocurrency_choices() with a call to $this->do_api_call(), passing the endpoint as the first parameter, and the array of API parameters as the second. While at it, we don’t even need the endpoint and parameters into variables; we can just supply them to the method directly.
The end
The whole plugin/file should now look something like this:
We ended up having a non-trivial widget that connects to an external API, yet it is completely self contained and ready to work in whatever WordPress installation you throw it at. Of course, there’s always work to be done. OOP purists will argue that the API should be refactored into another class, but that’s out of scope of this tutorial.
What do you think? Did you find it easy building a widget? Consuming the CoinMarketCap API? Did you build a cool project with it? Let us know in the comments!
9 responses to “How to make a crypto WordPress widget using the CoinMarketCap API”
Coinmarketcap is charging for API. Here is a cryptocurrency widgets using CoinGecko API
wordPress plugin: http://coingecko-widgets.coolplugins.net/
Here is the CoinGecko API: https://www.coingecko.com/api/docs/v3
As I mentioned in the tutorial, CoinMarketCap offers a free plan, but sure, having alternatives is always a good thing.
Avoid the hassel and use wordpress plugin instead:
The point of the tutorial is to learn how to make one.
Thank you for taking the time and dedication for this tutorial. I’m not coding savvy but it was an interesting read.
Is this API aggregator similar? https://www.bitcombine.io/
No. To the best of my knowledge, the site you linked is a tool to find the best crypto prices across exchanges, while CoinMarketCap is informational with average prices.
Hi there! Thanks for this tutorial it was really helpful! I would like to add a search bar so I can find any coin easily. How can I do this? Thanks again!
You should look into replacing the currency dropdown with something like Select2.