Documentation for Public Opinion – Legacy
- About
- Quick Installation
- WordPress theme installation
- Image Sizes
- Useful Plugins
- Importing Sample Content using One Click Import
- Importing sample content
- Importing widgets
- Installing WooCommerce
- Theme pages
- Setting up your theme
- Customizing Your Theme
- Widgets
- Infinite Scrolling
- Shortcodes
- How to use the page builder template
- Next Steps
About
Public Opinion is premium Magazine, News & editorial WordPress theme.
Quick Installation
WordPress theme installation
The easiest way to install the theme is by accessing your WordPress admin panel, then go to Appearance > Themes. Select the Install Themes tab and click the Upload link located just below the tab’s name. Click on Browse… and select the WordPress theme zip file you just downloaded. Then click the Install Now button, and after a few seconds, your new theme should be installed. Click activate and the theme is ready to use.
In order to install the theme manually, or in case you have trouble installing it through the admin panel, you have to unzip the WordPress theme’s zip file on your computer and upload via FTP the resulting theme folder into your WordPress installation themes folder (wp-content/themes). Then, from the WordPress admin go to Appearance > Themes. The theme should be available in your themes list. Click activate.
TIP: A more visual guide can be found here.
Image Sizes
The recommended image sizes for Public Opinion theme are:
Post Thumbnail: 885x500px
Hero Full Width: 1340x500px
Media Item: 885x750px
Item Full Width: 1140x650px
Useful Plugins
These plugins provide functionality and features used directly (or not) by the Theme. So, it is recommended to install and activate them before importing your sample content.
- Public Opinion Specific plugin: You will be asked to auto install this plugin when installing the site. You can find this under your theme /plugins/ folder.
- One Click Import : Use this plugin to help you import your content with just one click.WPForms use this plugin to create a contact form, then copy the shortcode it gives you and paste it in an empty page.
- WordPress Jetpack: You can use this to create a contact form, insert sharing buttons, create tiled galleries, and Infinite Scrolling.
- Woocommerce: Enable eCommerce functionality for your website.
- Mega Max Menu : Use this plugin to enchant your menus.
Importing Sample Content using One Click Import
To automate the process of importing and for a better experience we have natively included support for OneClick Import Plugin. Let install it fist:
From your WordPress dashboard
- Visit ‘Plugins > Add New’,
- Search for ‘One Click Demo Import’ and install the plugin,
- Activate ‘One Click Demo Import’ from your Plugins page.
From WordPress.org
- Download ‘One Click Demo Import’.
- Upload the ‘one-click-demo-import’ directory to your ‘/wp-content/plugins/’ directory, using your favorite method (ftp, sftp, scp, etc…)
- Activate ‘One Click Demo Import’ from your Plugins page.
Once the plugin is activated you will find the actual import page in: Appearance > Import Demo Data.
Click on the Import demo data button and you are done!
This plugin requires PHP version of at least 5.3.x, but we recommend version 5.6.x or better yet 7.x. Please contact your hosting company and ask them to update the PHP version for your site.
Importing sample content
To get the sample content file you can click the link in the notice that will appear on your dashboard immediately after activating the theme.
Extract the zip file you downloaded and upload the xml file in Tools > Import > WordPress (if not already present, you will be prompted to install the WordPress importer plugin), asking the authors to an existing user and make sure you check the “import attachments” box. You can now import the sample content.
Importing widgets
You can also import the widgets you see on the theme’s demo. To do that, you need the Widget Importer & Exporter plugin. To install it go to Plugins > Add new search for Widget Importer exporter and install the plugin. Activate it and go to Tools > Widget Importer & Exporter click choose file and upload the lense_widgets.wie file which is located in the sample content zip file, click Import widgets and you are good to go.
WARNING: As this will create posts, pages, custom post types, categories, widgets, etc. and change various system settings, it is strongly advised that you do this on a clean WordPress installation, without any previous and/or precious data. Under no circumstances we can be held responsible for total or partial data loss, so please be careful.
Installing WooCommerce
To enable eCommerce functionality for your website you need to install and activate the WooCommerce plugin by WooThemes. You can download the plugin free of charge from the WordPress Plugin Repository.
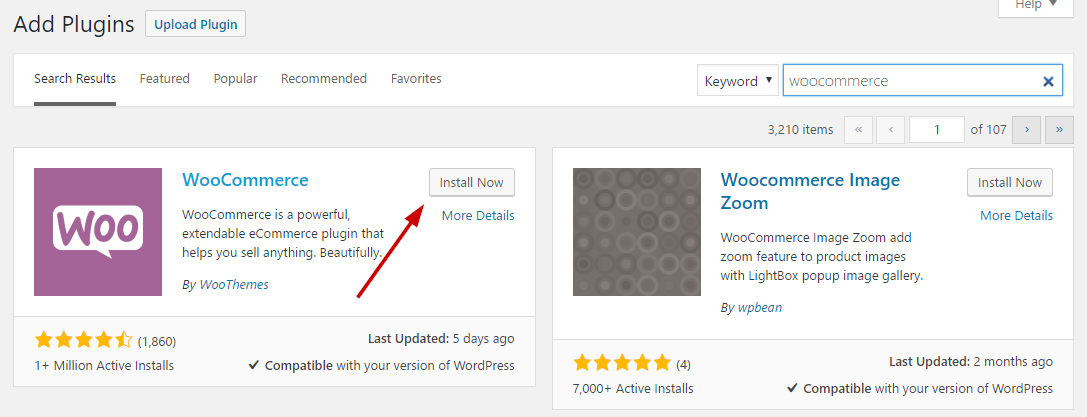
Go to Plugins > Add New and search for WooCommerce. Once the results come back, click the Install Now button.
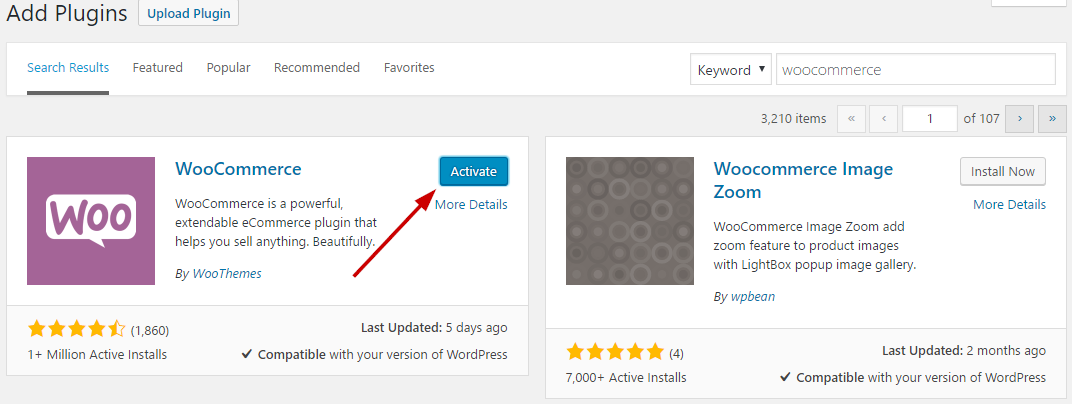
Once the installation is finished, click the Activate button to activate the plugin.
For detailed installation and usage instructions please refer to the plugin’s documentation.
Once you have installed and activated the WooCommerce plugin please install its pages by clicking on the button that WooCommerce provides on its banner. This will likely create a duplicate of some pages along with the pages install by the sample content but its a needed step. You can delete the old pages that came with the sample content or use them instead by going to WooCommerce > Settings > Pages and assign them anew.
Theme pages
Let’s start by adding the first few basic pages you are going to need. Go to Pages > Add New and create the following pages:
Frontpage Page
To set up the homepage create a page named Home and set to it the Front page Template from the Page Attributes drop down on the right. To add content to your front page go to Customize > Widgets or Appearance > Widgets and use the theme’s widgets to help you display your content. You will notice that in your Frontpage template page under the WordPress text Editor you have a Frontpage Options section.
Here you can control the featured posts that will appear on top of the homepage. These are posts tagged with the featured tag. You may optionally restrict the posts shown to a specific category, otherwise featured posts from all categories will be shown.
You can
- Select the layout you want for your frontpage featured section area.
- Select a specific category to restrict the featured posts.
Blog
this will be your posts page. Just create and publish a blank default page named “Blog” (or whatever you wish to name it) without adding any content, no further action needed for now.
Full Width Page
In this page you can add any content you wish without displaying the sidebar.
Default Page
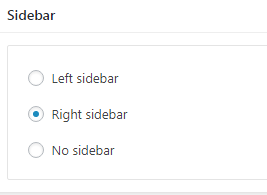
In this page you can add any content you wish but the the sidebar. You can select under Sidebar section where you need your sidebar to appear
Also, you can select whether you need to display the featured image in that page.
by checking the “Hide when viewing this post’s page” option in your Featured image box.
Setting up your theme
In this section we are going to have a closer look on How to setup Public Opinion theme.
Adding Posts
To add new posts to your blog, go to Posts > add new and proceed to:
- add a title to your post,
- enter the content in the editor,
- upload a featured image by clicking “Set featured image” on the Featured Image panel,
- add a category and/or tag to the post
- Publish the post.
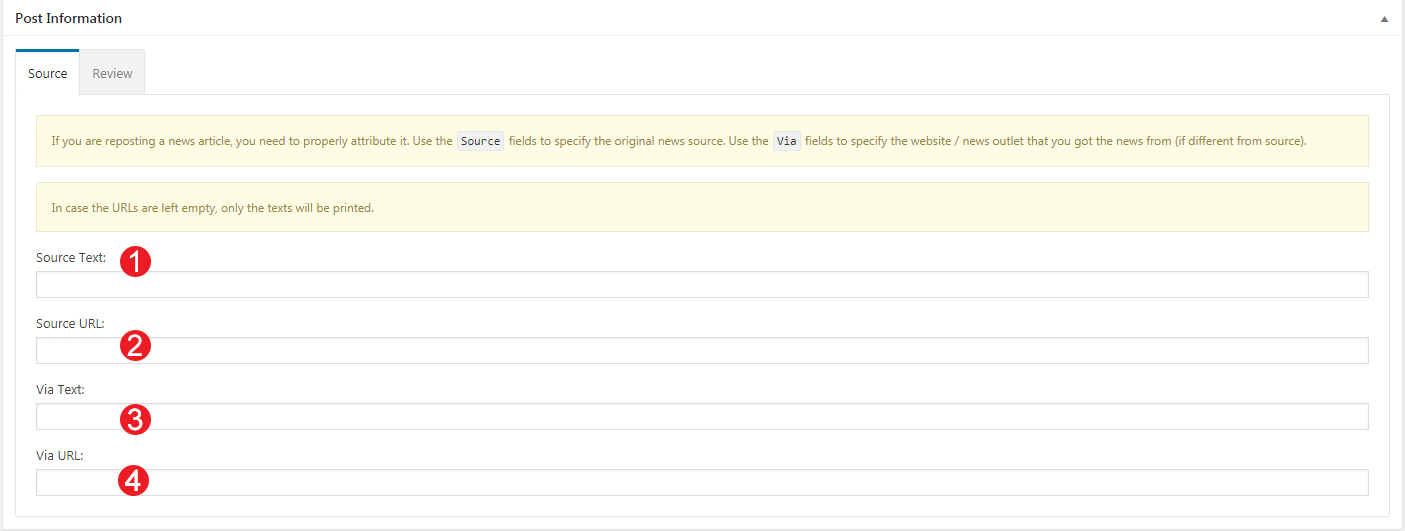
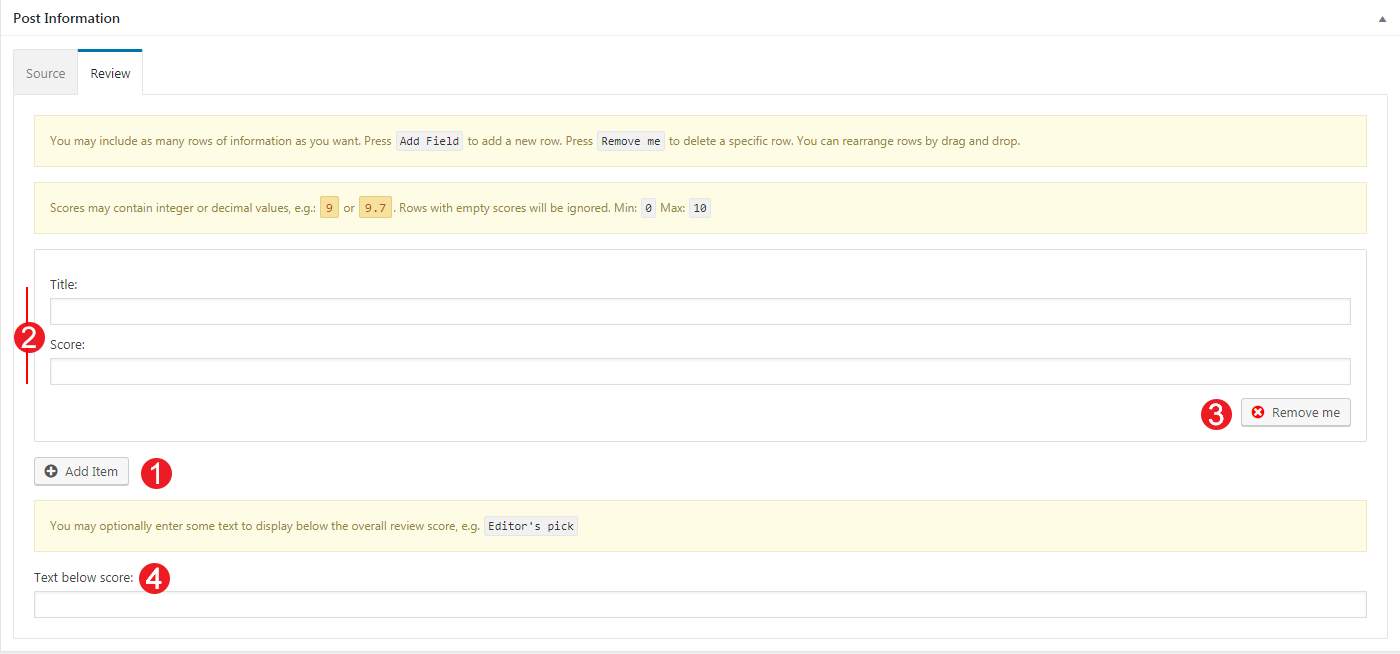
In Public Opinion we have included tools to allow you to create advanced articles with multiple features. In the Post Information box you can add some extra comment if you are reposting from another source, or if this is article is a review!
Under the Source tab you can
- Add the name (text) of the article source.
- Add the source URL.
- Add the website/news outlet name of the article.
- Add the URL of the website/news outlet name of the article.
If you are adding a Review, under the review Tab you can
- Add a Review item.
- Select the review item title and Score.
- Remove the item.
- Add some complementary text.
Public Opinion provides extra Trackback feature for articles under the Send Trackbacks box.
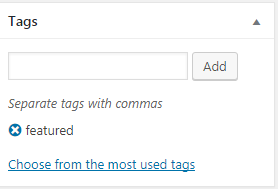
If you need a post to appear in the frontpage or in your post category listings you can add the “featured” tag under the Tags section
Post Formats
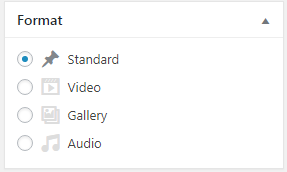
You can select the format of your article between Standard (default), Gallery, Audio and Video
Video Post Format
When Selecting the Video Format a new section will appear in order to add your Video URL
Gallery Post Format
When selecting this Post Format you will get a new Gallery section with two tabs. In the first tab you can
- Add your Images.
- Randomize the order they will appear.
In the second tab you can control your gallery styling by
- Adjusting the Row height.
- Change the margin between gallery images.
- Configure the behaviour of the last row.
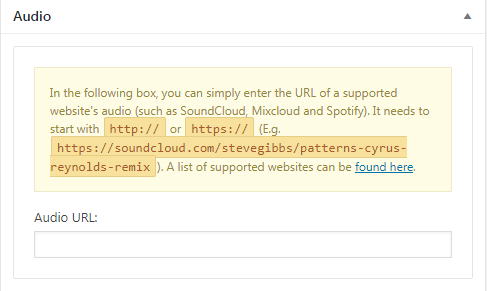
Audio Post Format
After selecting this Post Format a new Section will appear where you can add your Audio from your favorite Streaming(SoundCloud, MixCloud, Spotify) service.
Customizing Your Theme
All theme customization is done via WordPress’s built in customizer. If you haven’t used it or want to learn more about it, please read this article.
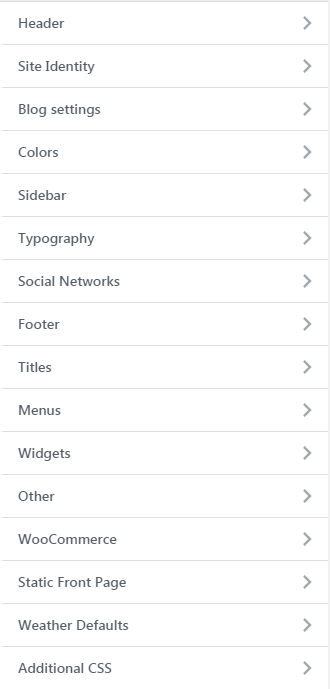
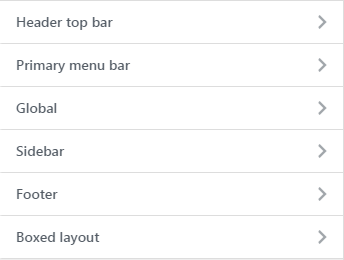
Go to Appearance > Customize and you will see this
TIP: any changes you make in the tabs below will be previewed live on the site which appears in right side of the screen, however to save these changes you need to click the Save & Publish button on the top of the bar, if you have made a change but see the button grayed out (for example changed the font size of a heading), move the cursor outside the input box, for example, to the next input box, then the button should be clickable again.
Let’s take a look at the options each tab gives you.
Header
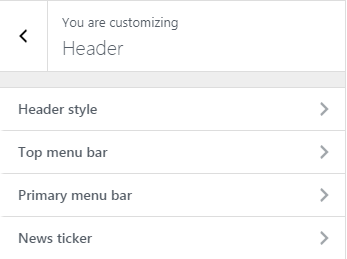
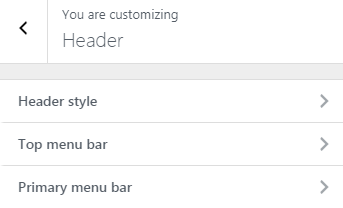
Header Options are split into four sections.
In the Header style section you can set the layout style your wish your header to have and make it fullwidth.
Under the Top menu bar you can add some custom text to it like your email or phone number. as well as select whether you need to show or not Search module or your social Icons.
- Vertical Padding your your menu bar.
- Control your menu text size
- Add complimentary text about your business
- Show or hide extra modules like Search box and Social Icons.
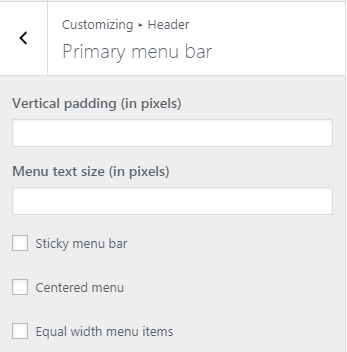
In the Primary menu bar you can select if you wish to have a sticky menu and change various display settings like the vertical padding of the menu and its text size.
Finally, we have the News Ticker where you can control the theme’s news ticker
You can show or hide the ticker, edit its title and source category as well as the post limit.
Site Identity
Here you can change the logo and favicon as well as the title and description. Use the appropriate fields to add your information, show or hide your site title and subtitle and upload your images.
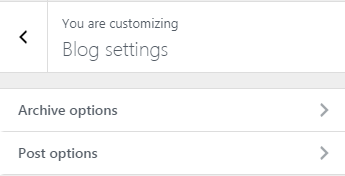
Blog Settings
Here you can change your blog archive looks as well as each element of your single articles. This section is divided in three parts Archive Options, Post Options and Featured articles.
In Archive Options
- Change your blog layout
- Show or Hide the Sidebar
- Make your sidebars sticky
- Use a Masonry effect to render your posts
- Change Excerpt Length
- Select a pagination method
In Post Options you can select which elements you wish your single blog posts to have. This includes showing or hiding the date, the featured image, the author and author box etc. Or even enabling/disabling the Lightbox option for your galleries.
Finally in Featured Articles you can change the name of the tag name for your Featured sections. Throughout your website will only show articles that include this tag. The selected tag will be automatically hidden from tag lists.
Colors
This tab allows you to customize the colors and background images for the entire site, the header, hero section, sidebars and the footer as well as if you want a Boxed layout or not.
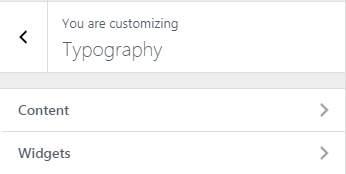
Typography
Through this tab you can control the font size of key theme elements, such as headings, body and widgets. If you want to change the default Theme fonts have a look here.
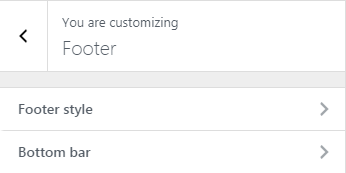
Footer
Here you can modify the credits text and your Footer Column Layout.
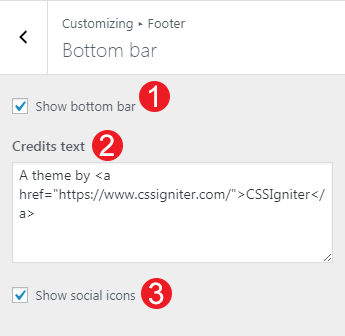
Under the Bottom Bar Section you can
- Select to show or not the bottom bar.
- Add you credit text. You can use some HTML here if you wish.
- Show Your Social Icons in the footer.
In your Footer style section you can
- Change the columns the footer will have.
- Set the footer to be fullwidth or not.
Menus
Here you can create and assign menus to the theme.Your theme supports 2 main menus. If you wish to have two menus surrounding the logo, select the equivalent option from Customize > Header > Header Style. To learn more about menu creation check out the Codex’s menu user guide here.
Public Opinion provides Full support for the popular Max Mega Menu plugin. Max Mega Menu will automatically convert your existing menu or menus into a mega menu. You can then add any WordPress widget to your menu, restyle your menu using the theme editor and change the menu behaviour using the built in settings. Max Mega Menu is a complete menu management plugin, perfect for taking control of your existing menu and turning it into a user-friendly, accessible and touch ready menu with just a few clicks.
This means you can use a Mega Menu right out of the box with Public Opinion following some simple steps.
Installing Max Mega Menu plugin
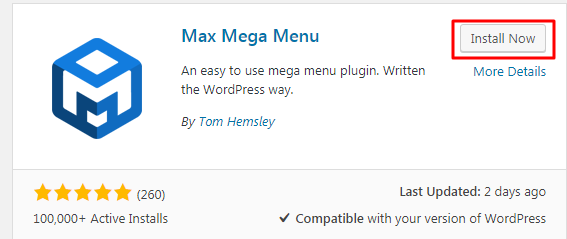
To install the plugin you navigate to Plugins > Add New, search for “Max Mega Menu” and click the Install button.
Once the plugin is installed and activated you can navigate to Mega Menu > Tools and head over to the Import Theme field box
There you will need to paste the contents of megamenu.txt located in your sample content archive file and then click Import Theme. This action will ensure that the mega menu will have the same look and feel with Public Opinion theme.
Setting Up a Max Mega Menu.
Head over to Appearance→Menus and select your main menu display location from Menu Settings.
This will ensure that your current menu will display in the correct location. After selecting a location, in the Max Mega Menu Option Box that will appear you will need to
- Enable Max Mega Menu.
- Select the Public Option theme.
- Select your Event to trigger the mega menu and the Effect to render it.
Now we are ready to actually create our first Mega Menu. Hover over an item you want to trigger a mega menu and click on the Mega Menu button.
Have a look at this video to get started with the Plugin or head over at the Plugin’s official Documentation page.
Static Front Page
Use this tab to make the Home page your static front page so you can take advantage of the homepage template we have created for you.
Woocommerce
In this tab you can change the number of products on shop listing page. You can use the built in [cart-info] shortcode in either of the Header > Top menu bar text boxes to display the total number of items in the cart along with their price. The information also serve as a link to the cart page.
Titles
In this tab you can change the titles for various theme pages, like the blog, search and 404.
Social Networks
In this section You can add your Social Network URLs. These icons will be displayed in the Theme-Social Icons Widget automatically.
Weather Defaults
Here you can setup your weather by adding an API key from Open Weather. You can display the current weather conditions with the shortcode [current-weather], and optionally provide a different location ID, e.g. [current-weather id="734880"]
Additional CSS
In this tab we host the custom CSS panel which you can use to insert styles for elements not covered in the rest of the tabs.
Other
Here you can download your sample content files.
Widgets
We have handcrafted some custom widgets to help you better display your content. You will find them under Appearance > Customize > Widgets or Appearance > Widgets
Theme (home) – Category Featured Posts
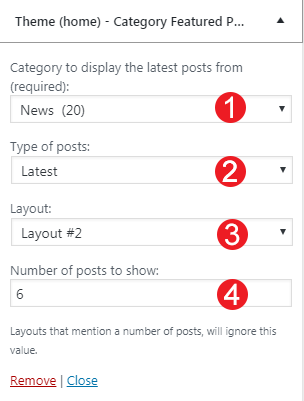
This widget will display in your Homepage latest / featured posts from a certain category in various layouts.
- Select the Category you need to display.
- Select the type of posts.
- Change the layout according to your preference.
- Change the number of posts.
Theme (Home)-Featured Posts
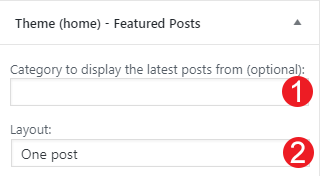
This widget will display latest / featured posts from a certain category in various layouts.
- Change the category of posts.
- Select a Layout.
Theme-Featured Posts
This widget will display latest / featured posts from a certain category in various layouts.
- Add your title.
- Select the type of posts.
- Change the category of posts.
- Number of posts to show.
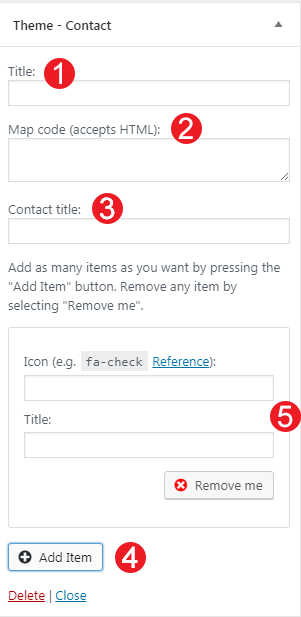
Theme-Contact
Using this widget you can create a contact box including a title a map and various complementary elements with icons that will help you add more information like telephone etc about your business.
- Add a title for your Contact widget.
- Add a map code (iframe).
- Add a contact title
- Create new complementary elements.
- Add an icon code (from fontawesome.io) and some text along.
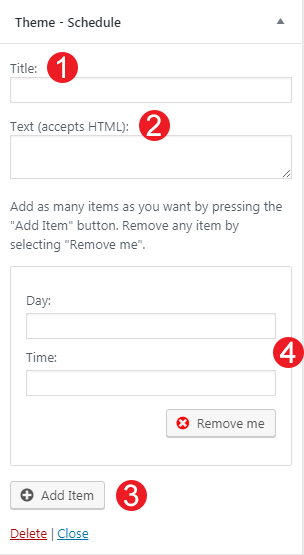
Theme-Schedule
This widget allows you to create a small Schedule table with extra contextual information.
- Add a title for your widget
- Add some complementary text. You can use HTML tags also if you wish.
- Add a new day/time widget.
- Add your day and time information for each item.
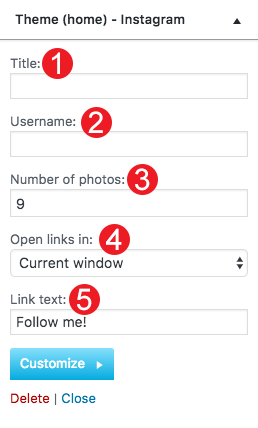
Theme(home)-Instagram
This will allow you to display your Instagram Account in your Front Page or Pre-Footer sidebar. The WP Instagram Widget must be installed and activated in order this Widget to appear
- Add a title for your Instagram Widget.
- Add your Instagram Account.
- Add a number of photos you wish to display.
- Select whether you need your images to open in the current window or open in a new tab.
- Change the link text.
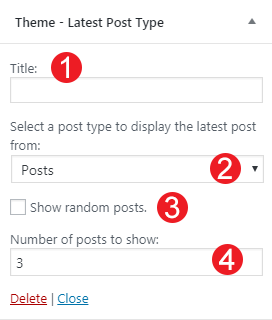
Theme-Latest Post Type
This widget is built to help you display your latest posts in any widget area you wish.
- Add a title.
- Select the post type you want to get the latest items.
- Check if you need random posts instead.
- Add the number of posts.
Infinite Scrolling
Public Opinion offers an Infinite Scrolling functionality using Jetpack’s native method. You will need to activate this feature from your Jetpack settings
Remember if you have widgets in your Footer Sidebars infinite scroll will not work but a load button will appear instead.
Shortcodes
Shortcodes in WordPress are small code like functions that allow you to do various things with little effort.
The main reason to use them is to execute code inside WordPress posts, pages, and widgets without writing any code directly. They can be used in Elementor ‘s (or any other page builder) shortcode module.
Public Opinion theme has many shortcodes you can use with various attributes:
Current Date
[current-date]
[current-date]

[current-date format="l F j, Y"]
Current Weather
[current-weather]
[current-weather]

[current-weather id="734880"]

[current-weather units="imperial" id="734880"]
Featured Posts
[featured-posts]
[featured-posts] (will show one featured post from any category).

[featured-posts cat_id="13"]

[featured-posts cat="news" layout="four-left-one-right"]
Latest Category
[latest-category]
[latest-category] (out of the box will show 10 uncategorized posts using layout #1)

[latest-category cat_id="13"]

[latest-category cat="news" layout="2" count="6"]
How to use the page builder template
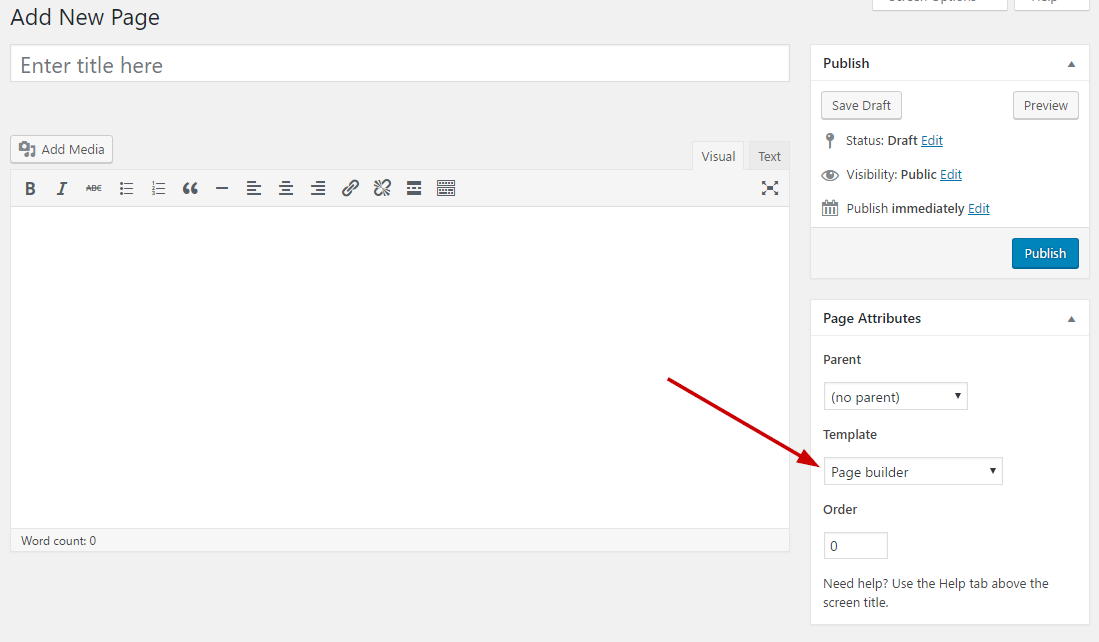
The theme comes bundled with a page builder template which allows you to use your favorite page builder plugin on it and create unique layouts very easily.
To use that template start by going to Pages > Add New. This will create a new page. Add a title to your page and select the Page builder template from the template drop down in the Page Attributes metabox.
That’s it. You can now start building your page using the page builder of your choice, once done publish it and check it out.
Next Steps
Still have questions or problems setting up your CSSIgniter Theme? We will be happy to help you out! Please visit our support Hub


