Documentation for Neuton
Theme installation
The easiest way to install the theme, is by accessing your WordPress admin panel, then go to Appearance → Themes. Select the Install Themes tab and click the Upload link located just below the tab’s name. Click on Browse… and select the WordPress theme zip file you just downloaded. Then click the Install Now button, and after a few seconds, your new theme should be installed. Click activate and the theme is ready to use.
In order to install the theme manually, or in case you have trouble installing it through the admin panel, you have to unzip the WordPress theme’s zip file on your computer, and upload via FTP the resulting theme folder into your WordPress installation themes folder (wp-content/themes). Then, from the WordPress admin go to Appearance → Themes. The theme should be available in your themes list. Click activate.
After activation, you will be redirected to the CSSIgniter Settings panel (accessible from Appearance → CSSIgniter Settings) to start customizing your brand new theme.
Image Sizes
The recommended image sizes for the Neuton theme are:
- Listing widget thumbnails: 700x464px
- Small hero image: 600x277px
- Big hero image: 600x554px
- Fullwidth thumbnail: 1300x600px
- Main thumbnail size: 825x380px
Useful Plugins
These plugins provide functionality and features used directly (or not) by the Theme. So, it is recommended to install and activate them before importing your sample content.
- CSSIgniter Shortcodes you can use our custom made shortcode plugin to help you create a variety of layouts and elements on your site. Instructions can be found here.
- Socials Ignited use this plugin to create a widget that links to all your social profiles. You can also customize it with your icons and add new social networks, a guide can be found here.
- Contact Form 7 use this plugin to create a contact form, then copy the shortcode it gives you and paste it in an empty page.
Importing Sample Content using One Click Import
To automate the process of importing and for a better experience we have natively included support for OneClick Import Plugin. Let install it fist:
From your WordPress dashboard
- Visit ‘Plugins > Add New’,
- Search for ‘One Click Demo Import’ and install the plugin,
- Activate ‘One Click Demo Import’ from your Plugins page.
From WordPress.org
- Download ‘One Click Demo Import’.
- Upload the ‘one-click-demo-import’ directory to your ‘/wp-content/plugins/’ directory, using your favorite method (ftp, sftp, scp, etc…)
- Activate ‘One Click Demo Import’ from your Plugins page.
Once the plugin is activated you will find the actual import page in: Appearance > Import Demo Data.
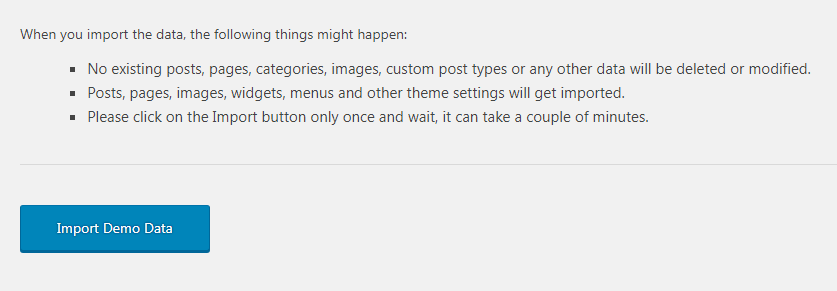
Click on the Import demo data button and you are done!
This plugin requires PHP version of at least 5.3.x, but we recommend version 5.6.x or better yet 7.x. Please contact your hosting company and ask them to update the PHP version for your site.
Creating your homepage
The theme comes with two Homepage Templates, one with the featured Hero section where your featured news show up as a grid and one with a slideshow.
To create a homepage navigate from within the WordPress Dashboard to Pages > Add New, give your page a title (e.g. Home) and from the right assign a homepage Page Template (named either “Front Page w/ Hero” or “Front Page w/ Slider” respectively). Just leave the page content blank and Publish it.
After you’ve published it, navigate to Settings > Reading and set the page you’ve just created as your static page.
Populating your homepage is just a matter of adding the custom widget “-=CI Posts from Category=-” in the homepage widget areas (namely: Homepage Widgets 1, Homepage Widget 2 and the Homepage Sidebar where you can put just about any widget you wish). The -=CI Posts from Category=- widget is basically a 7 in 1 widget where you can select how you wish to display your post listings from the selected category.
Marking a post as featured by clicking on the “Mark this post as featured.” checkbox will send the post to the hero (or slider) section of your homepage.
Widgets
This theme supports widgets. There are multiple widget areas defined. The theme also comes bundled with a few widgets developed by CSSIgniter. For information on using widgets, please see http://codex.wordpress.org/Widgets_SubPanel
Make sure you have populated your sidebars with widgets (especially the Footer Columns) so that your website does not appear empty.
Custom Menus
This theme supports custom menus. There are three menu locations defined, Main Menu, that appears under the header, Header menu which appears in the ribbon across the top of your website and Footer Menu which appears under your Footer Widgets. For information on using custom menus, please see read http://codex.wordpress.org/Appearance_Menus_Screen.
Reviews
To create a new Review, go to Reviews → New Review. A review is no different than a post, only it does not support post formats and has a rating custom field where you can place your rating for the review. The Category taxonomy is identical for Reviews and Posts for your convenience. You can create a “Reviews” category if you wish to group your reviews and show them in the homepage via the Posts from Category widget.
Full Width Page template
You may have any page displaying full-width, without a sidebar. All you need is to assign the Full Width, No Sidebar template from the Page Attributes box.
Archive page template
You can have an archive page displaying your posts based on the date. All you need is to create an empty page and assign the Archive template from the Page Attributes box.
Contact page template
You can have an contact page displaying a contact form using the Contact Form 7 or Gravity Forms plugin. All you need is to create a page and paste your contact form shortcode in it.
Trending Topics
Trending Topics are automatically generated by the theme’s algorithm which analyzes your most recent comments for the last 7 days, gets the most popular posts from those comment numbers and extract their Tags in order to generate the Trending Topics.
What this basically means is that in order for the Trending Topics feature to work you need to have tagged your posts (normal WordPress tags) and have comments in the last 7 days. The rest is automatic.
Theme Settings
Our custom options panel can be found under Appearance → CSSIgniter Settings.
How to use the page builder template
The theme comes bundled with a page builder template which allows you to use your favorite page builder plugin on it and create unique layouts very easily.
To use that template start by going to Pages > Add New. This will create a new page. Add a title to your page and select the Page builder template from the template drop down in the Page Attributes metabox.
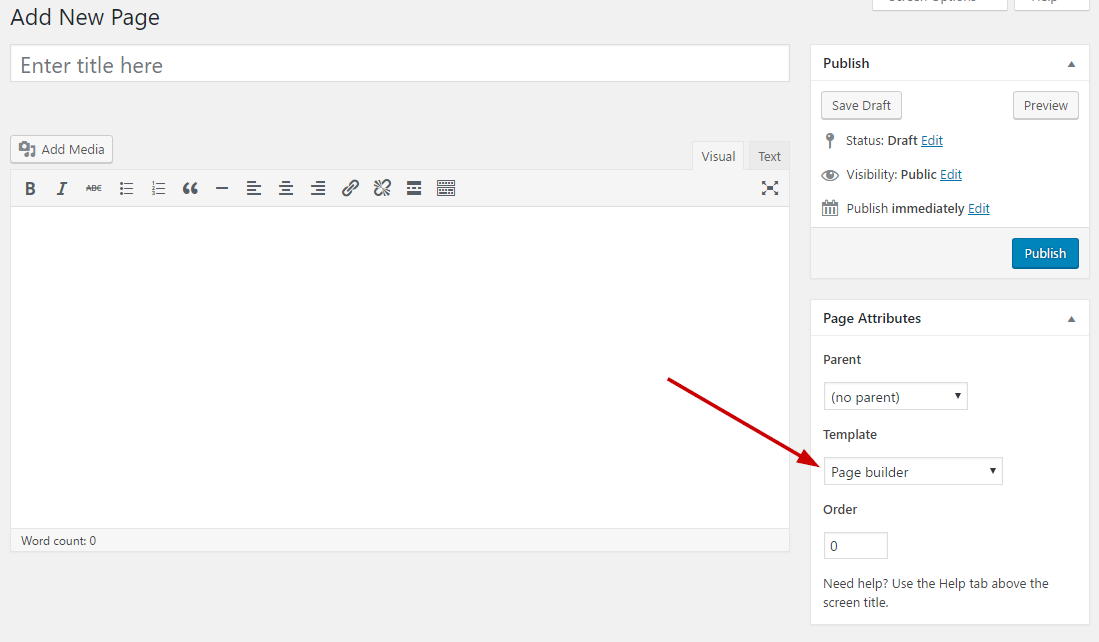
That’s it. You can now start building your page using the page builder of your choice, once done publish it and check it out.
Next Steps
Still have questions or problems setting up your CSSIgniter Theme? We will be happy to help you out in our support forums