Documentation for Mozzy – Legacy
Theme Installation
The easiest way to install the theme, is by accessing your WordPress admin panel, then go to Appearance → Themes. Select the Install Themes tab and click the Upload link located just below the tab’s name. Click on Browse… and select the WordPress theme zip file you just downloaded. Then click the Install Now button, and after a few seconds, your new theme should be installed. Click activate and the theme is ready to use.
In order to install the theme manually, or in case you have trouble installing it through the admin panel, you have to unzip the WordPress theme’s zip file on your computer, and upload via FTP the resulting theme folder into your WordPress installation themes folder (wp-content/themes). Then, from the WordPress admin go to Appearance → Themes. The theme should be available in your themes list. Click activate.
After activation, you will be redirected to the CSSIgniter Settings panel (accessible from Appearance → CSSIgniter Settings) to start customizing your brand new theme.
Image Sizes
The recommended image sizes for the Mozzy theme are:
- Listing page thumbnail: 560x330px
- Slider fullwidth: 1920x600px
- Slider fixed: 940x400px
- Portfolio images: 940x450px
Useful Plugins
These plugins provide functionality and features used directly (or not) by the Theme. So, it is recommended to install and activate them before importing your sample content.
- CSSIgniter Shortcodes you can use our custom made shortcode plugin to help you create a variety of layouts and elements on your site. Instructions can be found here.
- Socials Ignited use this plugin to create a widget that links to all your social profiles. You can also customize it with your icons and add new social networks, a guide can be found here.
- Contact Form 7 use this plugin to create a contact form, then copy the shortcode it gives you and paste it in an empty page.
Importing Sample Content using One Click Import
To automate the process of importing and for a better experience we have natively included support for OneClick Import Plugin. Let install it fist:
From your WordPress dashboard
- Visit ‘Plugins > Add New’,
- Search for ‘One Click Demo Import’ and install the plugin,
- Activate ‘One Click Demo Import’ from your Plugins page.
From WordPress.org
- Download ‘One Click Demo Import’.
- Upload the ‘one-click-demo-import’ directory to your ‘/wp-content/plugins/’ directory, using your favorite method (ftp, sftp, scp, etc…)
- Activate ‘One Click Demo Import’ from your Plugins page.
Once the plugin is activated you will find the actual import page in: Appearance > Import Demo Data.
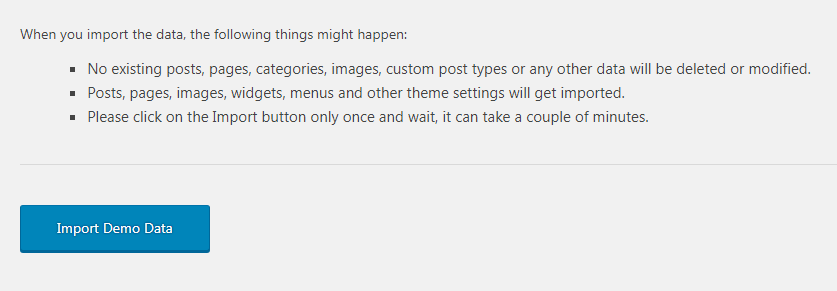
Click on the Import demo data button and you are done!
This plugin requires PHP version of at least 5.3.x, but we recommend version 5.6.x or better yet 7.x. Please contact your hosting company and ask them to update the PHP version for your site.
Theme features
Post formats
Your theme comes with support of post formats. These allow you to change the behavior of each post, depending on the format you choose. Depending on the post format, an icon appears, post format icon on the right of each post, stating the type of the post, and clicking on that, takes you to a listing page of that post type.
To choose a post format, create a new (or edit an existing) post, and from the Format box, select the format you want. The supported formats are:
- Standard: This is the standard format, just a plain post that can have a featured image.
- Image: The image post format, is just like a simple post with a featured image. Of course the post format icon is different. You need to set a featured image for image posts.
- Gallery: The gallery post format, is similar to the Image post format, but instead of a single image, a slider appears. You need to upload multiple images from within the post, in the same way that you would upload featured images. The behavior of the slider can be changed from CSSIgniter Settings – Display Options.
- Video: The video post type allows you to embed videos from a variety of sources. On the Video Details box, enter the URL of a video from a supported website, for example:
https://www.youtube.com/watch?v=4Z9WVZddH9w
- Quote: This post format allows you to post a quote, with proper attribution to the source. You enter the quote on the Quoted text box, the name of the person who said it on the Cite box, and optionally the URL of the webpage that you took the quote from in the Citation URL box.
- Link: This post format is mostly about external sources. You enter any URL you want in the URL: input, and the post’s main header links to this URL instead of the post’s permalink. The permalink can still be accessed via a secondary link that is shown below the post’s header. You can optionally mark the URL with the nofollow attribute. This is useful, for example, when you link to a scammer’s site to warn people, and you don’t want to be penaltized by the search engines.
Widgets
This theme supports widgets. There are five widget areas defined.
- Blog Sidebar, which appears on the left hand side of all posts and blog listings.
- Pages Sidebar, which appears on the left hand side of all pages.
- Footer Row #1, which appears on top row of your Footer on all page.
- Footer Row #2, which appears on bottom row of your Footer on all page.
- Contact Sidebar, which appears on the contact page tepmlate. You should only use the CI Socials Ignited widget/plugin for this widget area.
The theme also comes bundled with a few widgets developed by CSSIgniter. For information on using widgets, please see http://codex.wordpress.org/Widgets_SubPanel
Shortcodes
The theme, like all CSSIgniter themes, is complemented by the CSSIgniter Shortcodes plugin which provides a variety of shortcodes for your use. See the instructions for usage information.
Custom Menus
This theme supports custom menus. There are two menu location defined, Main Menu, and Footer Menu. For information on using custom menus, please see read http://codex.wordpress.org/Appearance_Menus_Screen.
Archive page template
You can have an archive page displaying your posts based on the date. All you need is to create an empty page and assign the Archive template from the Page Attributes box.
Blog
Normal WordPress functionality. Writing normal posts, will be displayed blog style as usual. In case you have created a front page, you will need to create also a blog page where your posts will be displayed (see Front Page template below). There are different blog layouts that you can use. See section Blog templates for more information.
Portfolio
Creating a portfolio collection generally involves three steps:
- First, you need to create some Skills. From your admin panel, go to Portfolios → Skills, and then create some skills such as Programming, PHP, Design, and Photoshop.
- Next, you need to create the portfolio items. Go to Portfolios → New Portfolio and enter the title (e.g. Redesign of Google.com), on the main content box enter the main text of you post (e.g. Larry approached me to redesign his website, …), select the Skills that it belongs into (i.e. Design, Photoshop), add a Featured Image by clicking on Set featured image, and finally, on the Portfolio Details box add more images by clicking the Upload button. You can disable the slider that appears internally on each portfolio page (a nice list will be shown instead), by checking the Disable the internal portfolio slider checkbox. You can optionally add a subtitle for your work.
- If you want to show the portfolio you just created on the homepage and/or the homepage slider, you need to also check the Show this portfolio item on the homepage and Show this portfolio item on the homepage slider checkboxes in the Portfolio Details box.
- You should also create a Project Information table, that appears at the side of the portfolio when viewed. In the Portfolio Details box click the Add field link a few times, and start writing. The first input box is used for the heading, and the second is used for the description. For example, on the left input on the first row, type Client and on the right input type Google. On the next row it could be your time-frame, budget, or anything you like. Note that you can re-arrange the lines by drag and drop. Just click a line between the two fields or next to the “Remove me” link and drag it in the position that you want it to appear.
- Finally, you need to create a page that will display your portfolio. What better place than the homepage? Take a look at the section Front page template later in this document for instructions on how to set up a Front page. You can also create a separate page that shows all you portfolio items. Take a look at the section Portfolio Listing below.
Front Page template
To set-up a front page, you need to create two pages. Name the first one “Blog” or something similar. Name the second one “Front Page” or something similar, and from the Page Attributes box assign it the Front Page template. Next, go to Settings → Reading, on the Front page displays select A static page and on the following two drop-downs select first your Front Page and then your Blog page. Save your changes.
Contact Section
First you need to install a contact form plug-in. The theme is designed to behave with both the “Contact 7” and the “Gravity Forms” plug-ins. Navigate to Plugins > Add New, and search for the above plug-ins. Install one and activate it.
As soon as you activate your desired Contact Form plugin you should then create a contact form; place as many input fields as you wish and then create a new page (Pages > Add New) named “Contact” or something similar.
The only thing you need to place there is the shortcode of the Contact Form you created by using one of the aforementioned plugins. Also make sure that you select the Contact Template from the Page Templates on your right hand.
Hit Publish, and then navigate back to the CSSIgniter Settings > Contact Section. There you will find all the options for your Contact Page including the map options.
Theme Settings
Our custom options panel can be found under Appearance → CSSIgniter Settings. Let’s have a look at each tab’s options:
Site Options
From this tab you can set your site’s properties.
- Upload your logo: Allows you to upload a logo image. You need to upload it to the correct size. Logo text is used as alternative logo description. If you haven’t set a logo, the site title and tagline will be used instead.
- Hero Text and Hero Font Size: Allows you to place a Hero Text at the top of your frontpage and Blog pages. You can also select its size.
- Color scheme: Allows you to change the color scheme used. Note that you can select a different color scheme for each page/post if you want, from the edit post/page screen.
- Upload your favicon: Uploads and registers a favicon. It must be already in .ico format. You can also upload icons for tablets and mobile phones from the respective choices below.
- Sample content: Download your sample content.
Display Options
Various options that affect what your website displays.
- Slider: Allows you to change the behavior of the front page and portfolio sliders.
- Read More text: What will be displayed instead of the default Read More…
- Excerpt length (in words): Limits how many words the excerpt will be, and whether it should be linked to the post.
- Excerpt auto cut-off text: When a manual excerpt is not provided, WordPress generates one automatically from your post’s content, limiting the words according to the setting above. Because that may be mid-paragraph, the cut-off text is appended at the end to show that the text continues.
- Title separator: How the various elements of thetag will be separated (dash, pipe, colon, etc)
- Show “Comments are closed” message: Allows you to hide/show the default “Comments are closed” message when comments are disabled.
- Show featured images on posts/pages: Control whether you want the featured image of each post to be displayed when viewing that post’s page. The featured image can be shown/hidden on each individual post type, with common dimensions.
Homepage
These options control the structure of your Homepage. You can hide the Portfolio, Clients and Services sections, and you can also select how many columns you wish each section to be.
Social Options
These options control the behavior of the -=CI Social=- widget. The widget displays Social Media icons, depending on the services you have enabled and provided a link to your profile, in this page.
Archive Options
These options control the behavior of the Archive page (if you created one) with the Archive page template assigned.
Google options
- Google Analytics Code: Just copy paste your Google Analytics code exactly as given by their website, and you are all set for tracking visits.
FeedBurner Options
- FeedBurner Feed URL: Paste the feed that FeedBurner provides you with, and it will be automatically be server to your users.
- FeedBurner Email URL: Paste the URL FeedBurner provides for registering to email updates.
BuySellAds Options
- BuySellAds.com Code: Paste the BSA code as given by their website and it will be automatically included on every page. Use our accompanying widget -=CI BuySellAds.com=- to display the ads.
Custom CSS
Paste your custom css in the box, and it will override the theme’s styles, along with the Background Options.
How to use the page builder template
The theme comes bundled with a page builder template which allows you to use your favorite page builder plugin on it and create unique layouts very easily.
To use that template start by going to Pages > Add New. This will create a new page. Add a title to your page and select the Page builder template from the template drop down in the Page Attributes metabox.
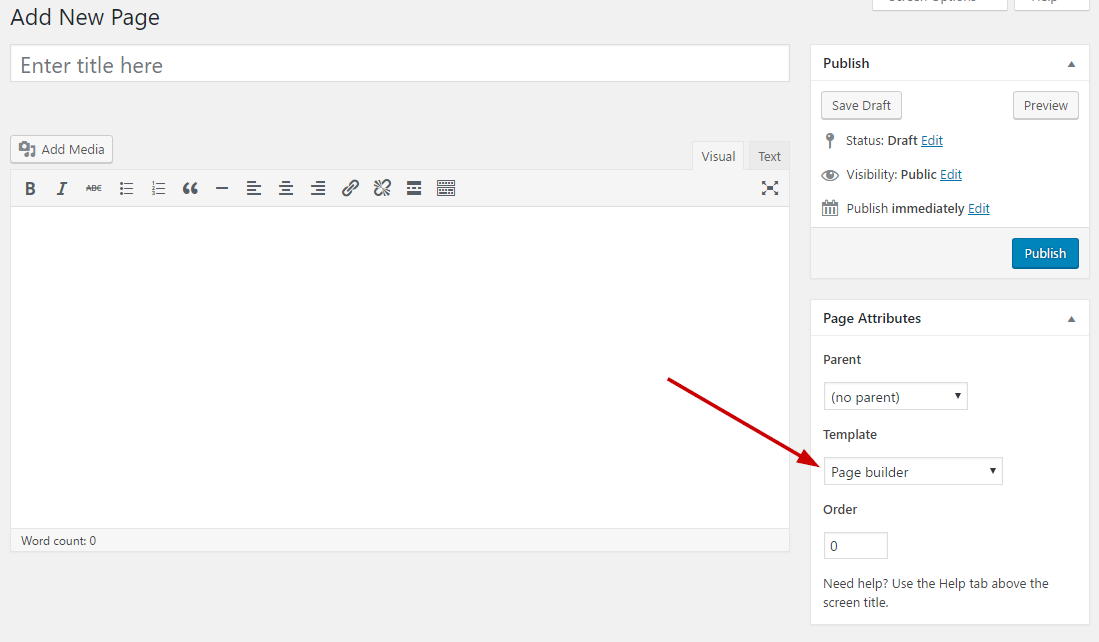
That’s it. You can now start building your page using the page builder of your choice, once done publish it and check it out.
Next Steps
Still have questions or problems setting up your CSSIgniter Theme? We will be happy to help you out in our support forums