Translating content with WPML
Multilingual sites allow you to reach a wider audience, especially for non native English speakers. Translating your site in English will make it accessible to a very large, worldwide audience. The benefits do not apply only to the English language though, you might want to make your site accessible to a market or country that does not have many English speakers, translating it to their language removes that barrier.
WordPress by itself does not offer any tools to help you translate a site to multiple languages, luckily there are plugins that can carry that weight. There are a few translation plugins out there but arguably the most popular among them is WPML. Let’s take a look at how we can translate content using WPML.
Getting started with WPML
WPML is a premium plugin, which means that there is an initial purchase involved. Pricing options are available here, pick the one that’s most suited to your and proceed. After you purchase the plugin you can go to the downloads section of your account and download it.
Installing WPML
To install the plugin navigate to Plugins > Add New > Upload and locate the zip file or files you downloaded, upload and activate them.

Firstly you need to install the file named sitepress-multilingual-xxxx.zip filename changes based on the package you purchased, it might be blog or cms. If you have other zip files of addons that offer extra functionality you can install them along. More info on the available packages here.
Once you activate the plugin you will be prompted to take care of the initial setup.
- The first step is to select the site’s main language, then language that all the current content is written in.
- Next you will select the additional languages, check all the needed boxes and click next.
- The third step takes care of the language switcher. You can choose the order in which the languages will appear on it, add it to a menu, in a widget area and the footer.
- Finally you can, optionally, register your plugin to enable automatic updates.
Translating content
Once you are done with the plugin’s initial setup you can start translating your content. To translate a post you can either go to the Posts page on your dashboard and click the blue “+” symbol below the desired language
![]()
or edit the post you want to translate and again click the blue “+” symbol in the language metabox on the right.
![]()
In both cases you will be presented with a new post creation screen, with which you are already familiar.
![]()
Proceed as usual by filling in the title, content in the chosen language and featured image.
![]()
Once you are finished you can publish it and you are done, you have just translated your first post!
The procedure is identical when translating a page.
Translating Categories & Tags
WordPress allows you to categorize and tag your posts to make both management and discovery easier. It stands to reason that you would like to use this organization system when translating, luckily WPML can handle this as well.
To translate a category go to Posts > Categories locate the category and edit it. Then click the add link next to the desired language
![]()
in the next screen fill in the translated category name, slug and description, just like as you did originally.
![]()
Once finished click the Add New Category button to create the translated category. Now you can start adding posts to it.
Translating tags follows the exact same procedure as categories.
Selecting the language URL format
WPML allows you to select the URL format of each language in order to organize multilingual content more efficiently. There are three available options as seen in the image below.
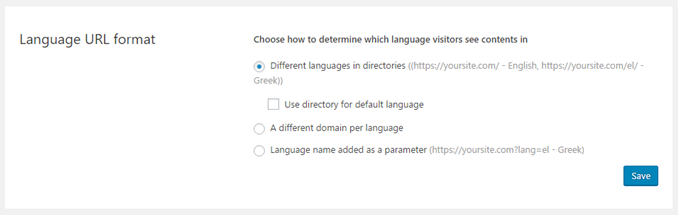
- You can have different directories per language. For example the main URL can be
http://yoursite.comand its French translationhttp://yoursite.com/fr. By default the site’s main language will not have the directory displayed, but if you want to show it there is an option to do so. - The second option is to have a different domain per language. Here the main language will be at
http://yoursite.comand the translation will be athttp://fr.yoursite.com(in this example we have a subdomain, but you can use an entirely different domain if you so desire). - Finally you can have the language name appended as a parameter to the site’s URL, for example
http://yoursite.com?lang=fr
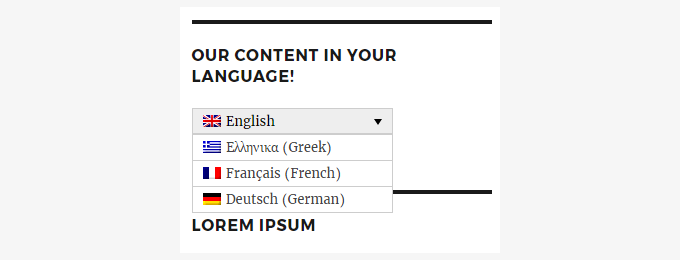
Switching between languages
WPML offers a very easy to configure and use widget to help your visitors quickly switch between the available languages on the site. To add it to a sidebar just navigate to Appearance > Widgets or Customize > Widgets and add the Language Switcher to the sidebar of your choice. The widget’s appearance can be easily customized to match your site’s layout. Once set up the widget will provide an accessible way for your users to select their preferred content language.
While WPML is a pretty complicated plugin which offers an abundance of translation related options, you can see that the basic content translation functionality is pretty straight forward. Hopefully this article has provided you with a basic understanding of this functionality and you are now ready to share your content in multiple languages!
4 responses to “Translating content with WPML”
Thank you Nik. Very helpful article. :)
Thank you very much! Glad you found it useful.
Excellent!
it will be useful if you write a post on how we make a theme compatible with WPML.
Glad to hear you liked the article Ali!
Thank you for the suggestion, it’s a rather interesting topic for a guide, albeit a pretty complex one, we’ll jot it down for a future release!